Welcome & Introduction
We’re excited to welcome you to the Pricing Subscription plugin 🎉
Created with care for entrepreneurs, businesses, and creators, this plugin gives you the tools to build a reliable and scalable subscription system on WordPress. It helps you generate predictable recurring revenue by offering valuable content or services with automated billing. Whether you are starting from scratch or expanding an existing audience, our aim is for Pricing Subscription to become a trusted companion that supports your growth now and in the future. Here’s to your success 🚀
With Pricing Subscription, you can:
- Create flexible subscription plans via Stripe.
- Offer monthly or annual billing options.
- Personalize confirmation emails with templates.
- Protect pages or WooCommerce content with smart access rules.
- Manage everything from your intuitive admin interface.
- Track your performance with clear statistics.
Let's get started 🚀
Getting Started
To begin using Pricing Subscription, you first need to install and activate the plugin inside your WordPress dashboard.
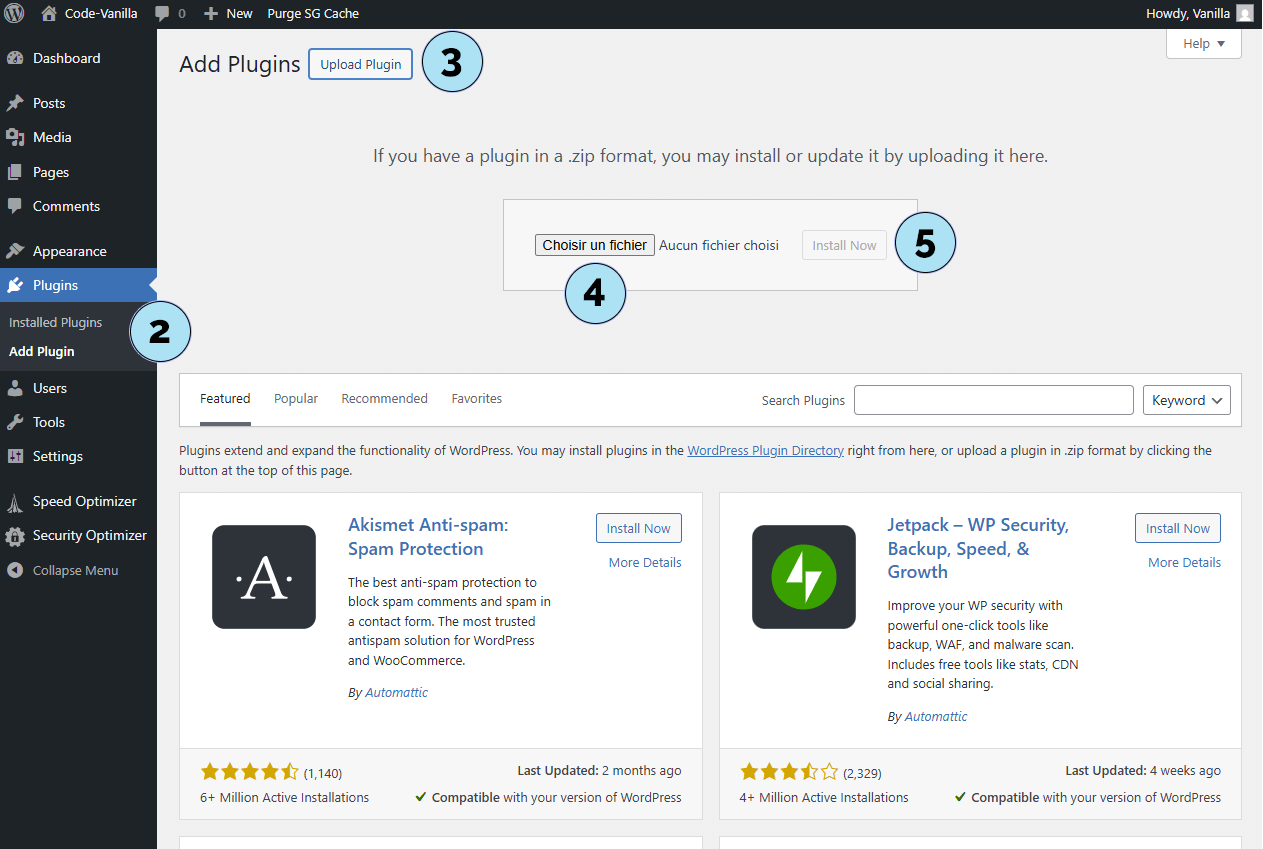
Installation steps:- Log in to your WordPress admin dashboard.
- In the left menu, go to Plugins → Add Plugin.
- Click on the Upload Plugin button at the top of the page.
- Select the
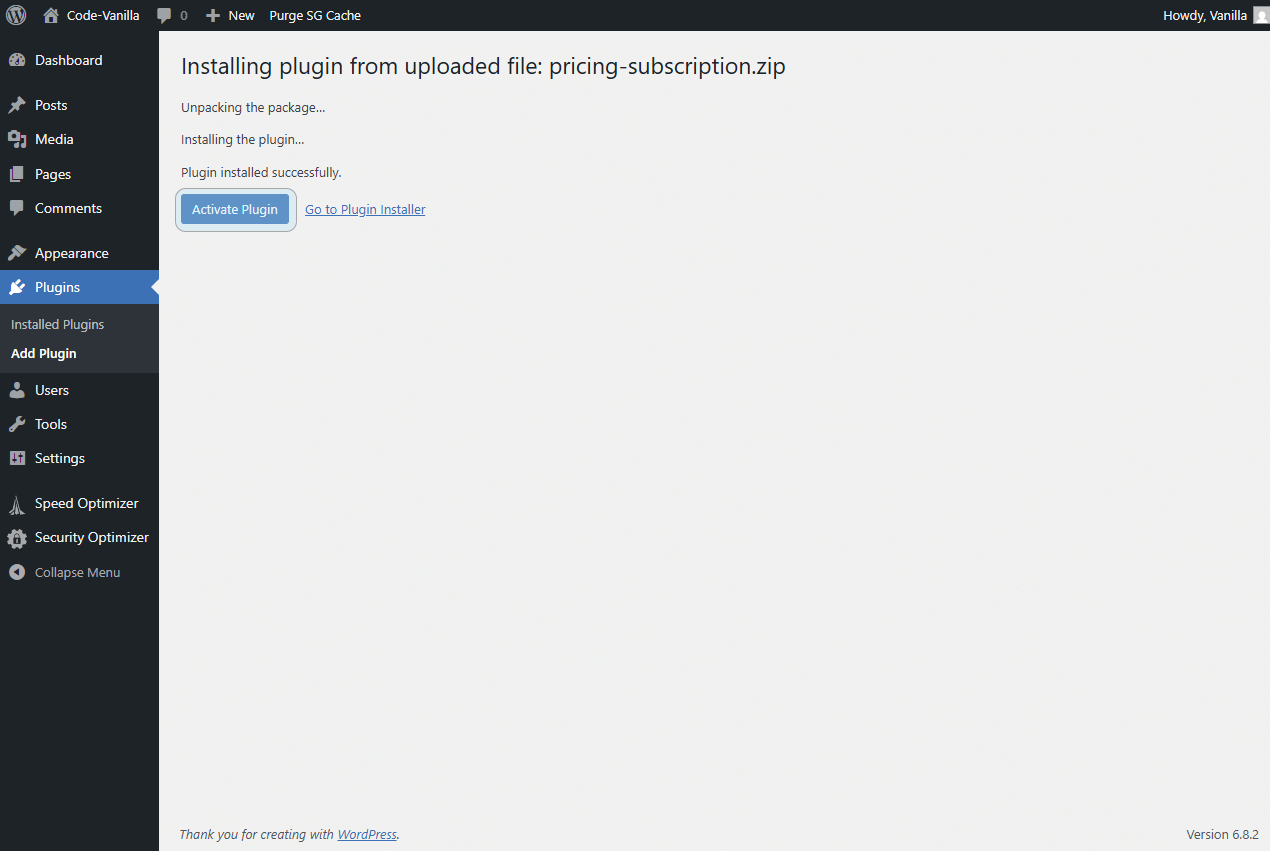
pricing-subscription.zipfile from your computer. - Click Install Now, then activate the plugin once installation is complete.
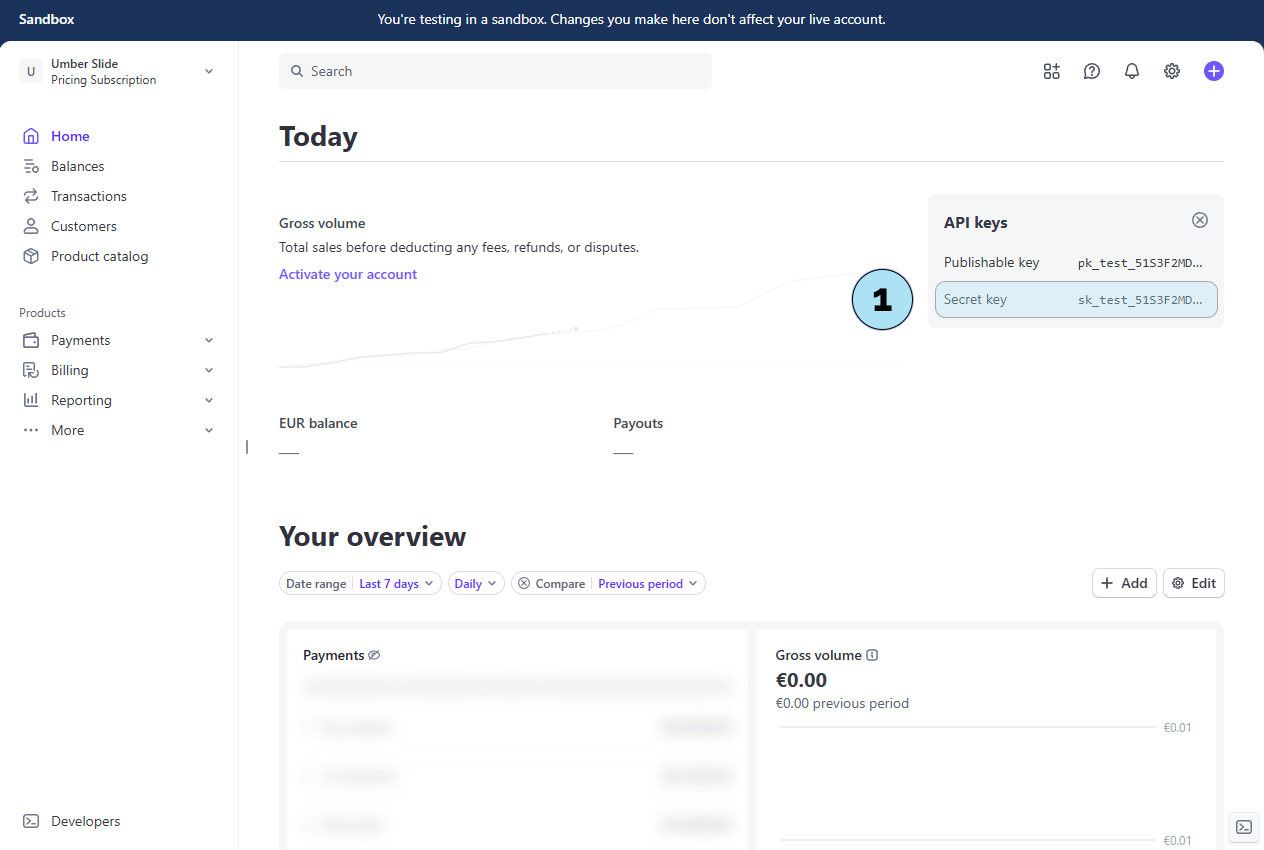
After activation, you will see a new menu called Pricing Subscription in your dashboard. The next step is to enter your Stripe keys and create your first plans.
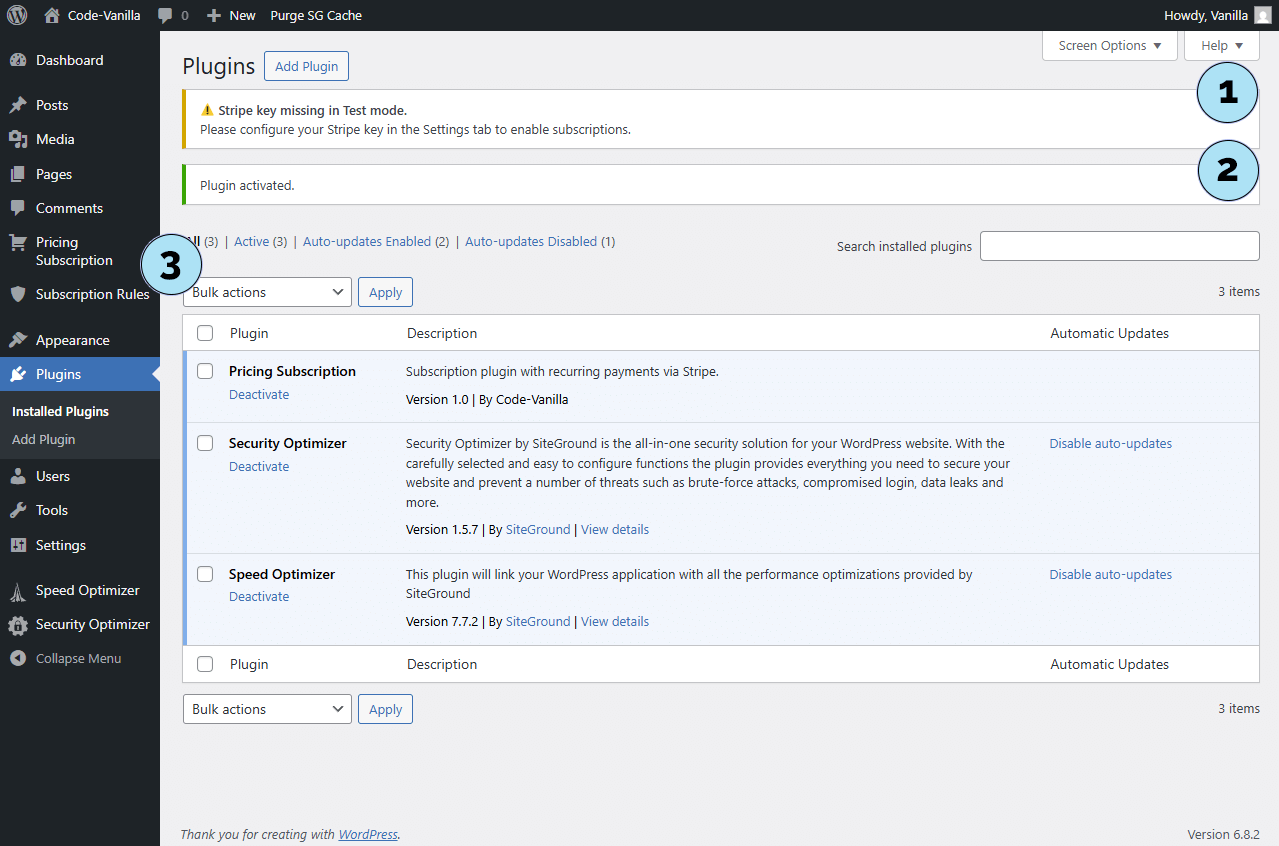
Plugin activated
What does “Stripe key is missing in test mode” mean ?
- This is normal right after activation. You have not entered your Stripe test keys yet, so the plugin warns you that test mode cannot run without them. Once you add your keys, the message will disappear.
- It confirms the plugin is active. Seeing this notice means the plugin is installed and running correctly.
- After activation, you will see a new menu called Pricing Subscription and Subscription Rules in your dashboard. The next step is to enter your Stripe keys and create your first plans.
Next step: click on the new Pricing Subscription menu in your WordPress dashboard, then select Connect Stripe to either create a new Stripe account or connect an existing one.
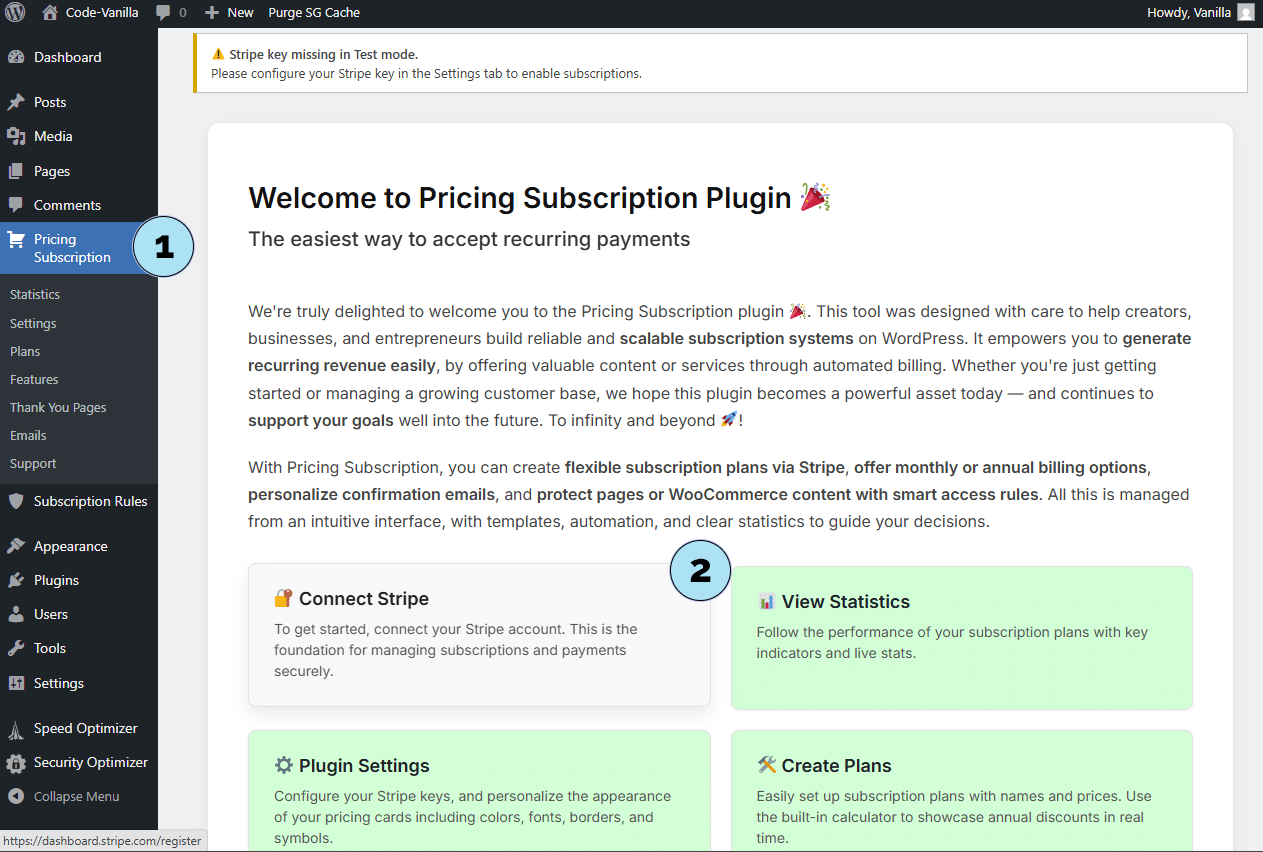
Welcome to Pricing Subscription Plugin
- The Pricing Subscription menu: This new menu in your WordPress dashboard gathers everything you need to configure and manage your subscriptions — from settings and plans to email templates and access rules.
- The Connect Stripe button: By clicking this button you will be securely redirected to the official Stripe platform, where you can either log in to your existing account or create a new one.
Next step: Create a Stripe account if you don’t have one yet. If you already have a Stripe account, you can skip this step and proceed directly to the connection process.
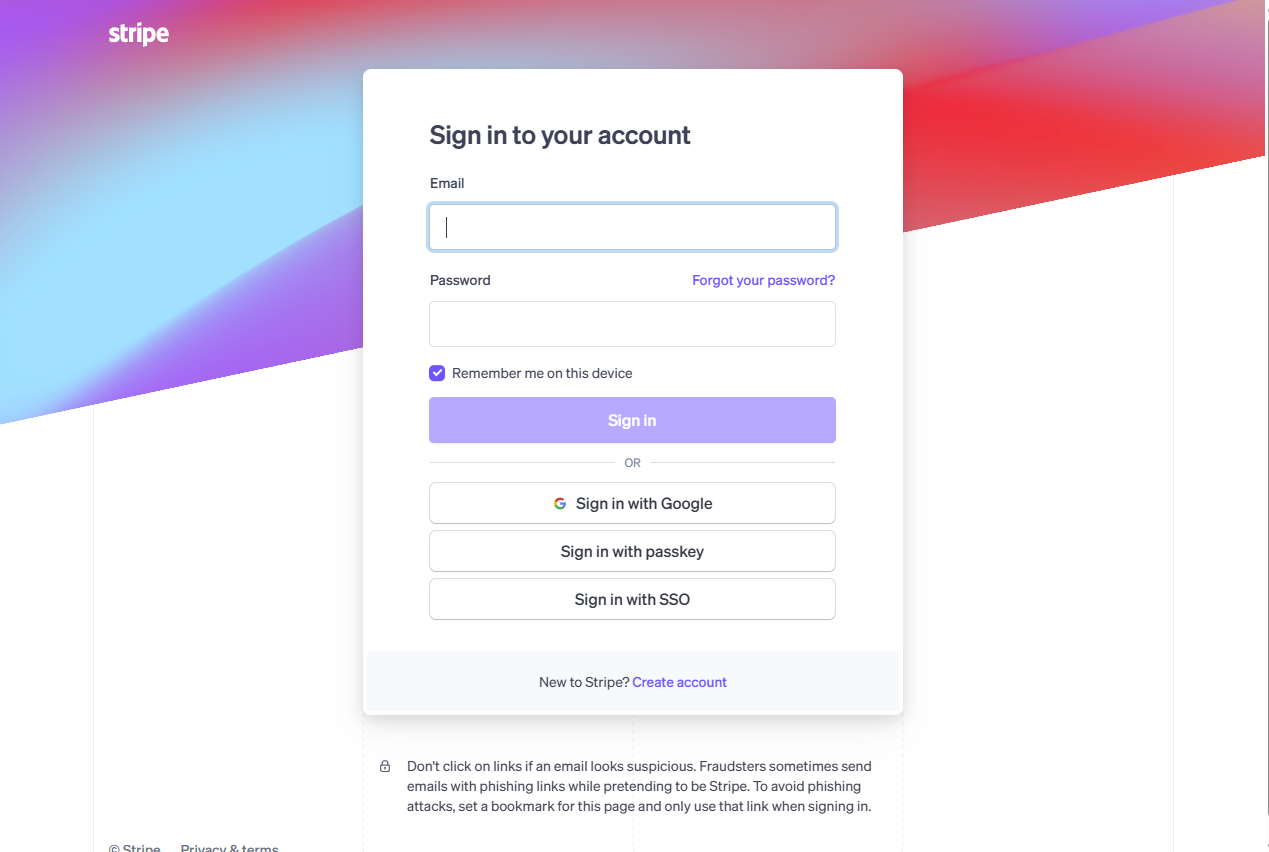
Create Your Stripe Account
When redirected to the official Stripe platform, you will see the account creation form. Here are the main fields you need to fill in:
- Email address: Enter the email you want to use for your Stripe account.
- Full name: Provide your first and last name.
- Password: Choose a secure password to protect your account.
- Country: Select the country where your business or activity is registered.
- Get started: Click this button to create your new Stripe account.
Next step: Explore your new Stripe dashboard to become familiar with the platform and its features.

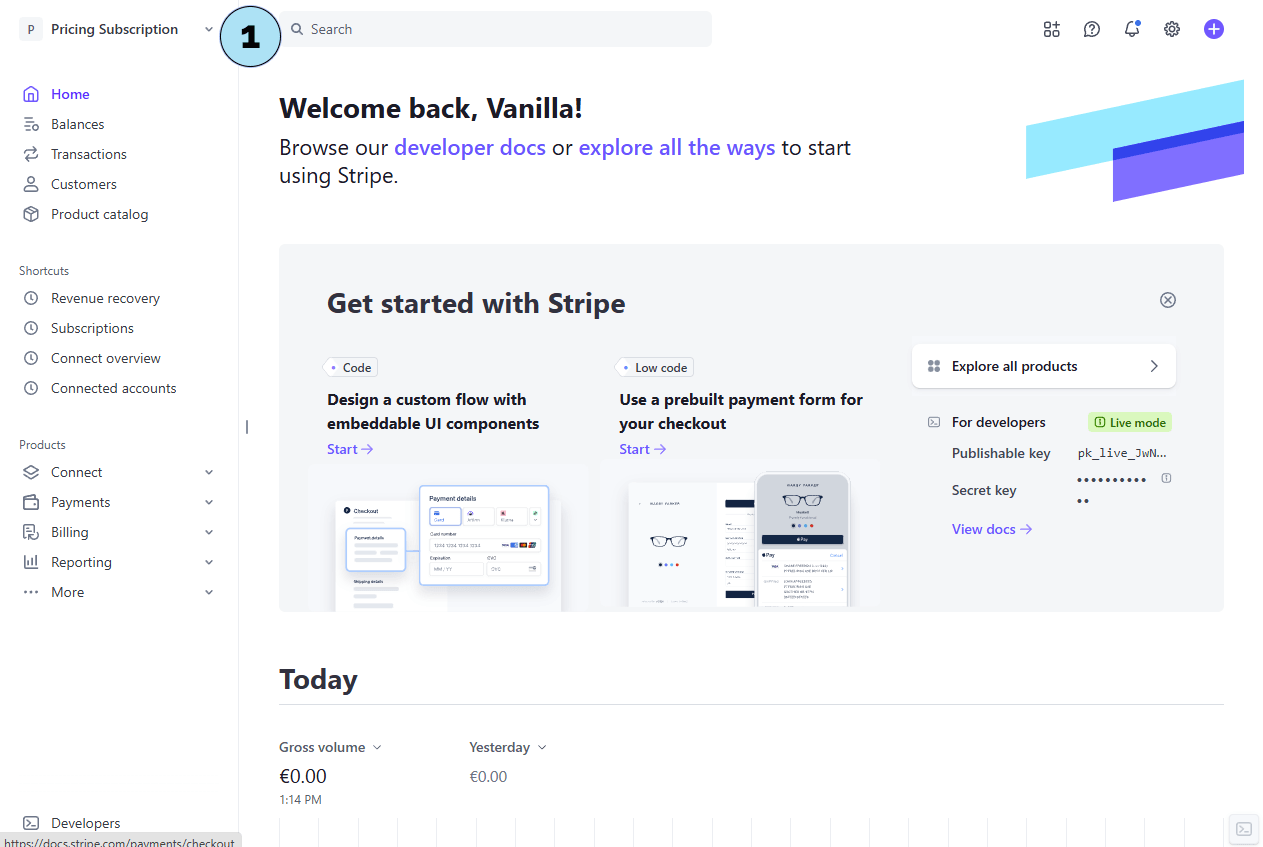
Explore the Stripe Dashboard
Once your Stripe account is created, you will arrive on the Stripe dashboard. This interface gives you access to all the main features of Stripe. Let’s start by exploring the sandbox mode, which is perfect for testing the Pricing Subscription plugin safely.
Step 1 – Open the menuOn the top left corner of the Stripe dashboard, click the small arrow to open the menu. From there, you can access the option to create a sandbox account for testing.
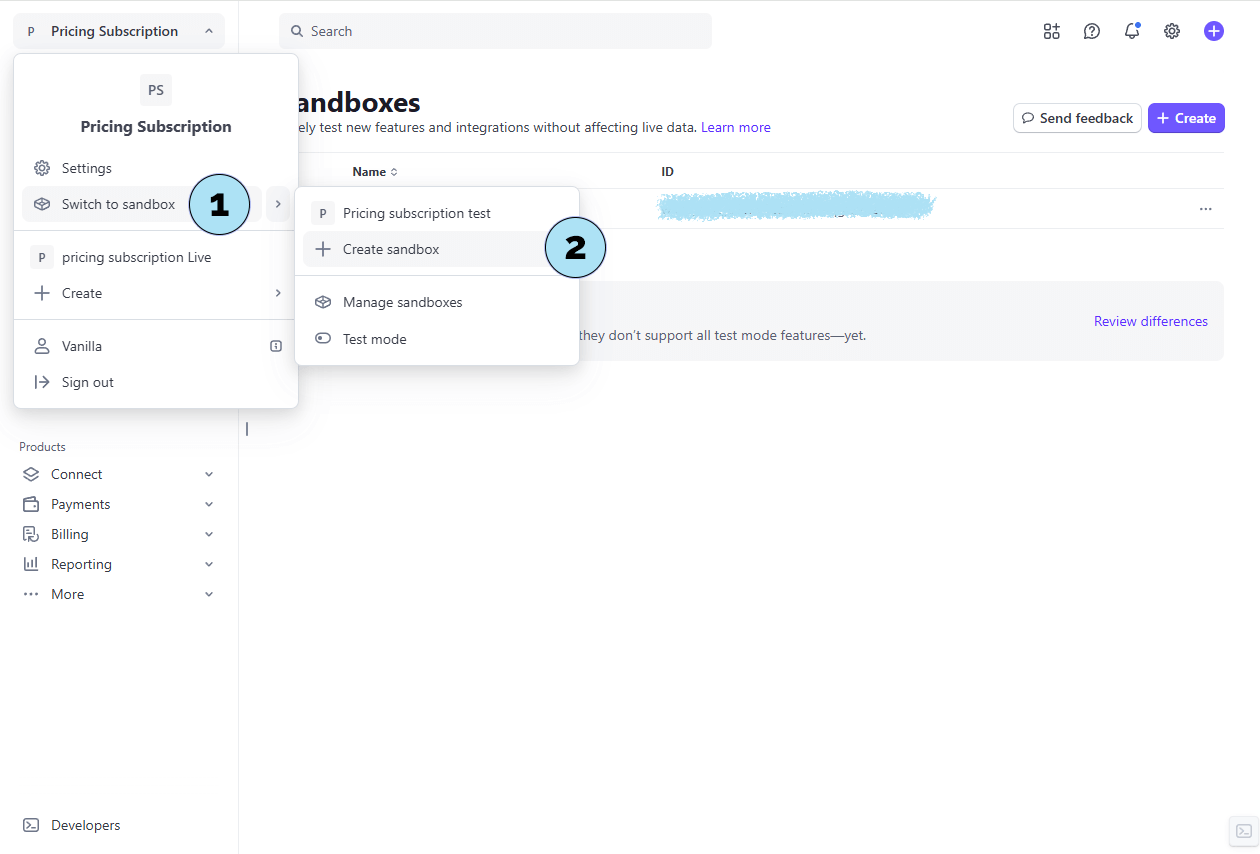
Step 2 – Switch to SandboxIn the menu :
- Click on Switch to sandbox.
- Then click on Create sandbox to generate a dedicated test account.
Next step: Finalize the sandbox account creation and retrieve your Stripe test key, which will be used to configure the plugin.
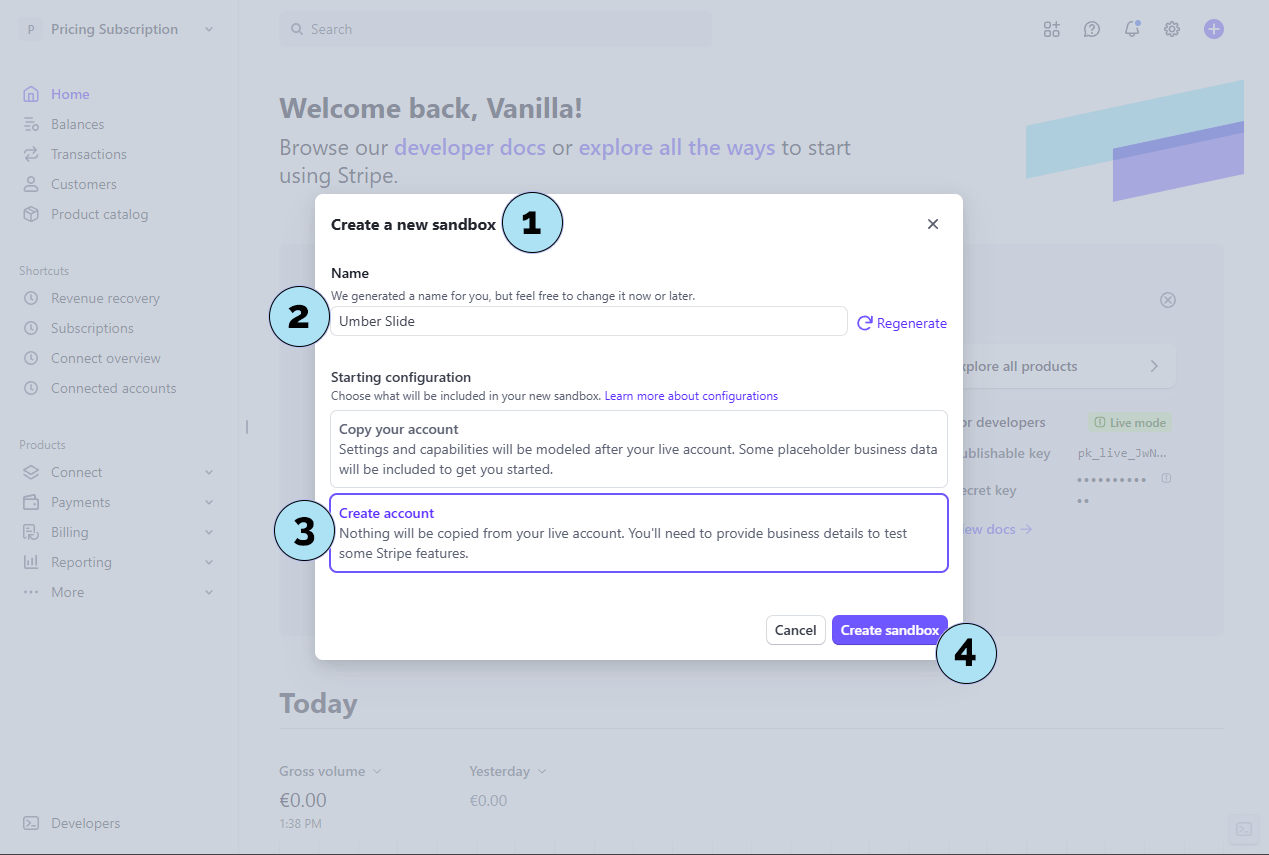
Finalize the Creation of Your Sandbox
You are now on the window for creating a new Stripe sandbox. Follow these simple steps to finalize it:
- Confirmation: Make sure you are on the correct screen for sandbox creation.
- Sandbox name: You can choose any name for your sandbox, or click Regenerate to generate a different name. This choice is not critical.
- Create account: Select the option Create account to proceed.
- Finalize: Click the Create sandbox button to complete the process.
Once your sandbox is created, you will be able to retrieve your secret test key. Copy this key and paste it in the Pricing Subscription → Settings menu under the Test environment section of the plugin.
Next step: Create a product catalog in Stripe to prepare your subscription plans.
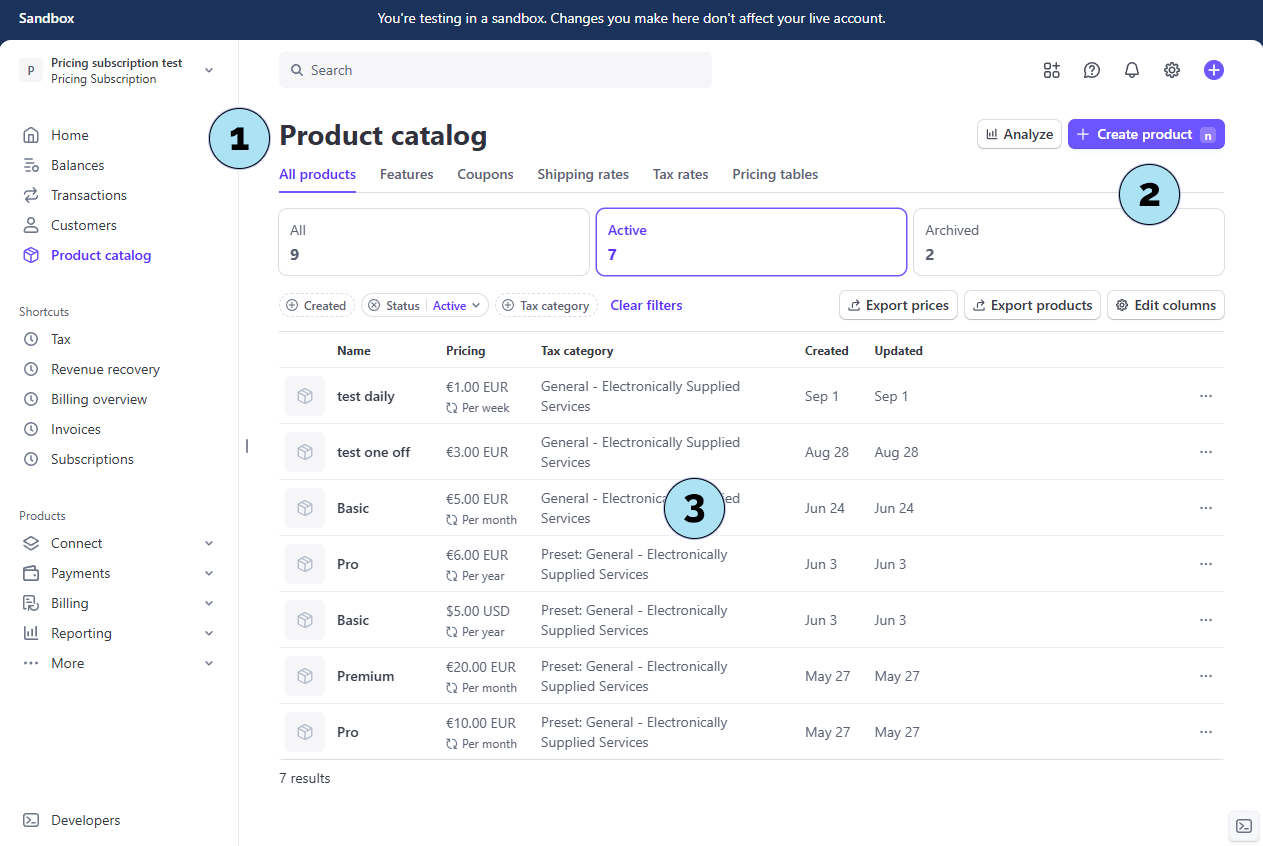
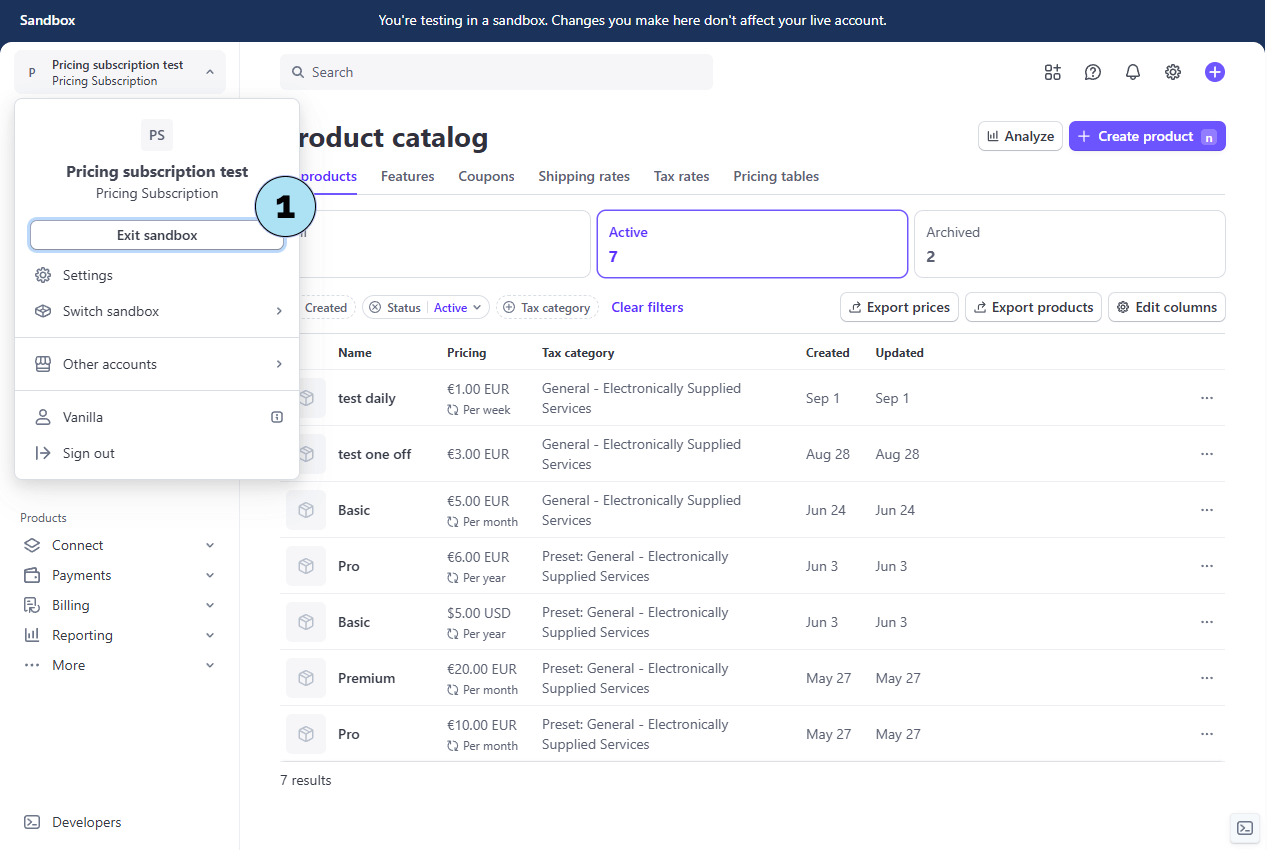
Create a Product Catalog
Now that your sandbox is ready, you can start working with your Stripe product catalog. This catalog is where you will define the subscription products and plans that connect directly with the Pricing Subscription plugin.
Note : In this documentation, we have switched to our Pricing Subscription sandbox account that was used during the plugin development phase. That is why you may already see some test products listed in the catalog. For new users, the catalog will be empty until you create your own products.
- Product Catalog title: At the top of the page, you will see the Product Catalog heading, which confirms you are in the correct section.
- Create Product button: Use this button to add a new product. In this case, you will create recurring subscriptions.
- Existing products: This section lists all products already created in your account. For new users, this catalog will be empty until you add your first product.
Next step : Create a new product inside the catalog to start defining your subscription offers.
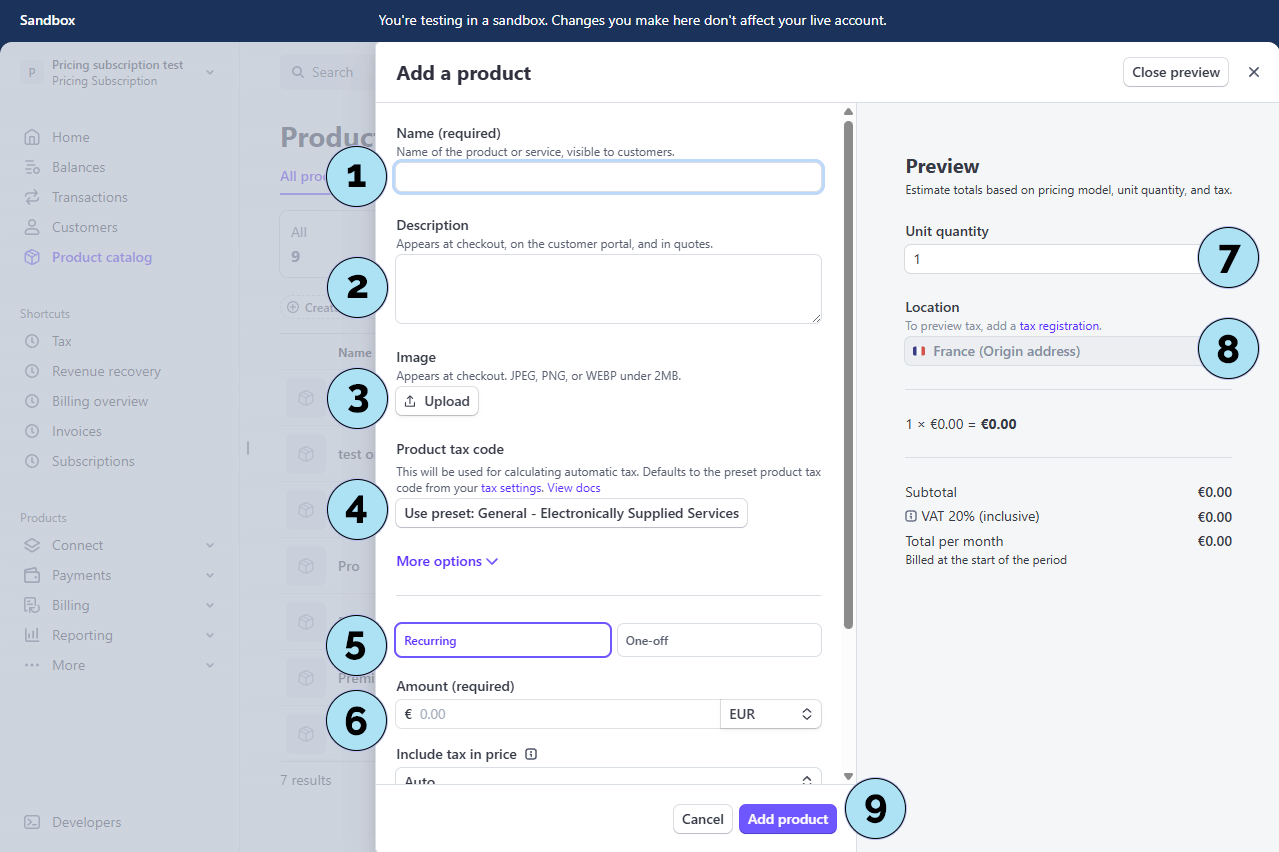
Create Stripe Subscription
Below is how to create a subscription product (plan) in Stripe for use with the Pricing Subscription plugin.
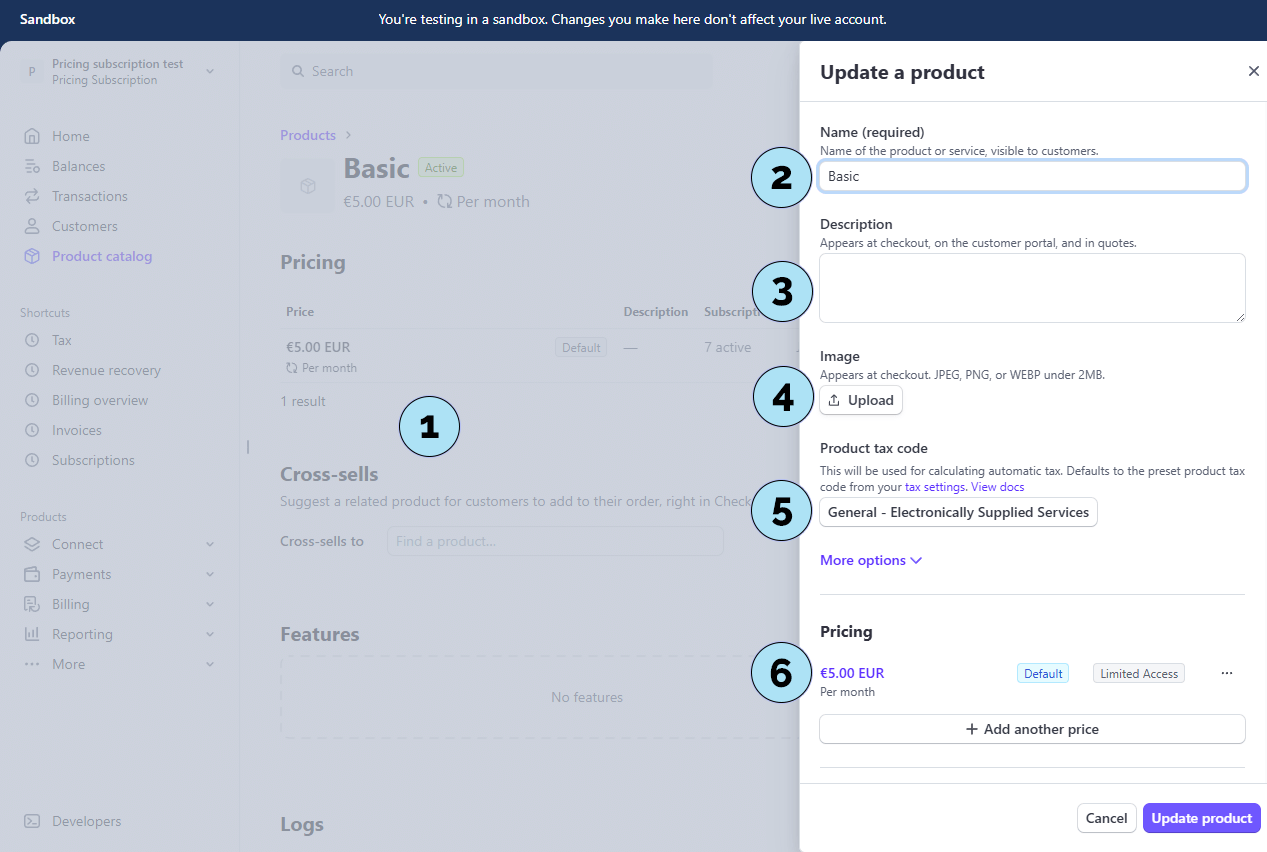
Part 1 — Product basics- Name (required) : Choose any name you like (e.g., Basic, Standard, Pro, Premium, Ultimate).
- Description : This text appears to your customers on Stripe’s checkout/payment page.
- Image : An optional product image that will also appear during checkout.
- Product tax code: Select the appropriate category (e.g., general goods, digital products, physical products, services) to apply correct tax rules.
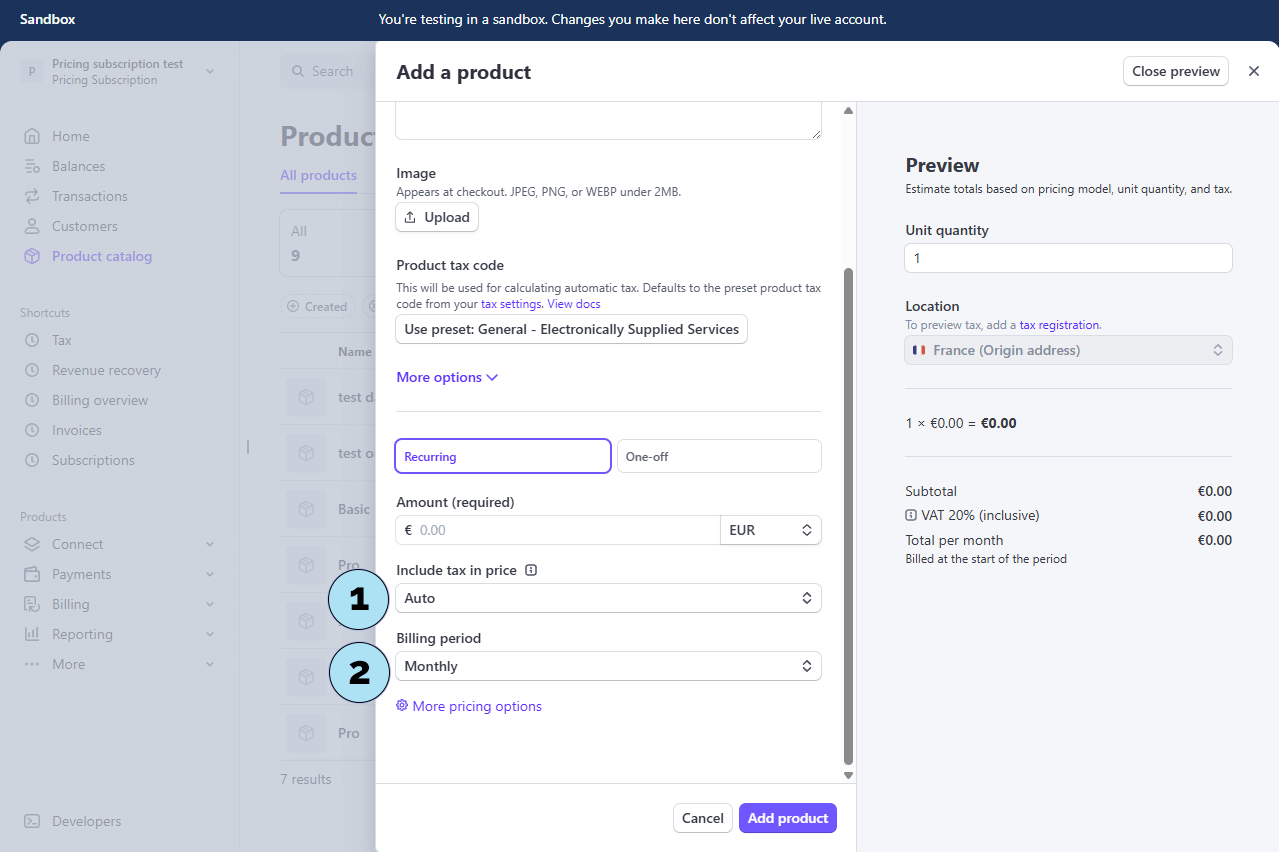
- Billing type : Choose Recurring or One-off.
- Amount & currency : Set the price your subscriber will pay for this plan and pick the currency.
- Unit quantity : Leave at
1(recommended for standard subscriptions). - Business location : Your Stripe account’s country settings; this cannot be changed here due to regional tax and compliance rules.
- Add product : Click to add this product (plan) to your test catalog.
- Tax behavior: Choose whether prices are tax inclusive or exclusive based on how you want amounts to display at checkout.
- Renewal periods: Select the billing interval.
Next step: We will review a product that has already been created in Stripe.
View an Existing Stripe Product (Basic plan)
Each subscription plan in Stripe has a unique Price ID. This identifier is required to link your Stripe plans with the Pricing Subscription plugin.
Part 1 – Copy the Price ID- Select your plan: Open the Basic plan, which is active with a recurring payment of €5/month.
- Opened product view: You are on the product details screen for the Basic plan (visible in the page background/header).
- Product name: The plan is named Basic.
- Description: Optional. If added, it appears during Stripe checkout.
- Image: Optional. If added, it appears during checkout.
- Product tax code: Not modified here (kept default for testing). You can assign a category (e.g., digital goods, services) to apply correct tax rules.
- Recurring price: €5 with a monthly billing interval.
Next step: Retrieve the Price ID from your newly created product.
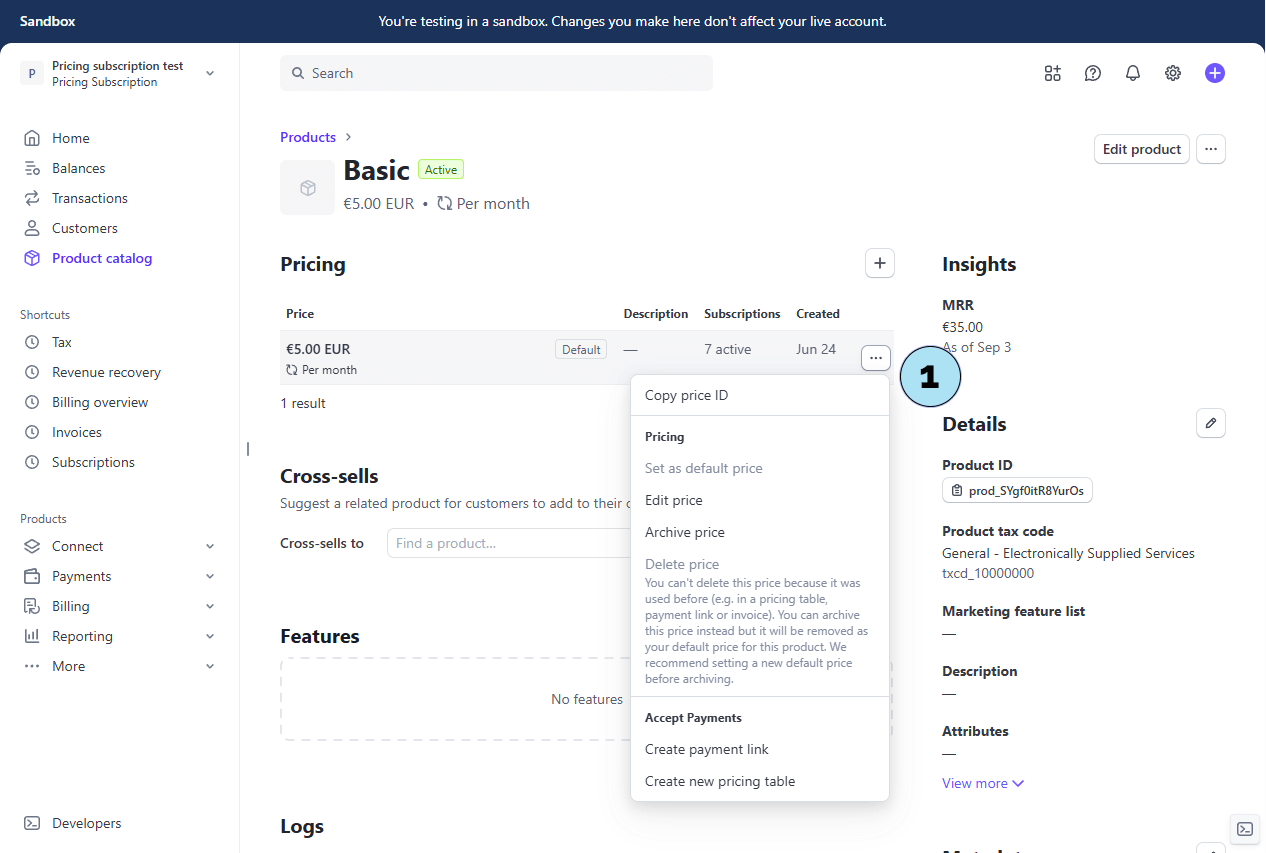
Retrieve the Price ID from Stripe
Each subscription plan in Stripe has a unique Price ID. This identifier is required to link your Stripe plans with the Pricing Subscription plugin.
Part 1 – Copy the Price ID- Select your plan : Here we open the Basic plan, which is active with a recurring payment of €5/month.
- Find the Price ID : On the right-hand side of the Pricing section, click the three dots (options menu).
- Copy the Price ID : Click Copy price ID to copy it to your clipboard.
We recommend saving this ID in a safe place, such as a Notepad file or any secure note-taking tool, so you can easily access it when configuring the plugin.
Next step: Go back to WordPress and open the Pricing Subscription plugin. You will need your Stripe test secret key and the Price ID you just copied.

Configure Stripe Keys in WordPress (Test Mode)
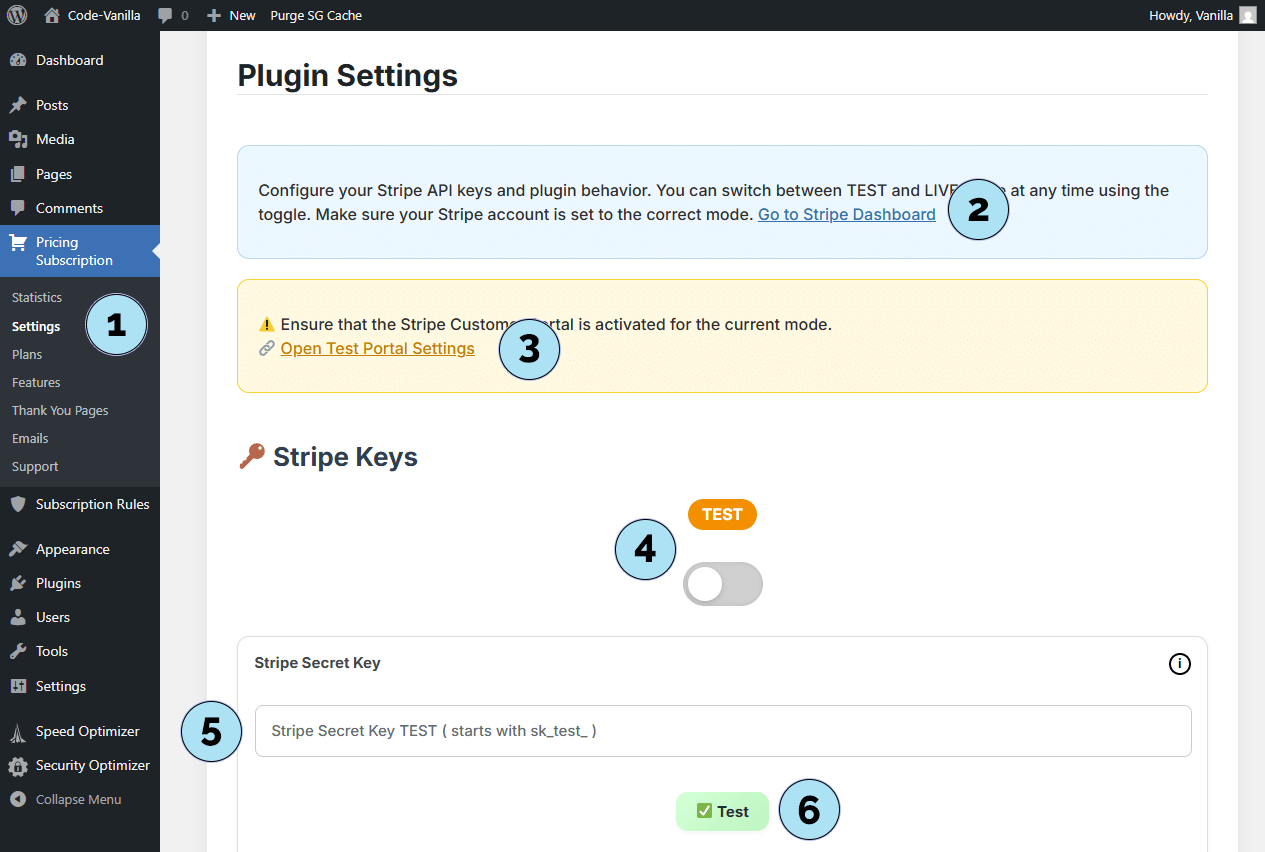
Back in WordPress, open the Pricing Subscription plugin settings to add your Stripe test key.
- Settings submenu: In your WordPress dashboard, click Pricing Subscription → Settings to open this page.
- Help notice: A notice at the top explains where to retrieve your Stripe Secret Key depending on the selected mode.
- Stripe test portal (optional): A link is provided to the Stripe-hosted customer portal (to let end users manage subscriptions, pay/download invoices, update payment details). Note: this is useful but not required for this plugin to work.
- Mode switch: Toggle between Test and Live. Reminder: in Test mode, payments are not real and are only for testing. In Live mode, payments are real.
- API key fields: Paste your Stripe Secret Key and Publishable Key for the selected mode (Test or Live) in the corresponding fields.
- Test connection button: Use the test button to verify your key for the currently selected mode.
Tip: Start in Test mode with your sandbox keys. Once everything works as expected, switch to Live and paste your live keys.
Next step: Add your first plan Price ID to the plugin to connect Stripe pricing with your WordPress site.
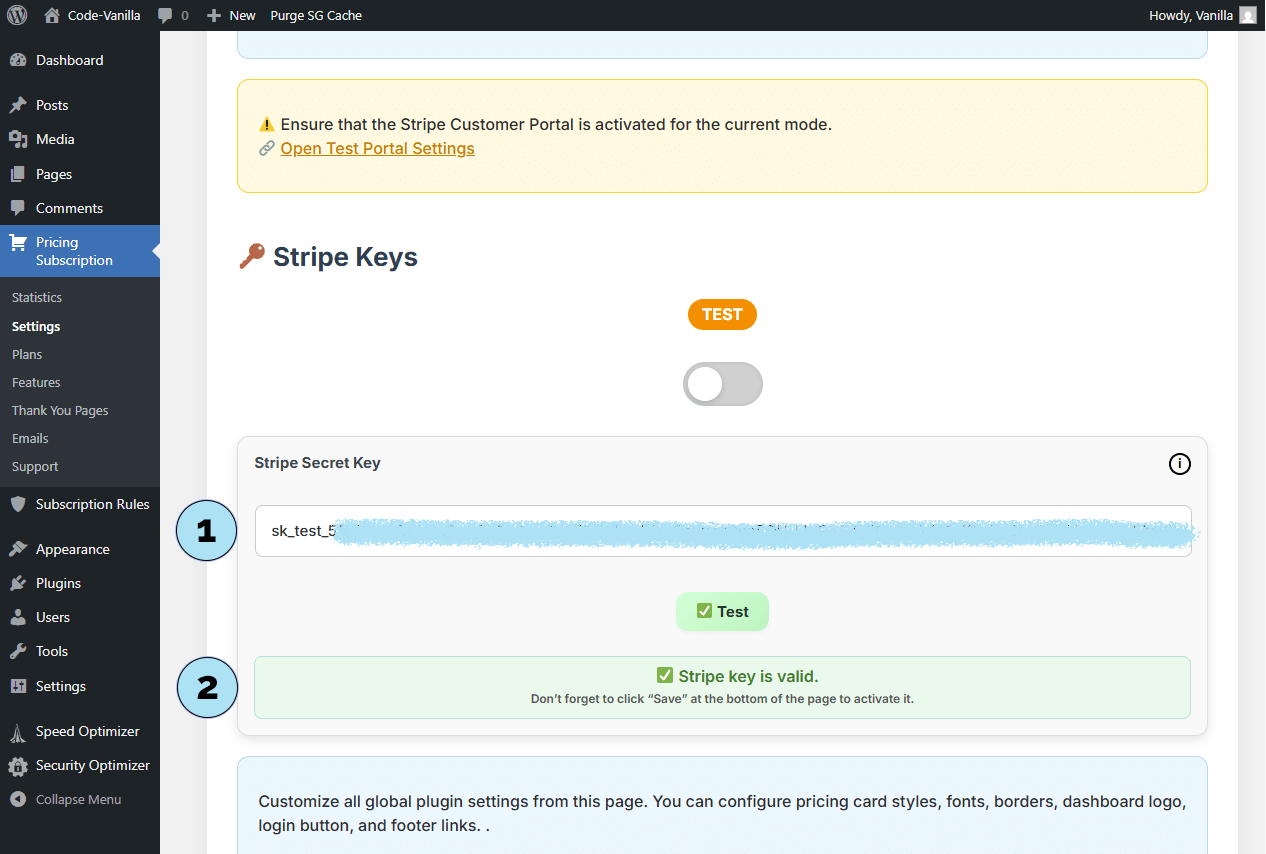
Validate Your Stripe Test Key
This section shows how to validate your Stripe Test key. The process is the same for Live mode.
Part 1 — Enter and test your key- API key field: Paste your Stripe Secret Key in the input field.
- Test button: Click the Test button to verify the key for the currently selected mode (Test or Live). This button does not save your key — it only checks connectivity.
When you enter a Stripe key for the first time, you must save the key in the plugin settings to store it permanently.
- Scroll to the bottom of the Settings page then, click Save Settings to store your key.
Tip: After saving, you can use the Test button again to confirm everything is correctly configured.
Next step: Create a plan in Stripe using the Price ID you saved earlier (Notepad, notes, etc.), and link it inside the plugin.
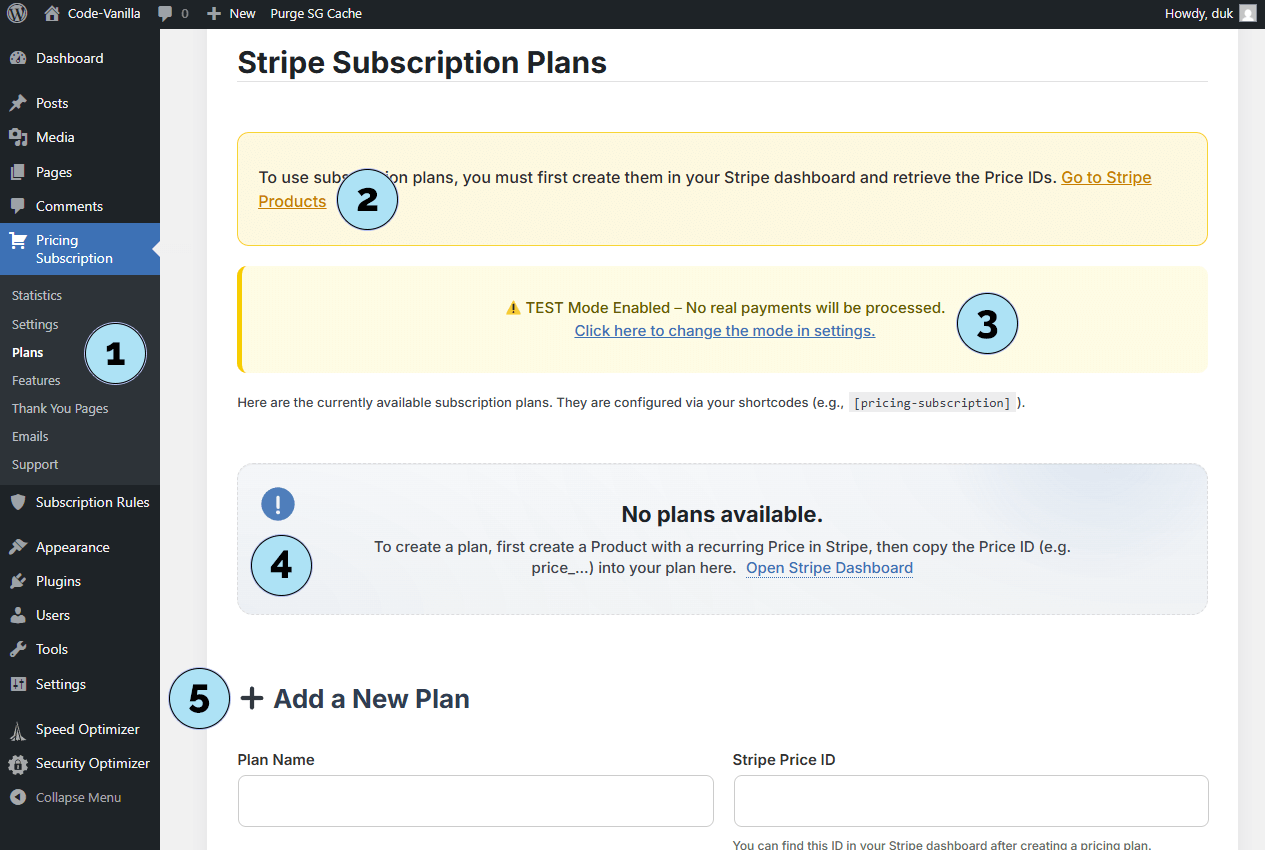
Plans – Overview
The Plans submenu is where you create and manage the subscription plans that will be offered on your site.
- Access the Plans page: Click Pricing Subscription → Plans to open the management screen.
- Stripe helper notice: A helpful notice provides a quick path to retrieve Price IDs from Stripe, making it faster to link your plans.
- Current mode notice: This banner shows whether you are in Test or Live mode. Reminder: Test mode uses virtual payments; Live mode processes real payments.
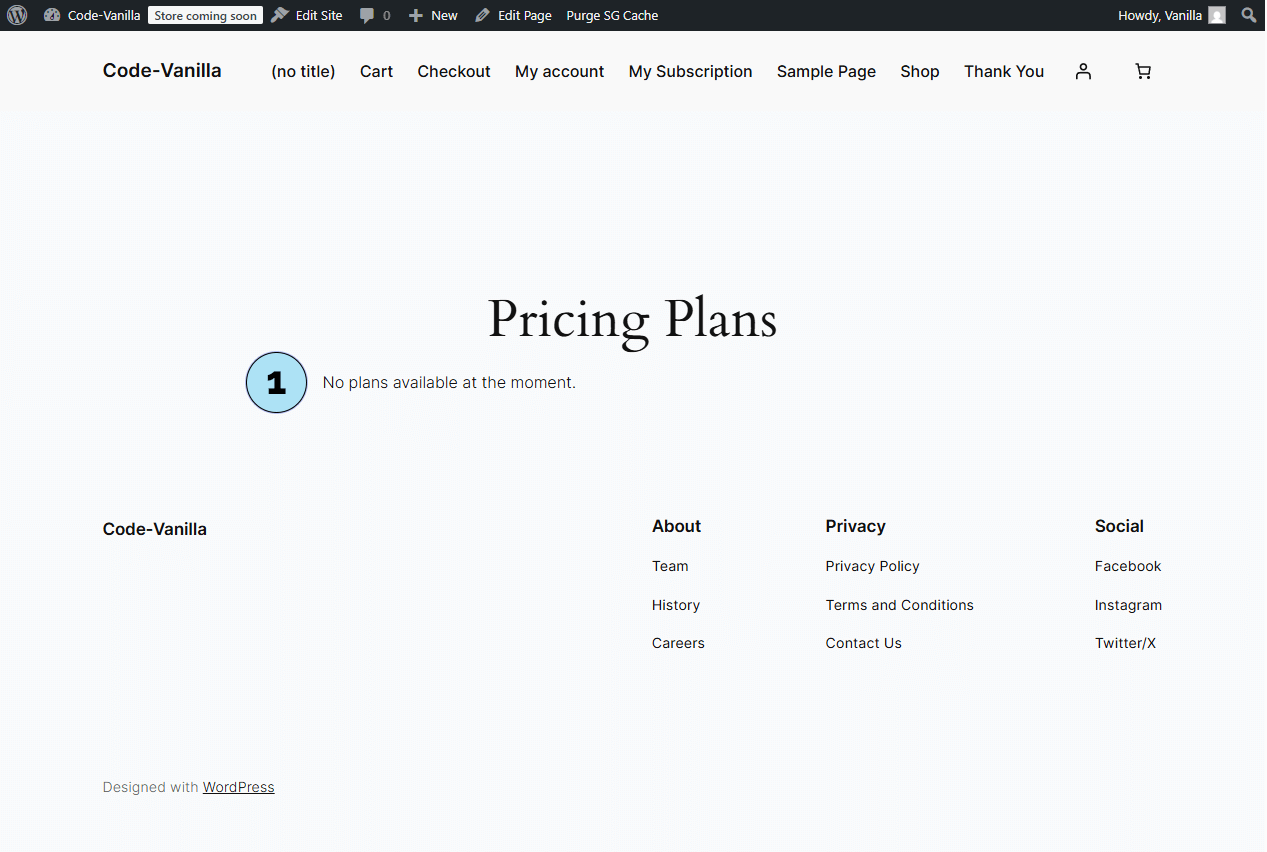
- No plans yet: If you have not created any plan, you will see an empty state indicating that no subscriptions exist yet.
- Create your first plan: Since you already have your Stripe details (Secret Key + Price ID), you can now create a plan directly from this page.
Next step: Create a plan inside the plugin using the Price ID you copied from Stripe.
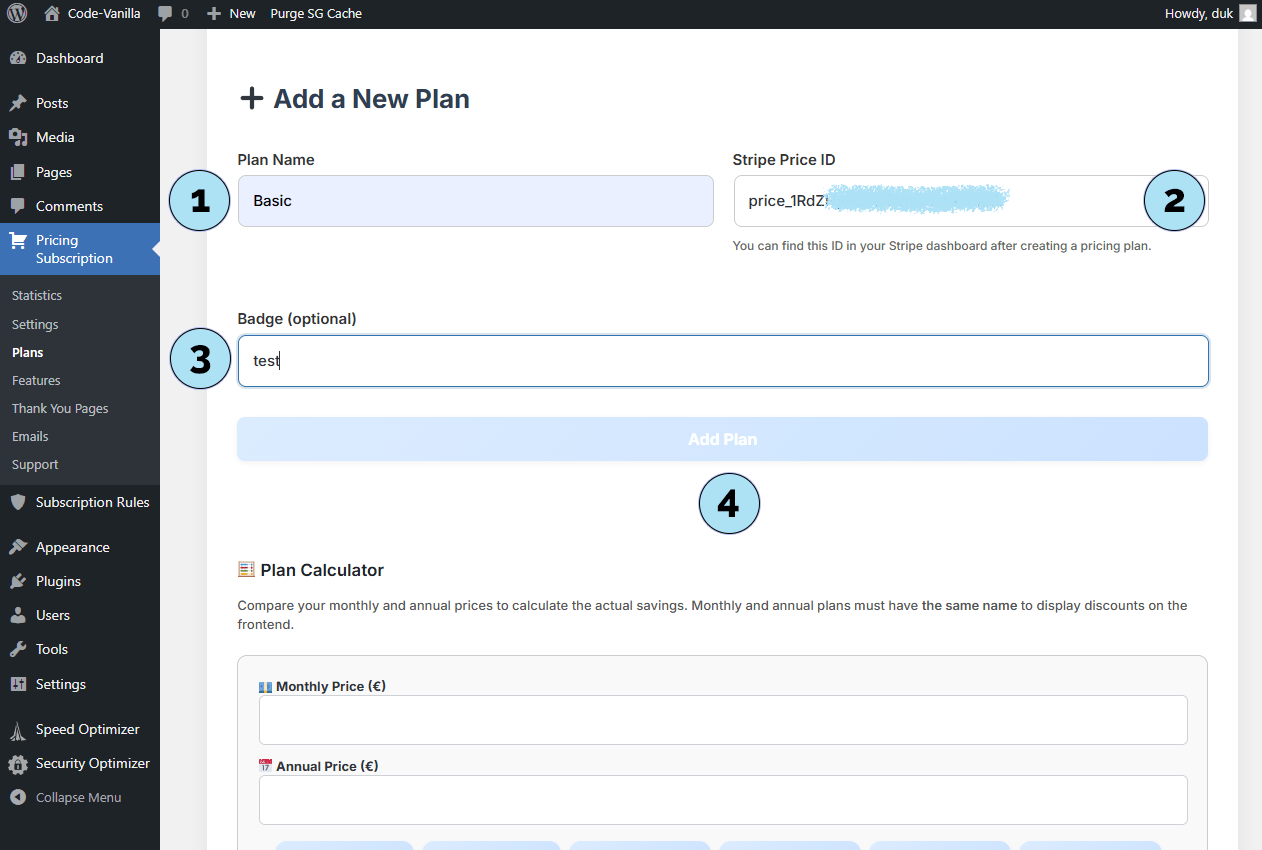
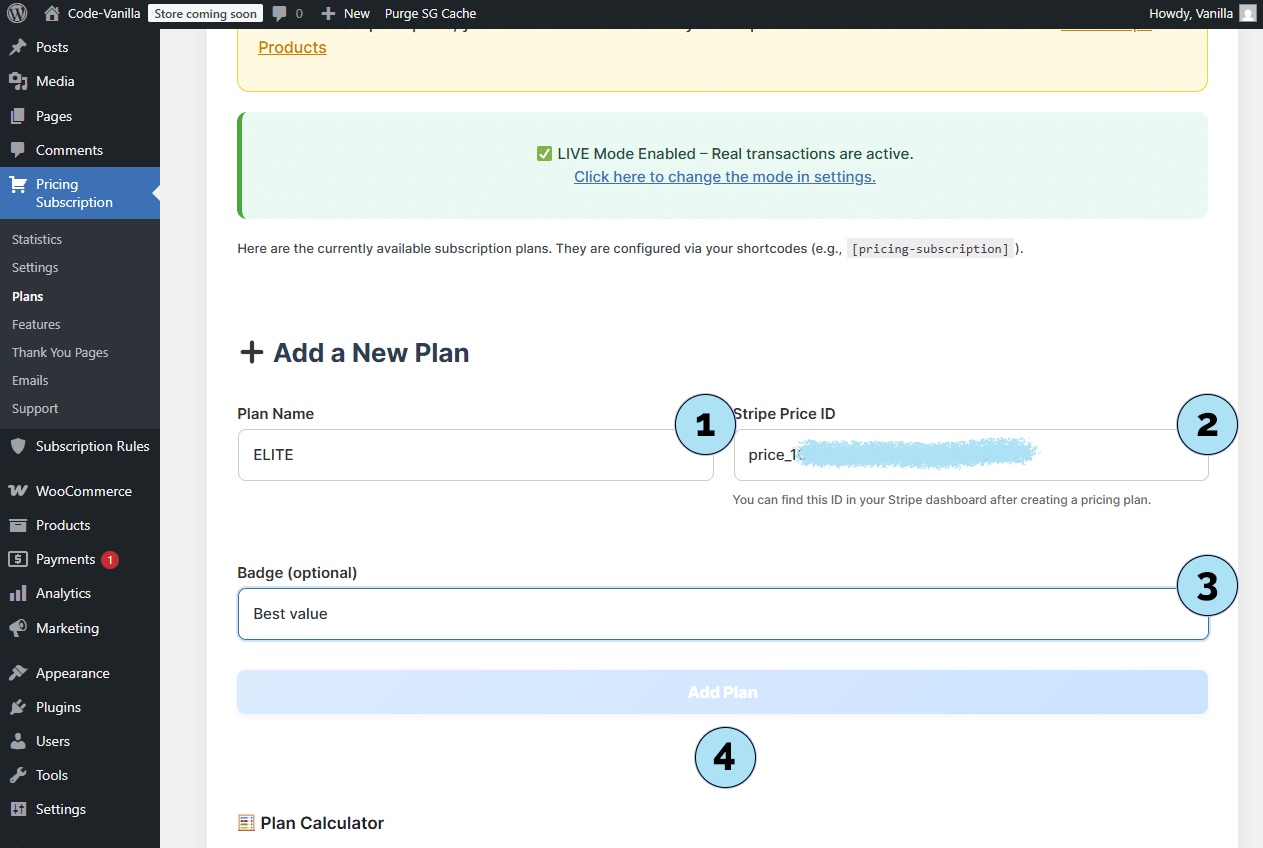
Create a Plan in the Plugin
Use the Plans page to quickly add a subscription plan that links to your Stripe pricing.
- Plan name: Choose any name you like for display on your site. It does not have to match the name you used in Stripe.
- Price ID: Paste the Price ID you copied from Stripe (the recurring price identifier).
- Badge (optional): Add a short label (e.g., Popular, Best value) to highlight this plan on the pricing card.
- Save plan: Click to save and add the plan to your list.
Next step: Once saved, your new plan will appear in the Plans list of the dashboard and can be displayed to users on your site.
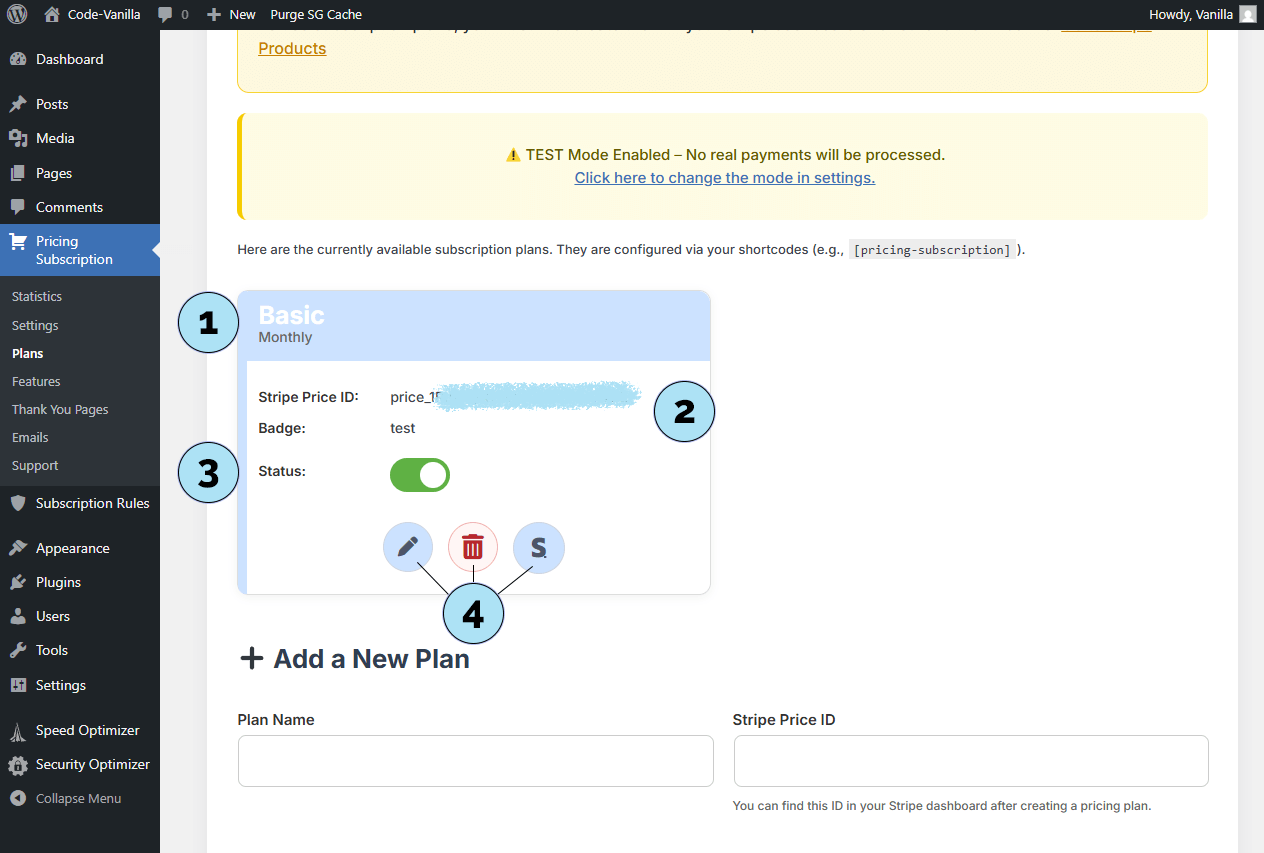
View a Created Plan in the Dashboard
Once you create a plan in the Pricing Subscription admin, a card is automatically generated. This confirms that the plan is ready to be used on your site.
- Plan name & period: Shows the name you defined for the plan, along with its billing interval (monthly or annual).
- Price ID & badge: Displays the Stripe Price ID linked to this plan, plus the optional badge if you set one (e.g., Popular).
- Status toggle: Lets you quickly activate or deactivate the plan for end users. This is useful for quick adjustments or if you need to pause a plan temporarily without deleting it.
- Action buttons:
- Edit/Update: Modify the plan details directly.
- Delete (trash): Permanently remove the plan from WordPress. Note: The plan is not deleted from Stripe itself.
- Open in Stripe: Quickly jump to the corresponding plan inside your Stripe dashboard.
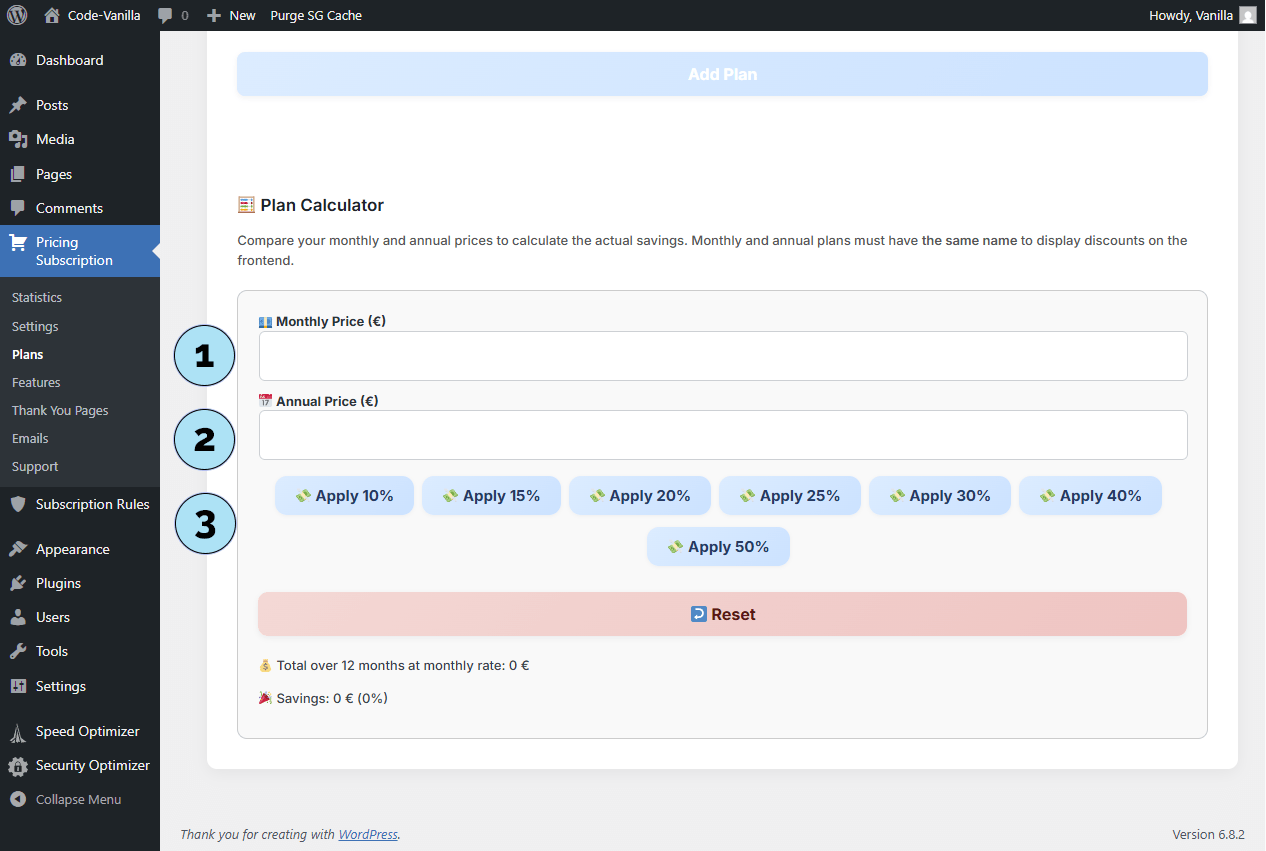
Next step: Explore the Plan Calculator just below the plan creation form to help balance your monthly vs. annual pricing.
Plan Calculator
The Plan Calculator is a handy tool to help you optimize your pricing without using an external calculator.
- Monthly price: Enter the monthly amount of your plan.
- Discount display: The tool instantly shows the calculated discount for the annual plan.
- Discount field: Apply the discount percentage you want to offer on the annual plan.
This way, you can quickly create an annual version of your plan at a reduced cost for subscribers. It is a simple but practical helper when designing attractive subscription offers.
Next step: Configure the colors of the plan cards that will be displayed to your users on the front end.
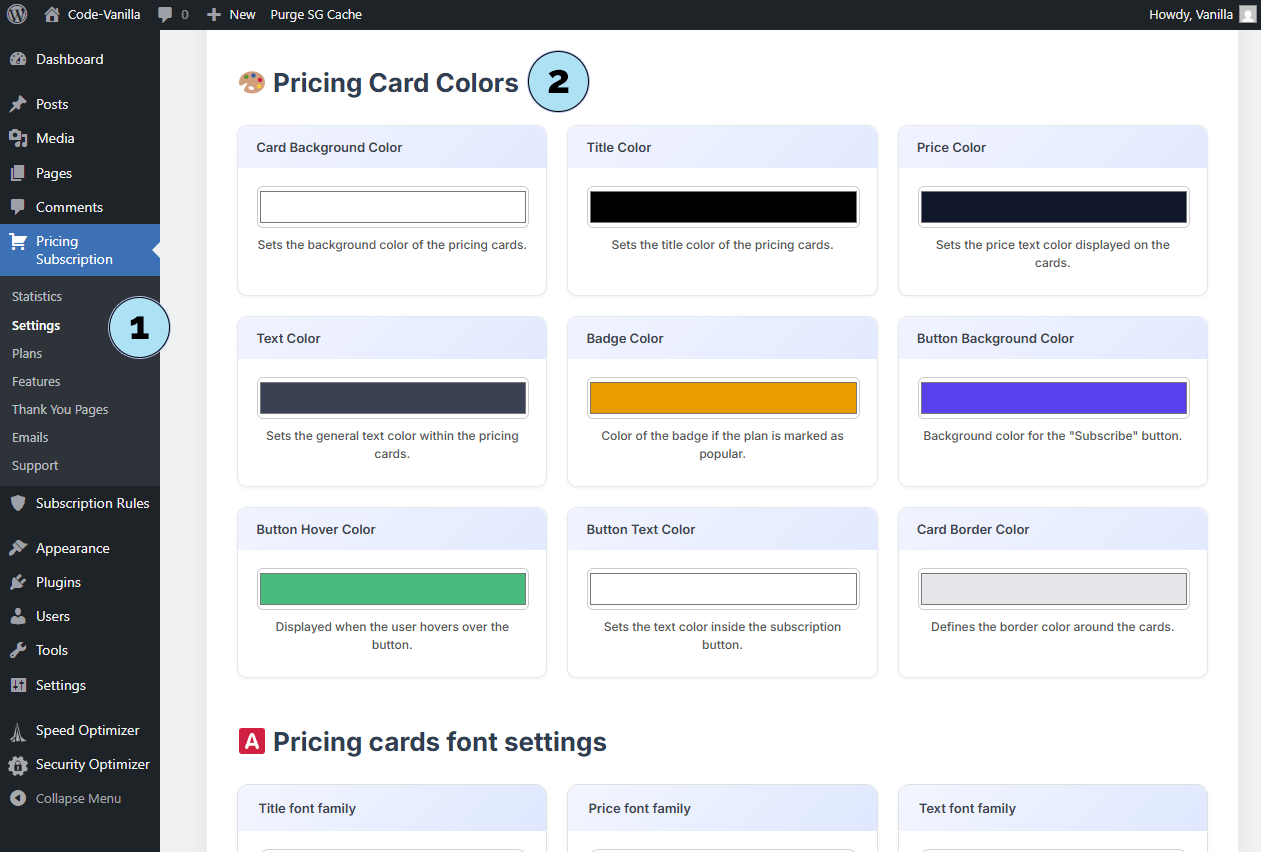
Customize Plan Card Colors
You can easily customize the look of your subscription cards by changing their colors in the Settings submenu.
Part 1 — Change colors in Settings- Access Settings: Go to Pricing Subscription → Settings in your WordPress dashboard.
- Color options: The panel allows you to change:
- Card background
- Plan title color
- Price color
- Text color
- Badge background color
- Button background color
- Button hover background color
- Button text color
- Card border color
- Save changes: Scroll down and click Save Settings to apply your changes.
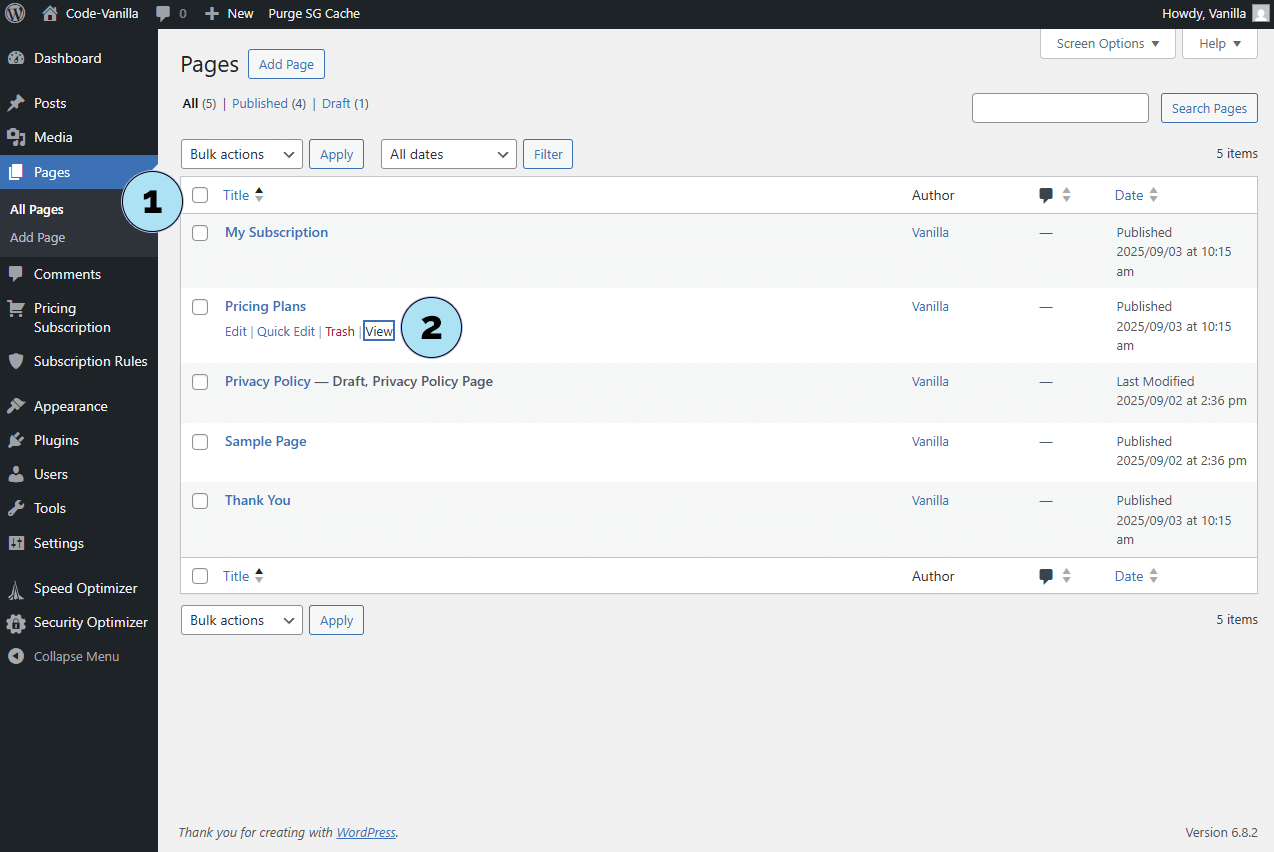
- All Pages: From your WordPress dashboard, go to Pages → All Pages.
- Open Pricing Plans page: Click on the link to view the
/pricing-planpage where your subscription cards are displayed. You will see the updated colors in action.
Next step: Learn how to modify the font style and size of your plan cards.
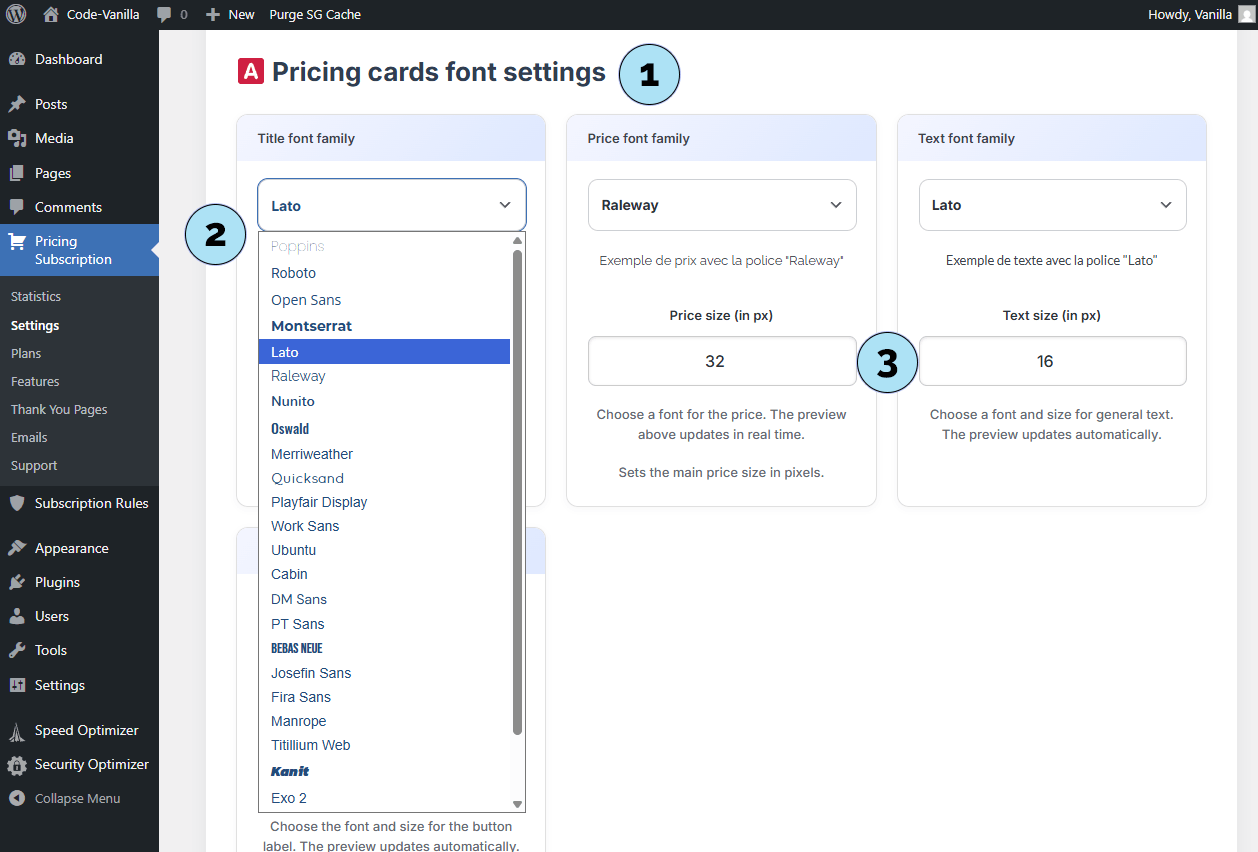
Pricing Cards – Font Settings
Inside the Settings submenu, you will also find the Pricing Cards Font Settings section. This allows you to control the typography of your subscription cards.
- Editable elements: You can modify the font style for the plan title, price, text, and button.
- Font family selection: Choose the font you prefer from the dropdown menu. A live preview is displayed below so you can immediately see how the font looks.
- Font size: Adjust the text size either by using the up/down arrows or by typing a value manually. The input is limited by a minimum and maximum range to ensure sizes remain readable and balanced.
This customization helps you align the design of your pricing cards with your site’s overall branding and style.
Next step: Learn how to customize card borders and the symbols used for the feature list.
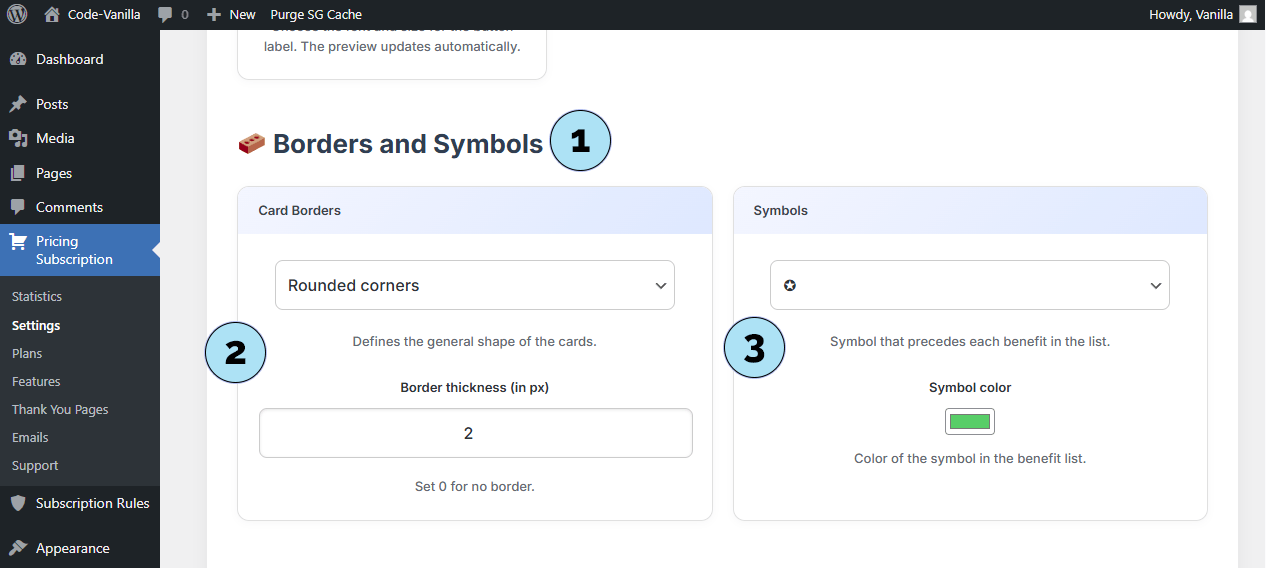
Card Borders & Symbols
In the Settings submenu, you will also find options to customize the borders and symbols of your pricing cards. These settings allow you to refine the look and feel of your subscription display.
- Customization panel: Open the panel dedicated to card borders and symbols to access these options.
- Card borders: Choose between rounded corners or square corners, and adjust the border thickness.
Setting the border value to
0means no border will be displayed at all. - Symbols: Pick a symbol that will be displayed in front of each feature of your plans. This helps add clarity and style to your feature list. The symbol color can also be customized here.
With these options, you can make your pricing cards more visually appealing and perfectly aligned with your site’s branding.
Next step: Learn how to configure the logo image and the login button settings.
User Dashboard – Logo & Login Button Settings
The User Dashboard has been specially designed for the Pricing Subscription plugin. From the Settings submenu, you can customize its appearance and login options.
- Logo title: Enter the text that will appear in the top left of the dashboard, next to the logo inside the sidebar.
- Logo image: Select an image from your WordPress Media Library by clicking Select image. The chosen logo will be displayed inside the dashboard sidebar.
-
Login button text: Define the text displayed on the login button (e.g., Sign In).
To display the button, add the shortcode
[psp_login_button]on one or several pages. - Redirect URL: Specify the URL where users will be redirected after clicking the login button. This can point to the plugin’s dashboard page or an alternative such as the WooCommerce dashboard.
- Login button shortcode: You can insert the shortcode
[psp_login_button]anywhere on your site. The main advantage is flexibility — you can embed it wherever it fits best.
Next step: Configure the footer settings for the user dashboard.
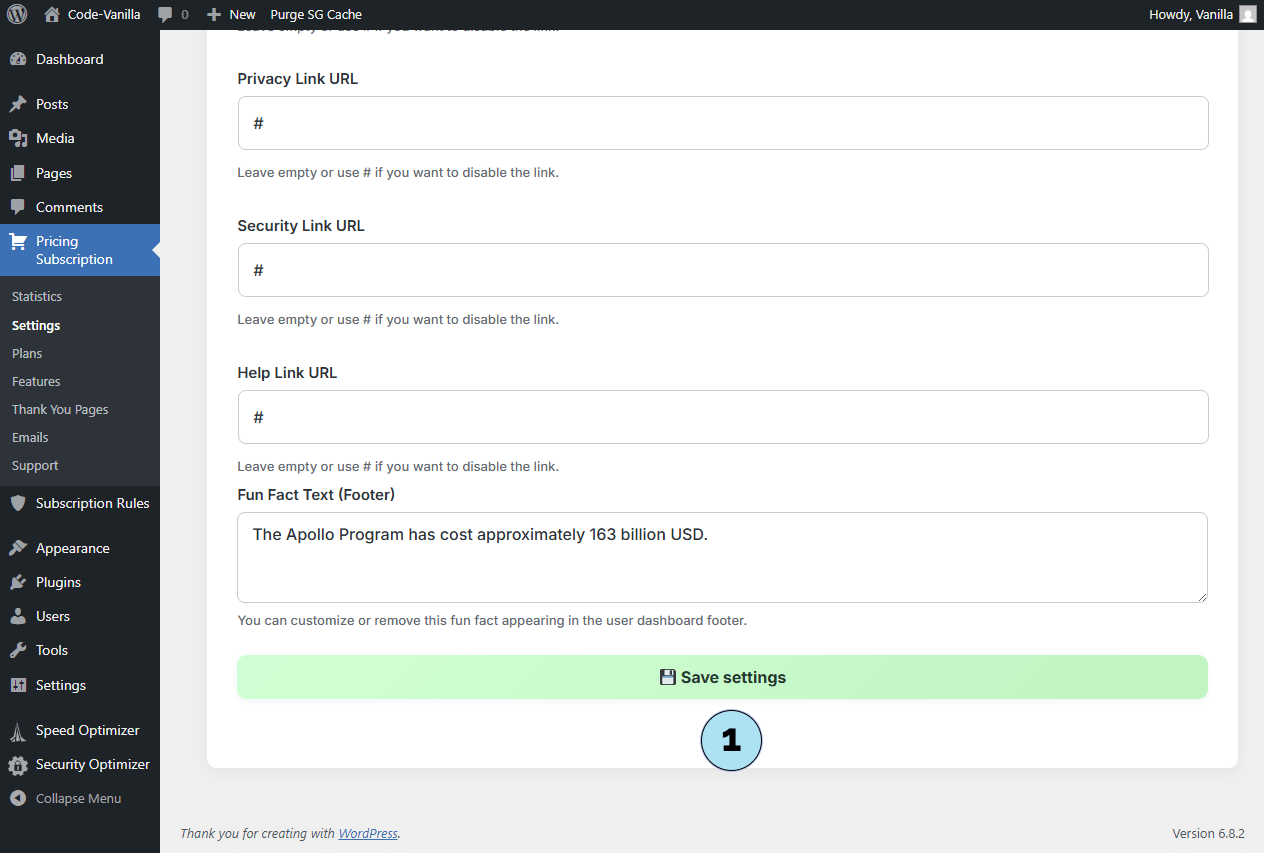
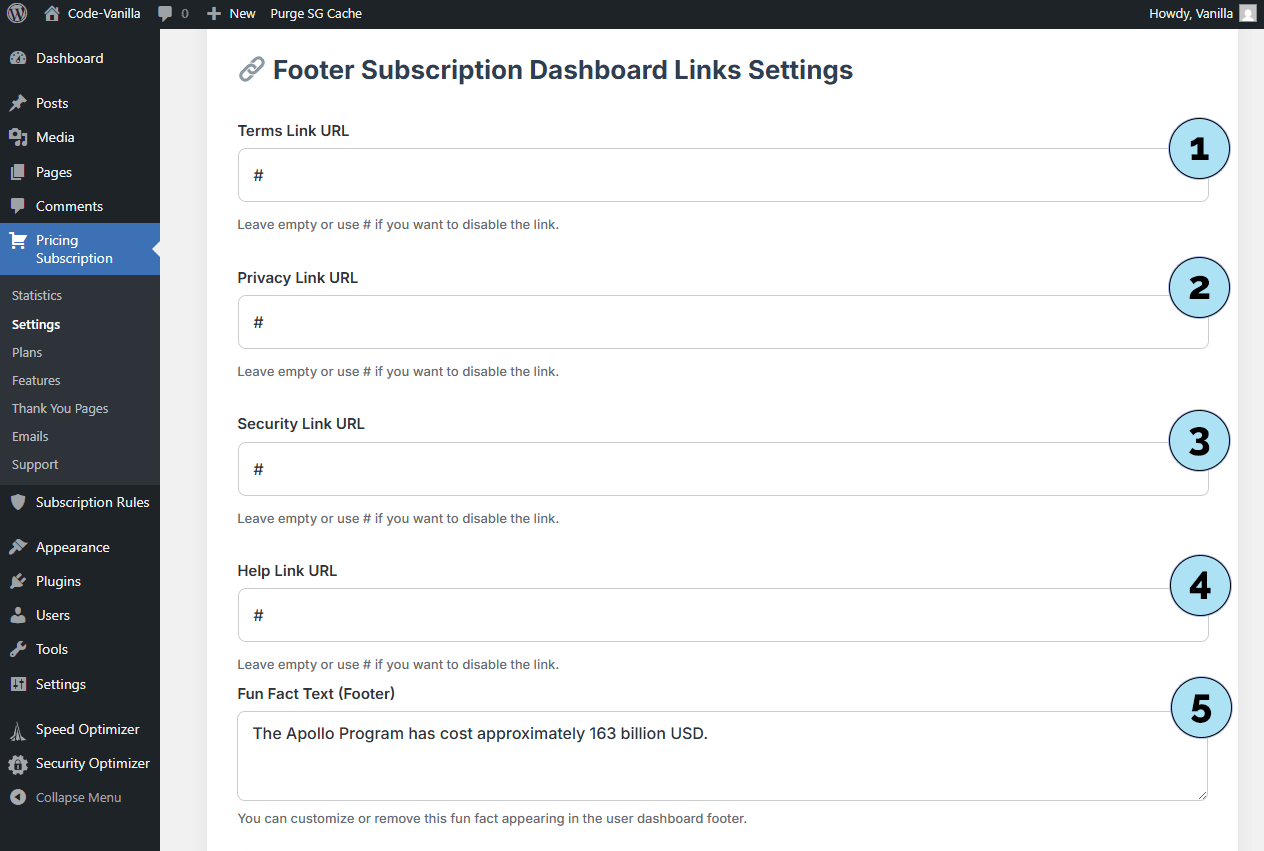
User Dashboard – Footer Settings
The footer of the User Dashboard can be customized from the Settings submenu. This allows you to manage links and even display fun information for your users.
- Terms link: Define the URL for the Terms link. You can point it to your Terms & Conditions page or any custom page.
- Privacy link: Set the destination URL for the Privacy link, usually leading to your Privacy Policy page.
- Security link: Add a link for your Security page or any resource about protecting user data.
- Help link: Provide a redirection to your Help or Support page, or any page you want your users to access for assistance.
- Fun facts: An optional area where you can display fun or current facts. This can be updated daily or as often as you like, giving your users something new to discover each time they visit their dashboard. If you prefer, you can leave this field empty.
Next step: Learn how the statistics feature works in the Pricing Subscription plugin.
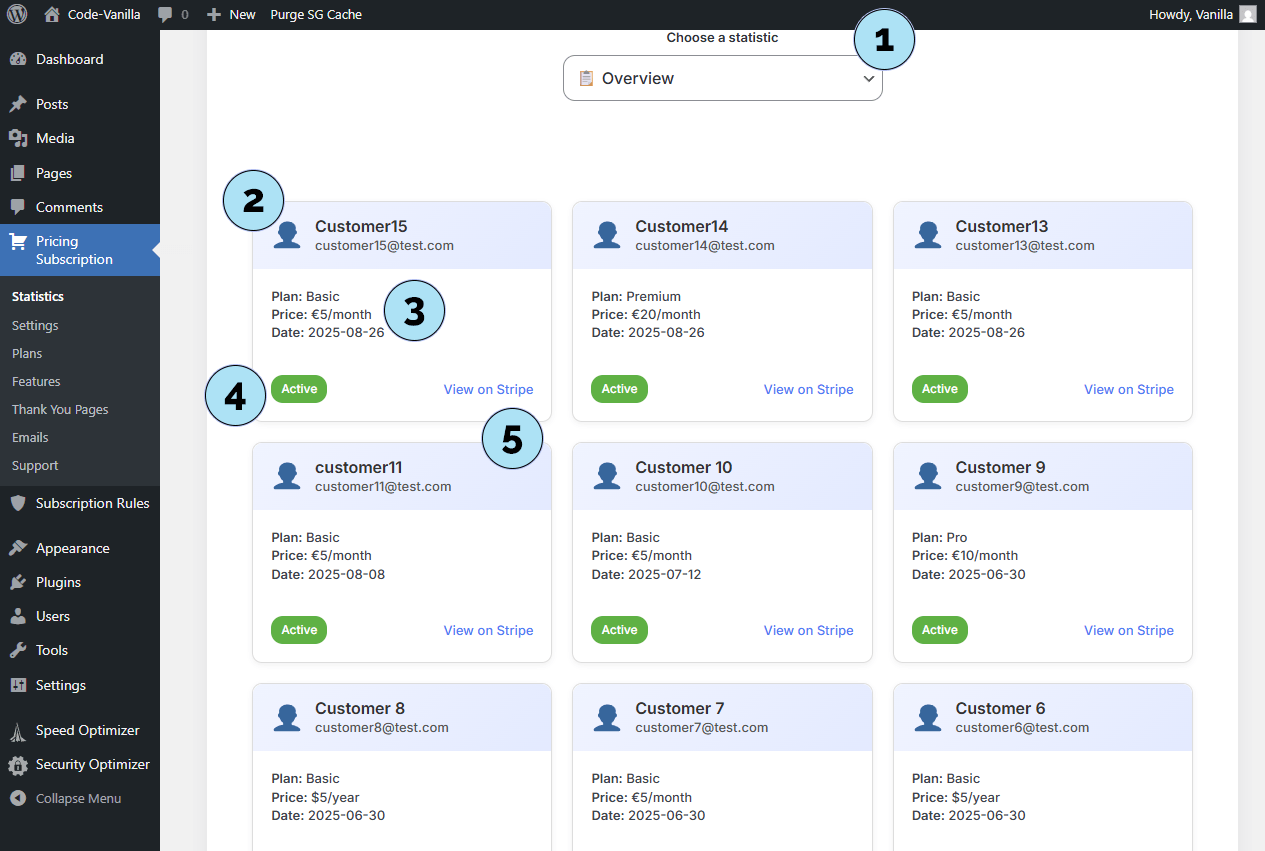
Statistics – Subscribers Overview
The Statistics page gives you an overview of your subscribers and their activity. Since the plugin is built around subscriptions, it is only natural to have access to this data directly in your WordPress dashboard.
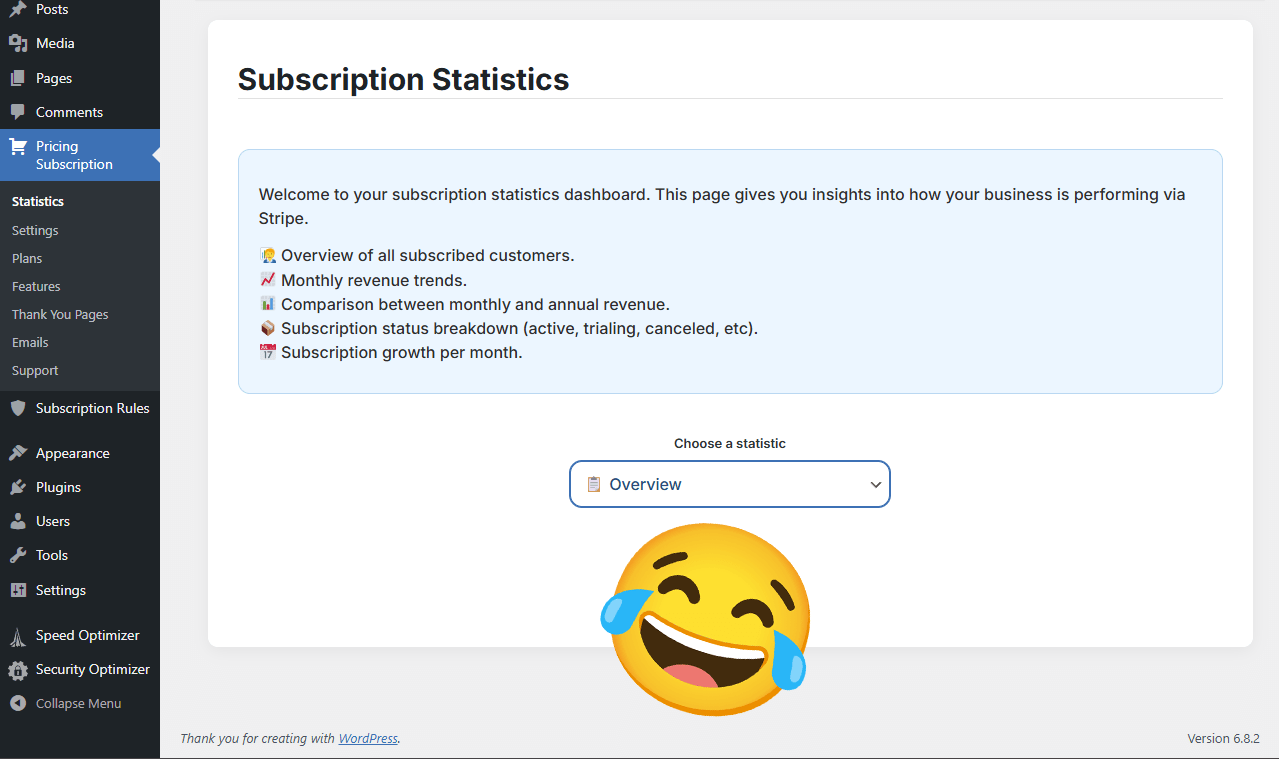
Part 1 – No subscribers yetWhen you first open the statistics page, you may see empty data. While this can feel discouraging at first, it simply means that no users have subscribed yet. This state confirms that your plugin is running and ready to track future subscribers.
Part 2 – Subscriber list- Overview dropdown: Use the dropdown (default: Overview) to display all subscribers registered on your platform. These details are pulled directly from Stripe and made available in your dashboard.
- Subscriber identity: Each subscriber is listed with their identifier (e.g., Customer15 used here for testing).
- Plan details: Shows the subscription plan (e.g., €5/month for Basic) and the start date of the subscription.
- Status capsule: Displays whether the subscriber is active. If disputes or issues occur, they are also indicated here (e.g., in the green capsule for active plans).
- View on Stripe: A direct link allows you to open this subscriber’s record in your Stripe dashboard with a single click.
This integration ensures you can manage and monitor your subscribers without constantly switching between WordPress and Stripe.
Next step: Explore the Monthly Revenue section in the statistics page to track your subscription income.
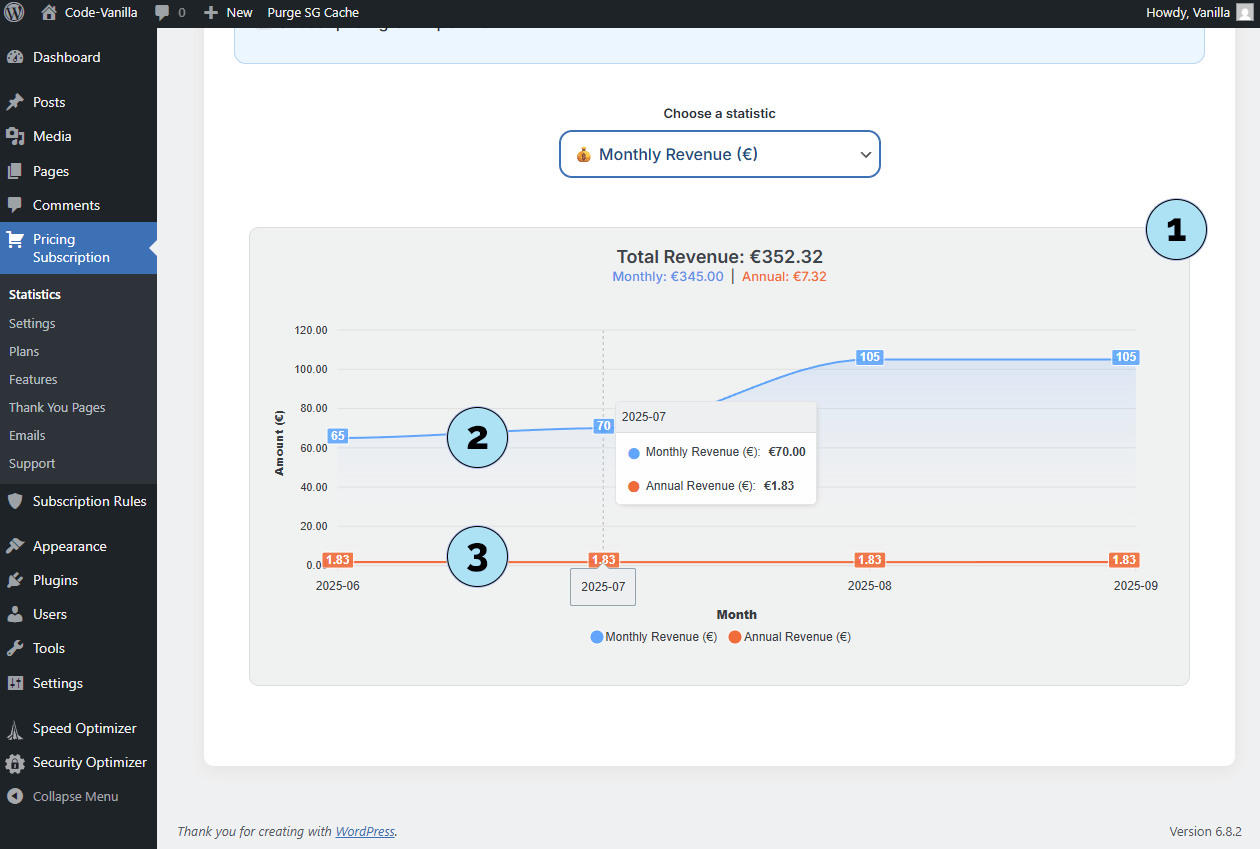
Statistics – Monthly Revenues
The Monthly Revenues chart shows the income generated by your subscription plans. It helps you quickly analyze how much revenue comes from monthly vs. annual subscriptions.
- Overall chart: Displays a visual overview of your total subscription revenue depending on the billing cycles chosen by your subscribers.
- Blue curve (Monthly): Represents income generated from monthly plans.
- Orange curve (Yearly): Represents income generated from annual plans.
By monitoring this chart, you can fine-tune your pricing strategy and encourage subscribers to choose the billing cycle that best fits your business goals.
Next step: Review the Monthly vs Annual comparison chart, also available in the statistics page.
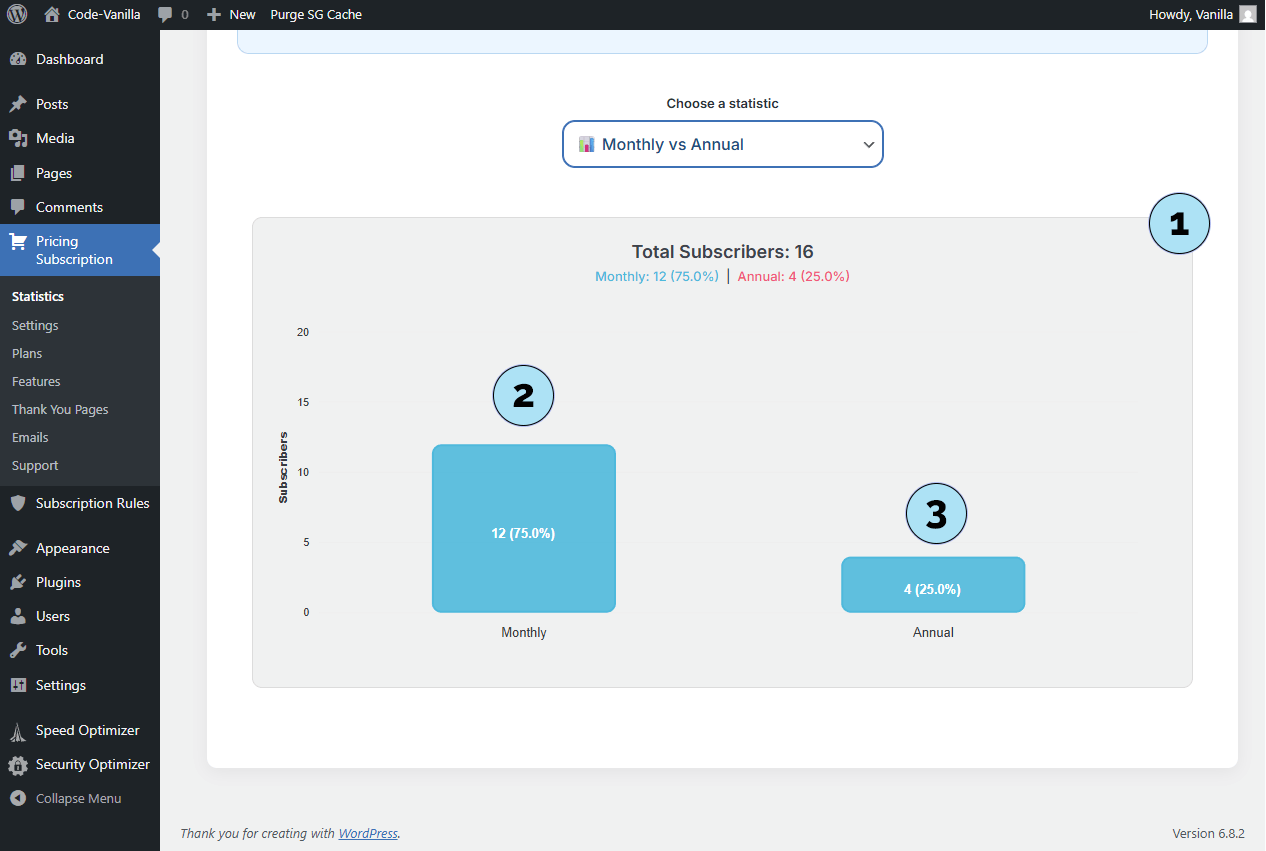
Statistics – Monthly vs Annual
The Monthly vs Annual chart provides a quick comparison of your subscribers based on their billing cycle.
- Bar chart overview: A simple bar diagram shows at a glance the total number of subscribers (in this example, 16). While not a huge number, it already demonstrates how subscriptions can build consistent revenue.
- Monthly subscribers: The chart highlights the count of subscribers on monthly plans, which in this case form the majority.
- Annual subscribers: The chart also displays how many users have chosen annual plans, allowing you to compare the two billing types easily.
This chart makes it easy to identify which type of billing cycle is most popular with your users and adjust your strategy accordingly.
Next step: Explore the Subscription Status Breakdown chart for a detailed look at active, canceled, and other subscription states.
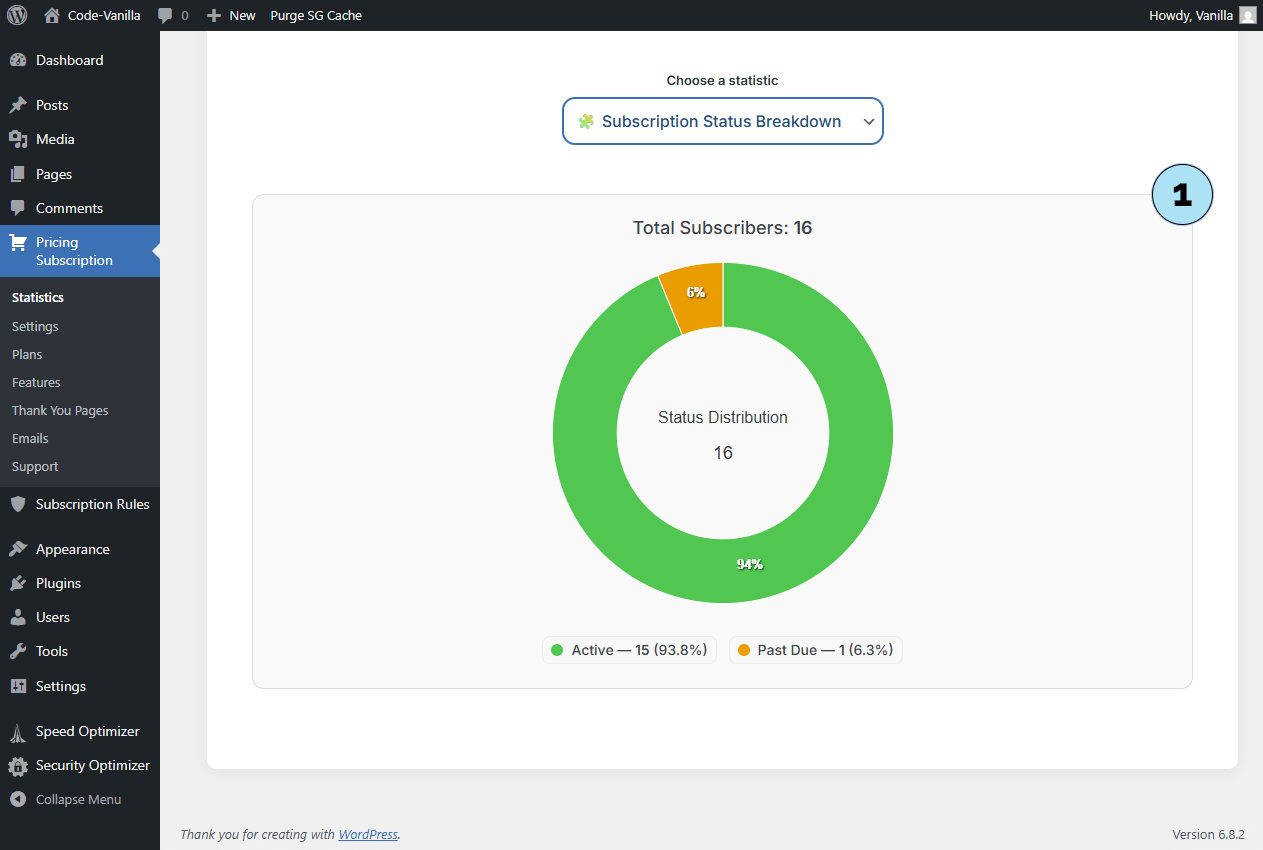
Statistics – Subscription Status Breakdown
The Subscription Status Breakdown chart provides a visual overview of your subscribers based on their current status.
- Pie chart view: The data is displayed as a pie chart, making it easy to identify subscription statuses at a glance.
- Active subscribers (Green): These are users who are up-to-date with their payments and whose subscriptions are valid.
- Subscribers in dispute (Orange): The chart also highlights users currently facing payment issues or disputes. This helps you quickly recognize accounts that may need attention.
This chart gives you instant visibility into which subscribers are in good standing and which may require follow-up. For more details, you can always check directly in your Stripe dashboard, where additional information and dispute management tools are available.
Next step: Review the Growth by Month chart to analyze how your subscriber base evolves over time.
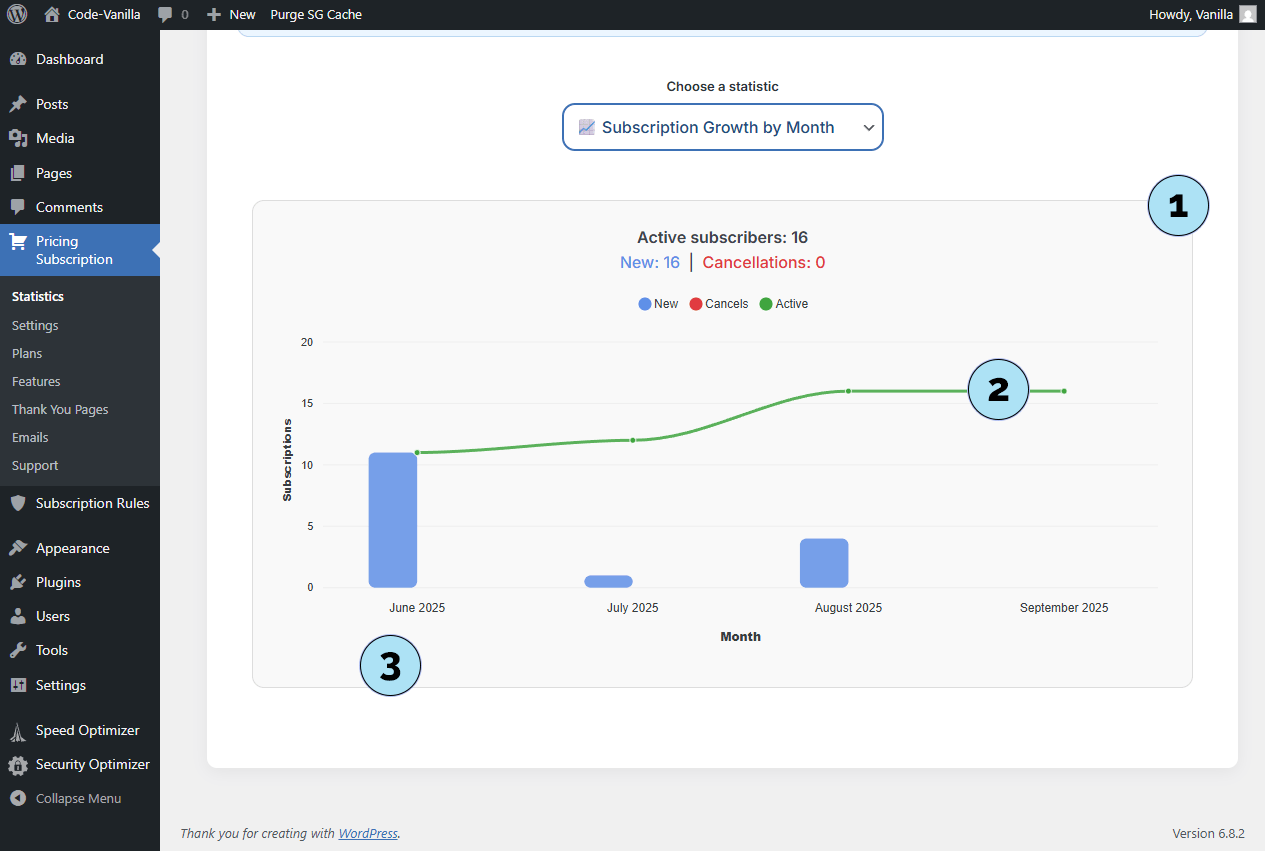
Statistics – Growth by Month
The Growth by Month chart gives you an overview of how your subscriber base evolves over time, helping you measure the growth of your platform.
- Overall chart: Displays subscription growth month by month, providing a clear view of your platform’s progression.
- Green curve: Represents the total number of active subscribers at each point in time.
- Monthly bars: Each bar shows the number of new subscribers acquired during that month.
This chart is a great way to visualize both your active base and your monthly acquisition, making it easier to track performance and set growth targets.
Next step: Learn how to use the Email & Campaigns features to communicate with your subscribers directly from the plugin.
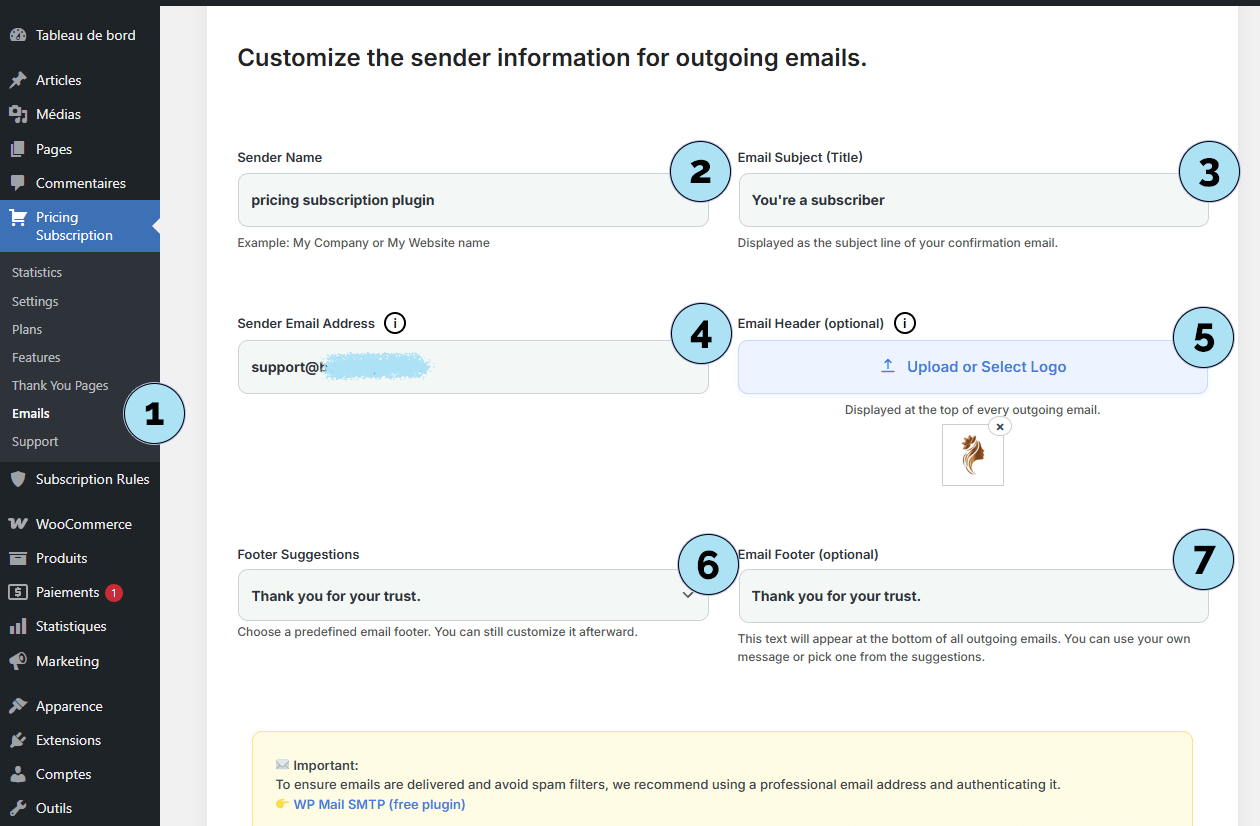
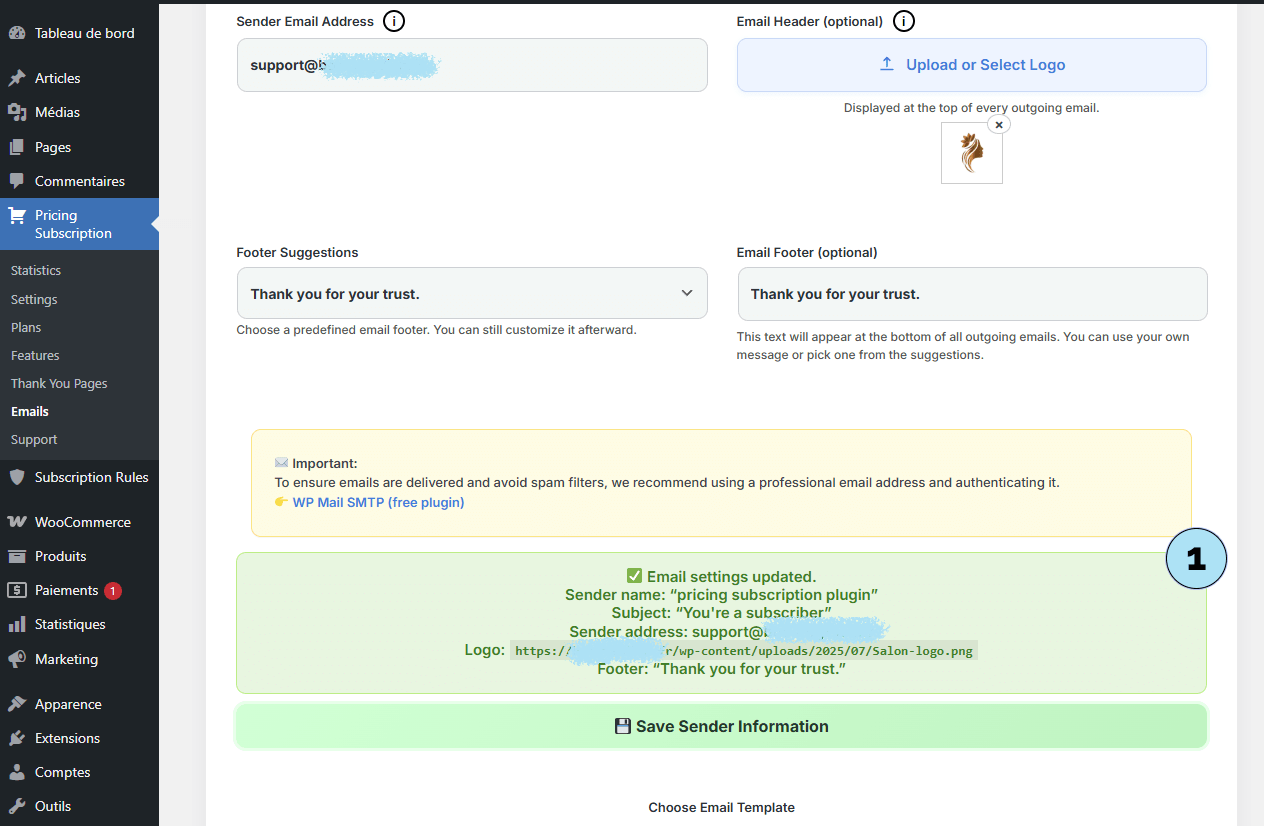
Emails – Send Messages to Your Subscribers
The Emails submenu in Pricing Subscription lets you send simple messages to your subscribers directly from your WordPress dashboard.
Part 1 – Email configuration- Emails submenu: Go to Pricing Subscription → Emails to open the email management section.
- Sender name: Define the contact name that your subscribers will see when they receive your email.
- Email subject: The subject line that will appear in your subscribers’ inbox.
- Sender email: Choose the email address that will be used as the sender. Replies from your subscribers will go to this address.
- Email header: Optionally upload a logo to display in the header of your emails.
- Email footer suggestions: Use the dropdown to select from suggested footers, leave it empty, or 7, create your own custom footer.
- Save button: Save your configuration to apply changes. Confirmation: Your saved settings will be displayed to confirm that your email configuration is active.
This ensures your messages are correctly personalized before sending them out to your subscribers.
Next step: Select an Email Template to prepare your email design before sending.
Emails – Select a Template
You can personalize the look of your emails by choosing from a set of responsive templates. These templates automatically adapt to mobile, tablet, and desktop screens.
- Template dropdown: Use the dropdown menu to select your favorite design. A total of 12 templates are available, each with a unique and original style for you to discover.
- Dynamic preview: Each template is automatically filled with your logo, title, content, and footer (as configured previously). This lets you preview how your email will look before sending it.
Next step: Define the recipients — the subscribers who will receive your email.
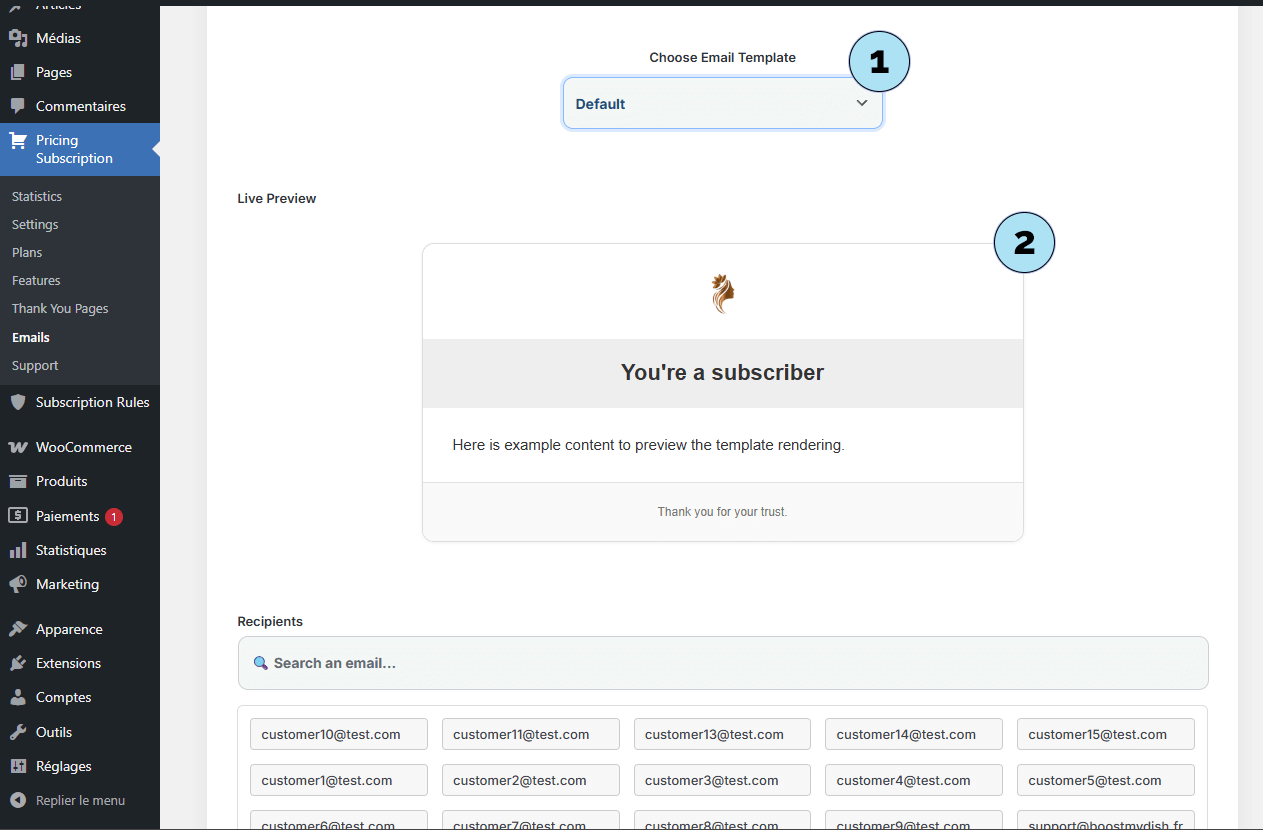
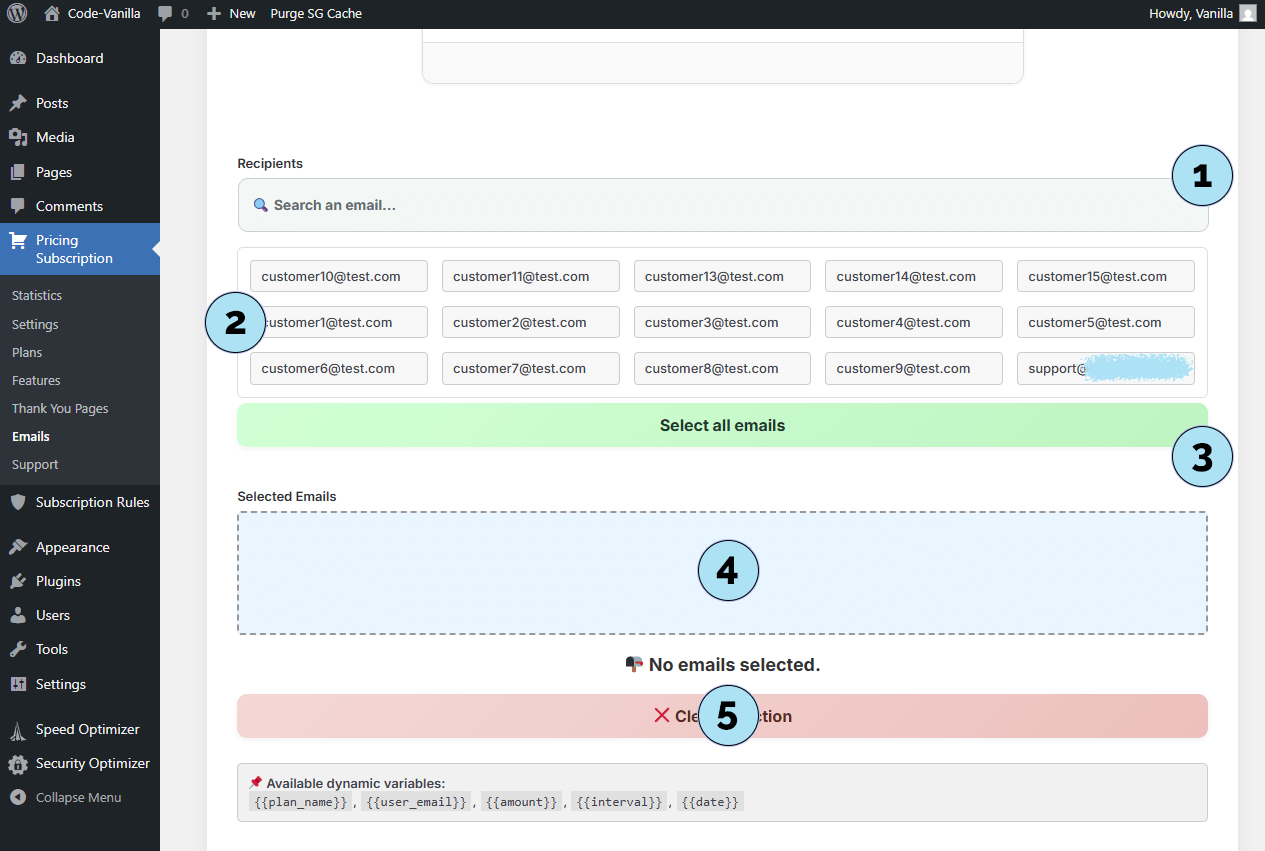
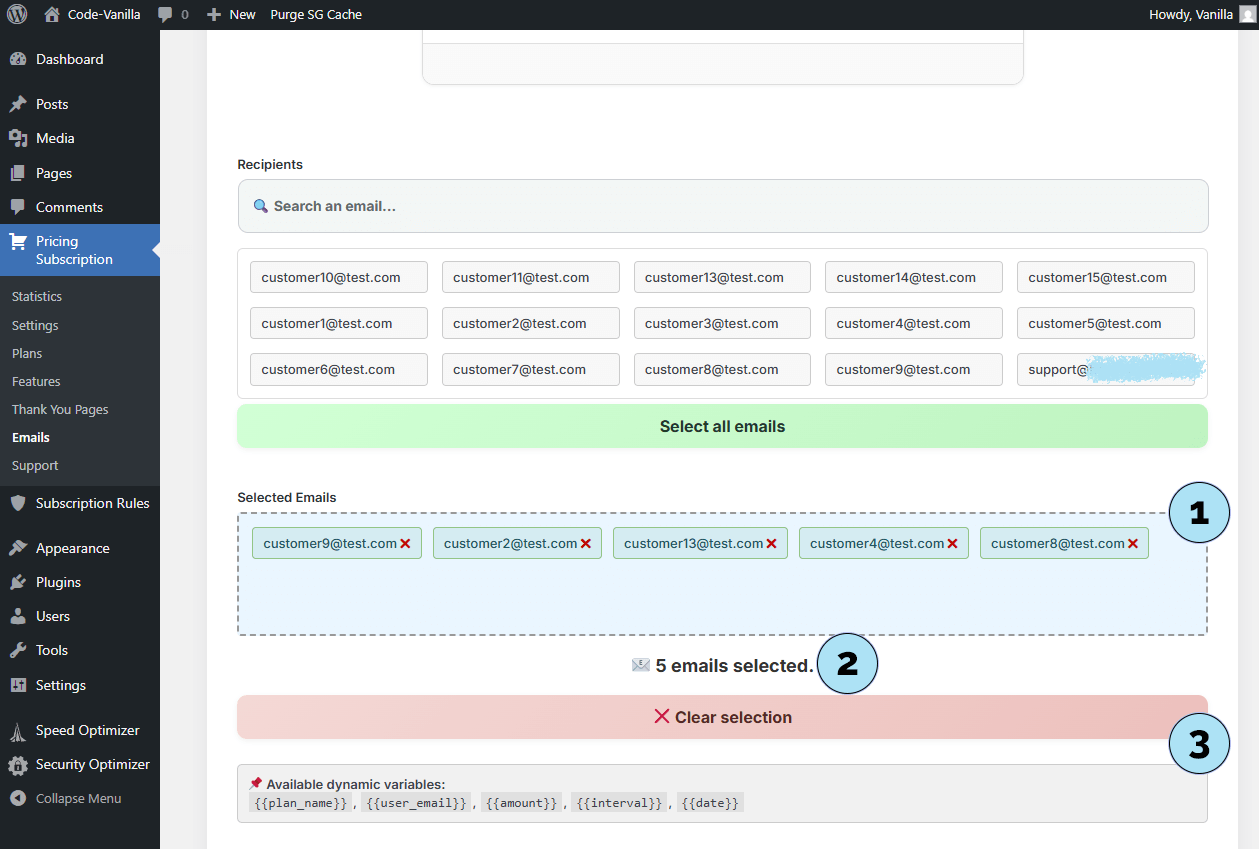
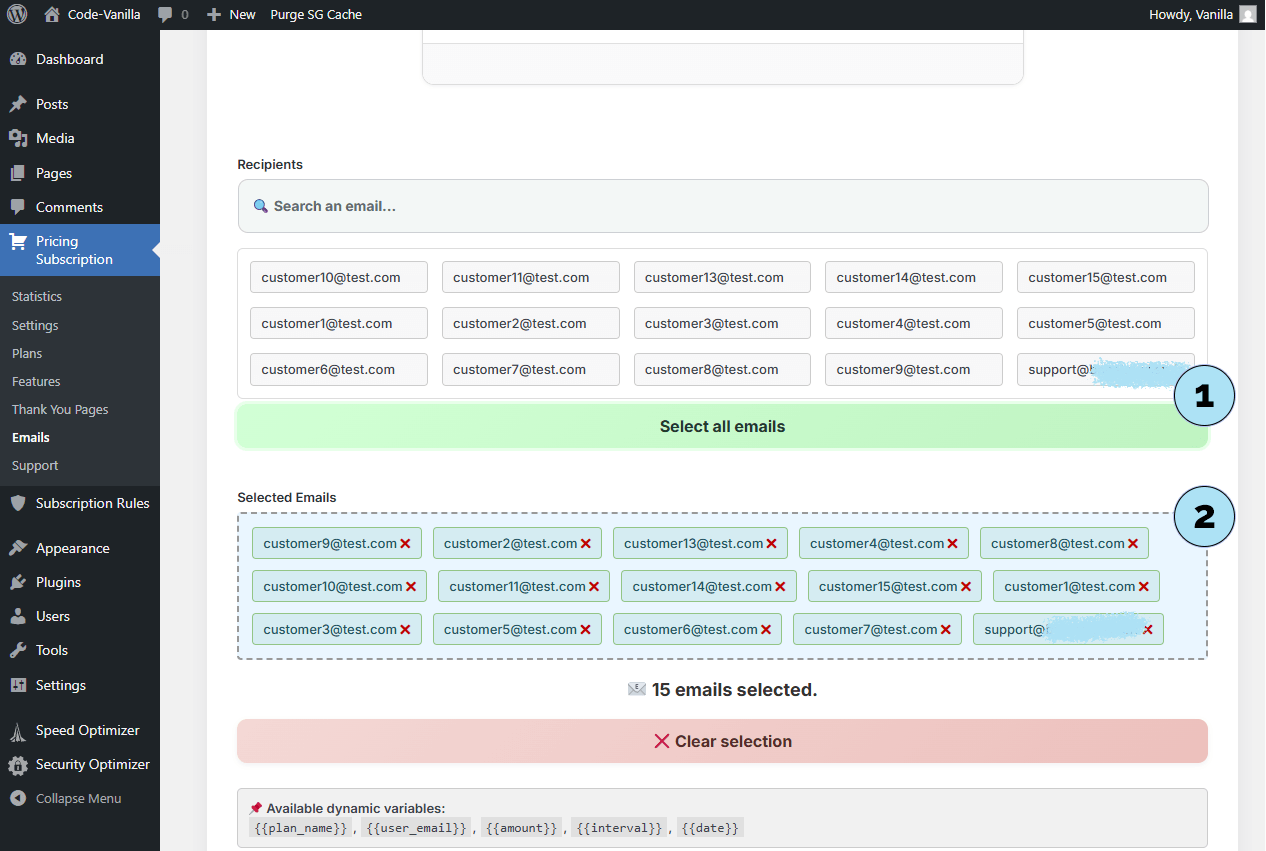
Emails – Select Recipients
The Recipients section lets you choose which subscribers will receive your email. Email addresses are automatically collected when users subscribe via the Pricing Subscription plugin.
Part 1 – Recipient selection options- Search field: Use the search bar to quickly find an address, especially useful if you have a large number of subscribers. You can search alphabetically by the beginning of the email.
- Email dropzone: Displays all available subscriber emails (separately for Test and Live modes). Drag and drop one or more emails into the Selected emails area.
- Select all: Choose all available subscriber emails at once with a single action.
- Selected emails list: Shows the emails you’ve picked for sending.
- Reset selection: Clear your current choices and start fresh.
- Some recipients chosen: A few emails have been manually selected from the list.
- Email counter: Displays the total number of selected addresses.
- Reset button: Always available to clear the selection if needed.
- Select all option: Instantly include all subscriber emails in the list.
- Dynamic display: All addresses appear in the Selected emails section.
This system makes it easy to manage recipients, whether you want to target a few users or send a message to your entire subscriber base.
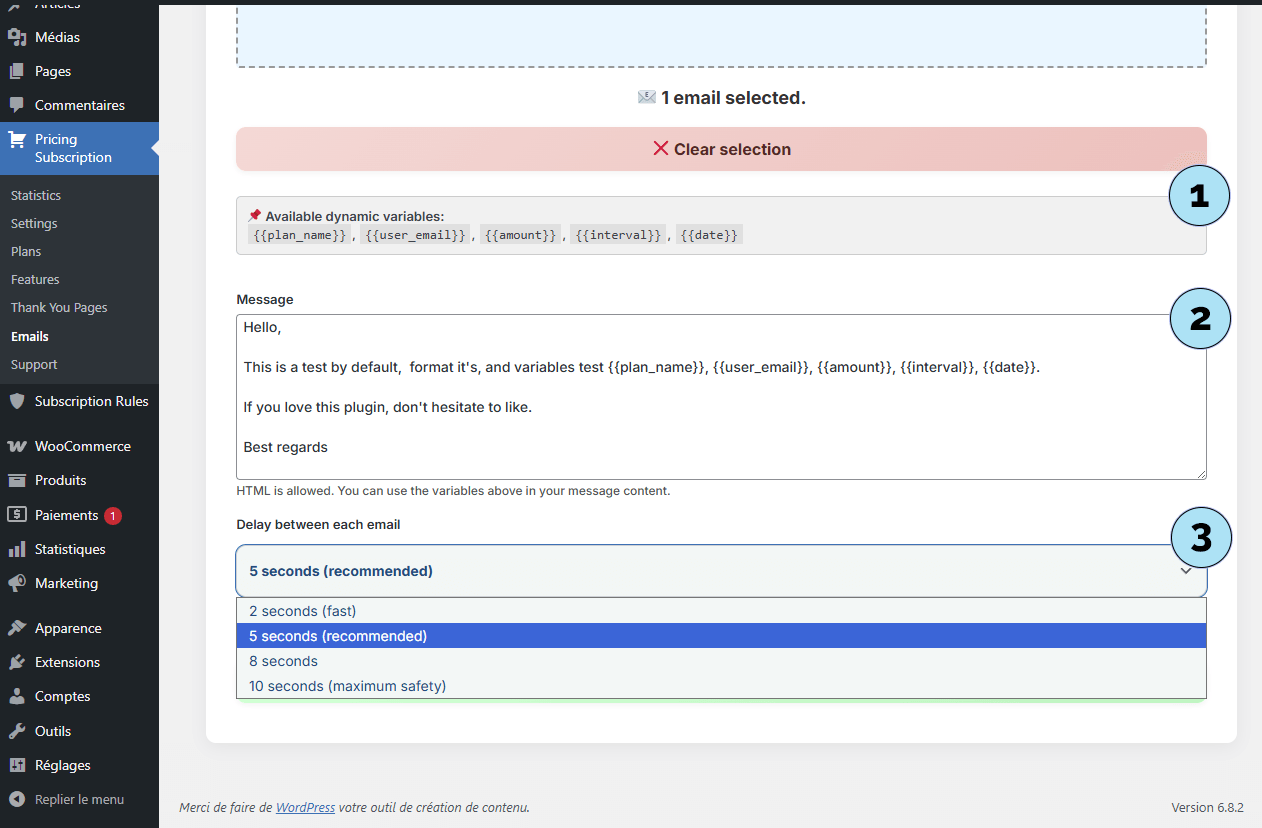
Next step: Define the content of the email, including dynamic variables for personalization.
Emails – Compose & Send
- Variables: Use
{{plan_name}},{{user_email}},{{amount}},{{interval}},{{date}}to personalize your email. These placeholders are replaced with each recipient’s real data. - Message content: Write your message freely. Variables are optional—use them if you want dynamic fields, or keep it simple.
- Send delay (throttling): Set a small delay for batch sends to reduce spam risk and mimic natural sending behavior.
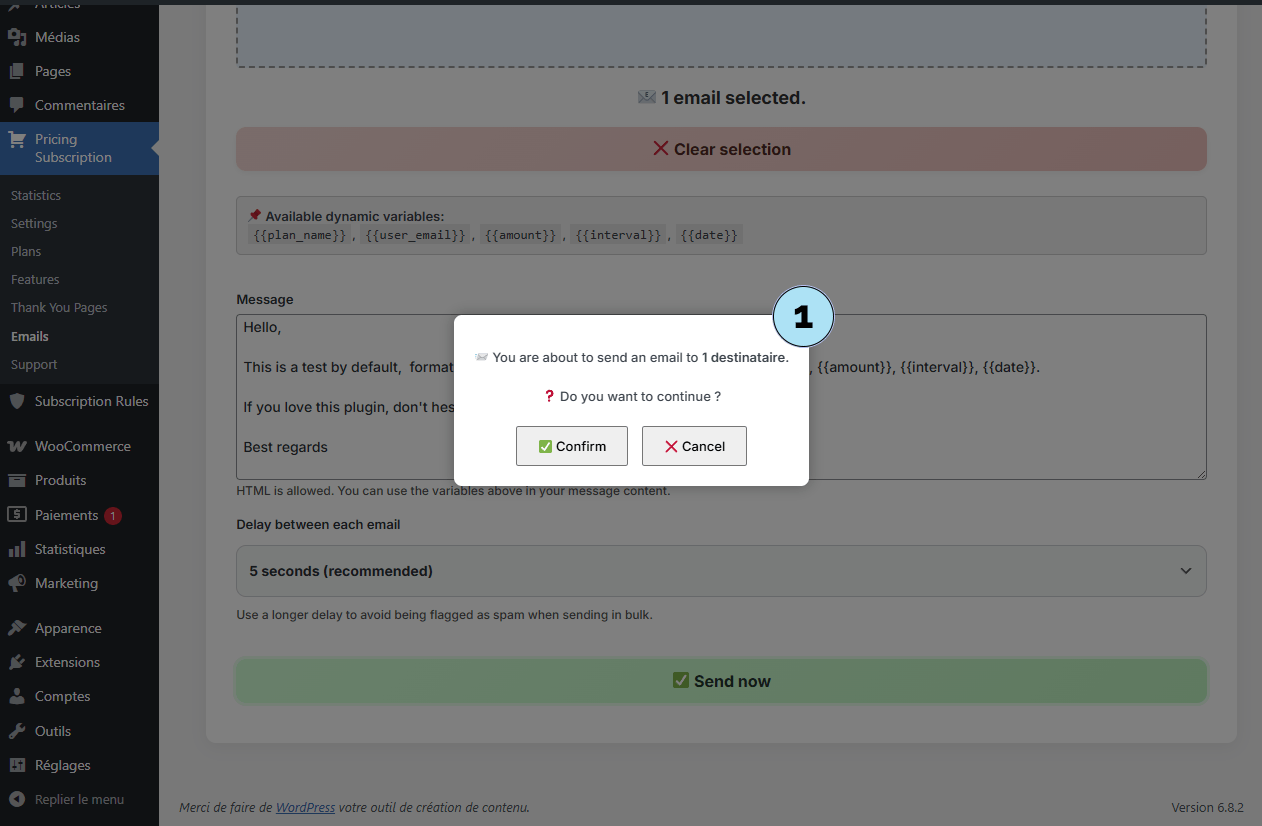
- Confirmation modal: A modal opens to confirm or cancel. Clicking Confirm sends your email(s) immediately; Cancel lets you revise your settings.
- Status panel: A results container appears at the bottom of the Emails page showing:
- Status: Overall progress of the job.
- Sent: Count of successfully delivered emails.
- Failures: Bounces/undelivered emails.
- Bounce rate: Percentage of undelivered messages.
Next step: Let’s preview the final result of a sent email.

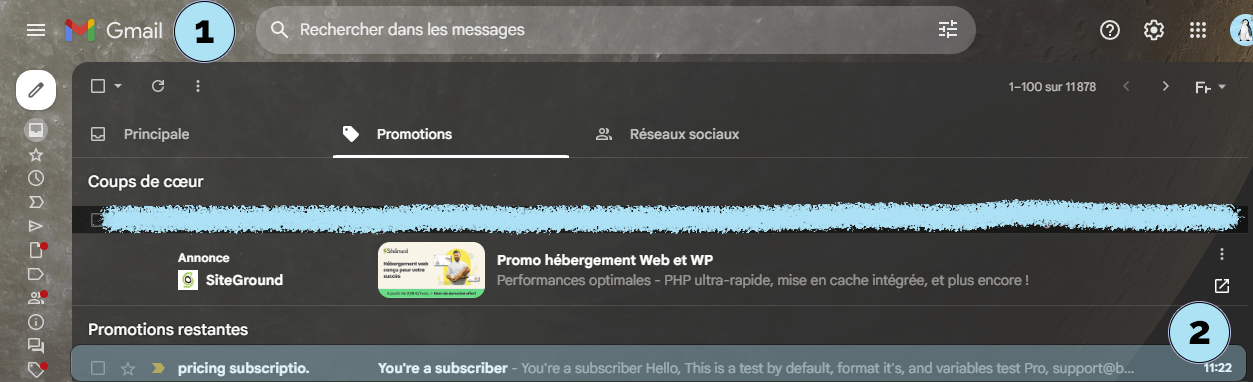
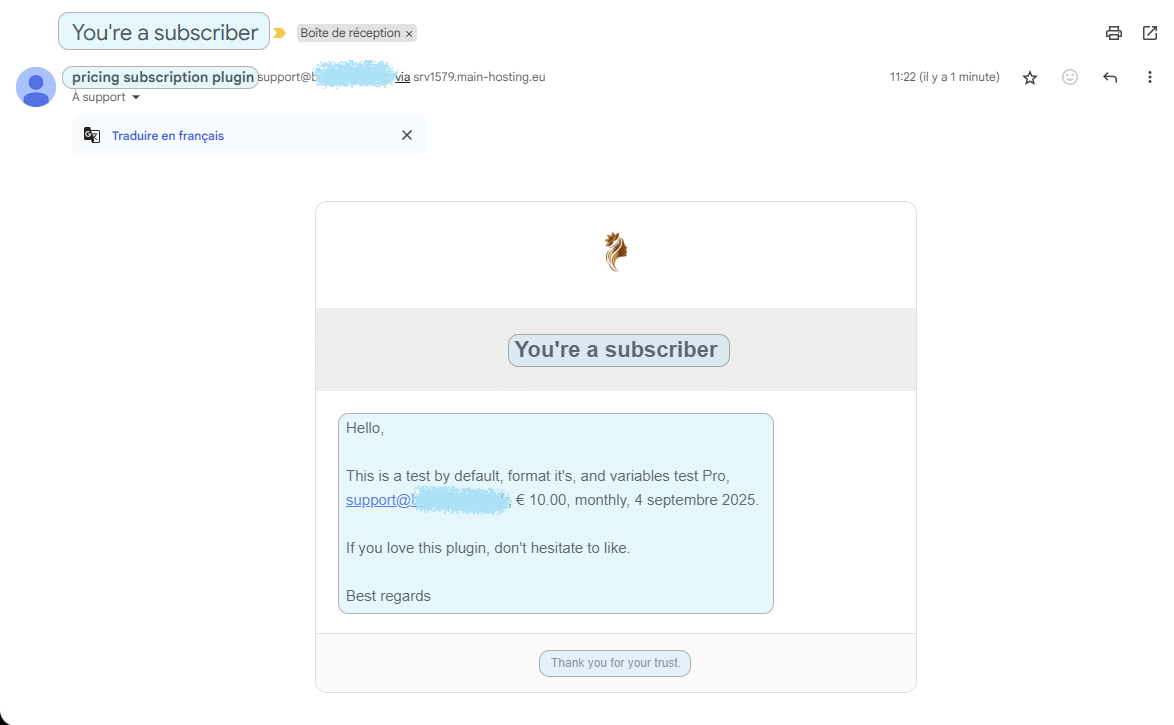
Emails – Received Message (Test)
We sent a test email to a valid address to verify the final rendering.
Part 1 — Inbox preview- Gmail interface: This example shows a Gmail inbox (interface displayed in French in our screenshot).
- Received email: The message appears with the correct sender name, the subject you defined, and a short content preview.
When opening the email, you can confirm:
- Title & sender name are correct,
- Content is rendered as expected,
- Footer matches your configuration,
- Logo is displayed properly,
- The selected template displays perfectly across devices.
This confirms your template, variables, and settings are all working as intended.
Next step: Let’s explore the Thank You Pages available in the plugin.
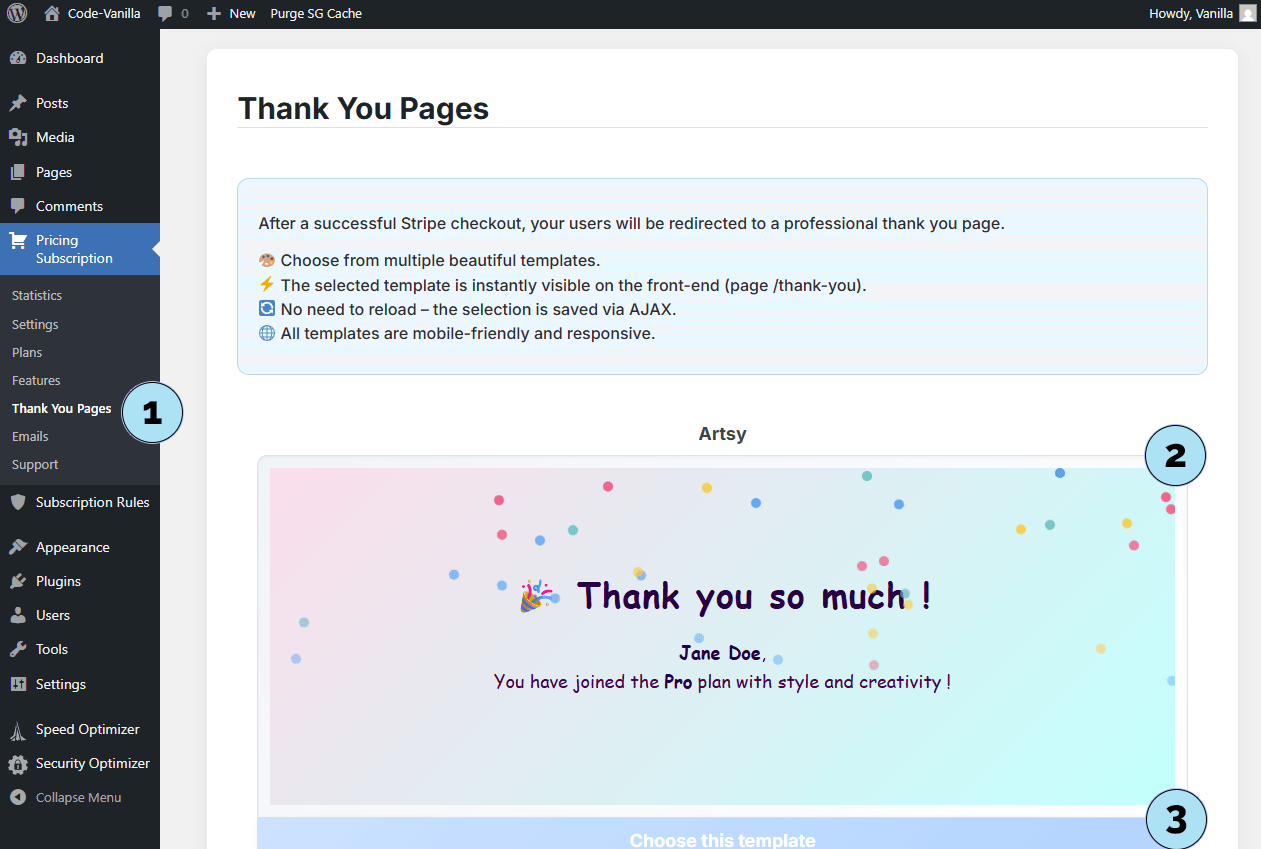
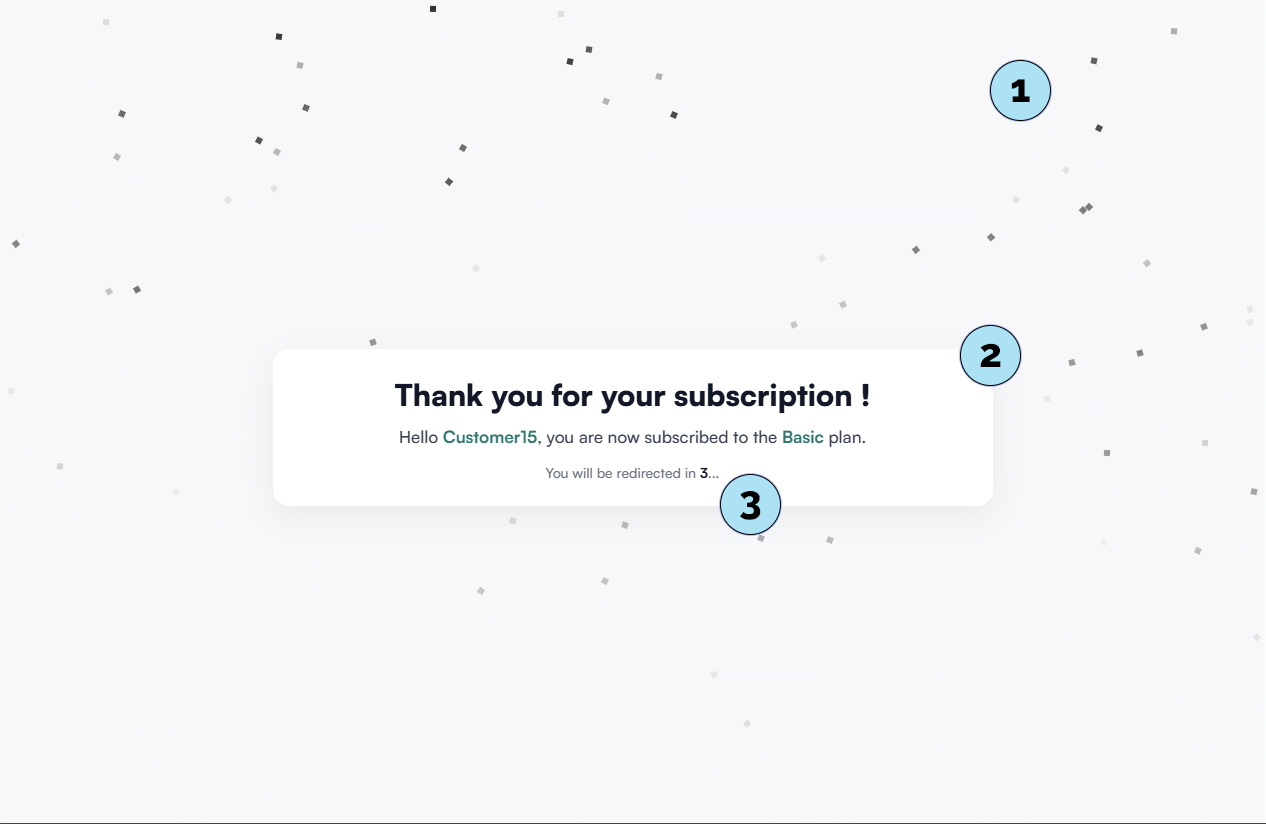
Thank You Pages
The Thank You Pages feature has been designed exclusively for you, the users of the Pricing Subscription plugin. It allows you to create a warm and professional experience for your new subscribers.
- Submenu access: Go to Pricing Subscription → Thank You Pages to open the template selection screen.
- Choose from 23 templates: Pick from a wide variety of 23 unique templates, each with its own style and layout. All templates include dynamic confetti animations for extra impact.
- Dynamic redirect: Once you select a template here, it will automatically be displayed every time a new subscriber joins. After a short delay, the user is redirected to your homepage, creating a smooth and engaging post-subscription flow.
This system ensures that every new subscriber feels appreciated and welcomed immediately after subscribing to one of your plans.
Next step: Discover the Subscription Rules, the core of the plugin for managing content access and restrictions.
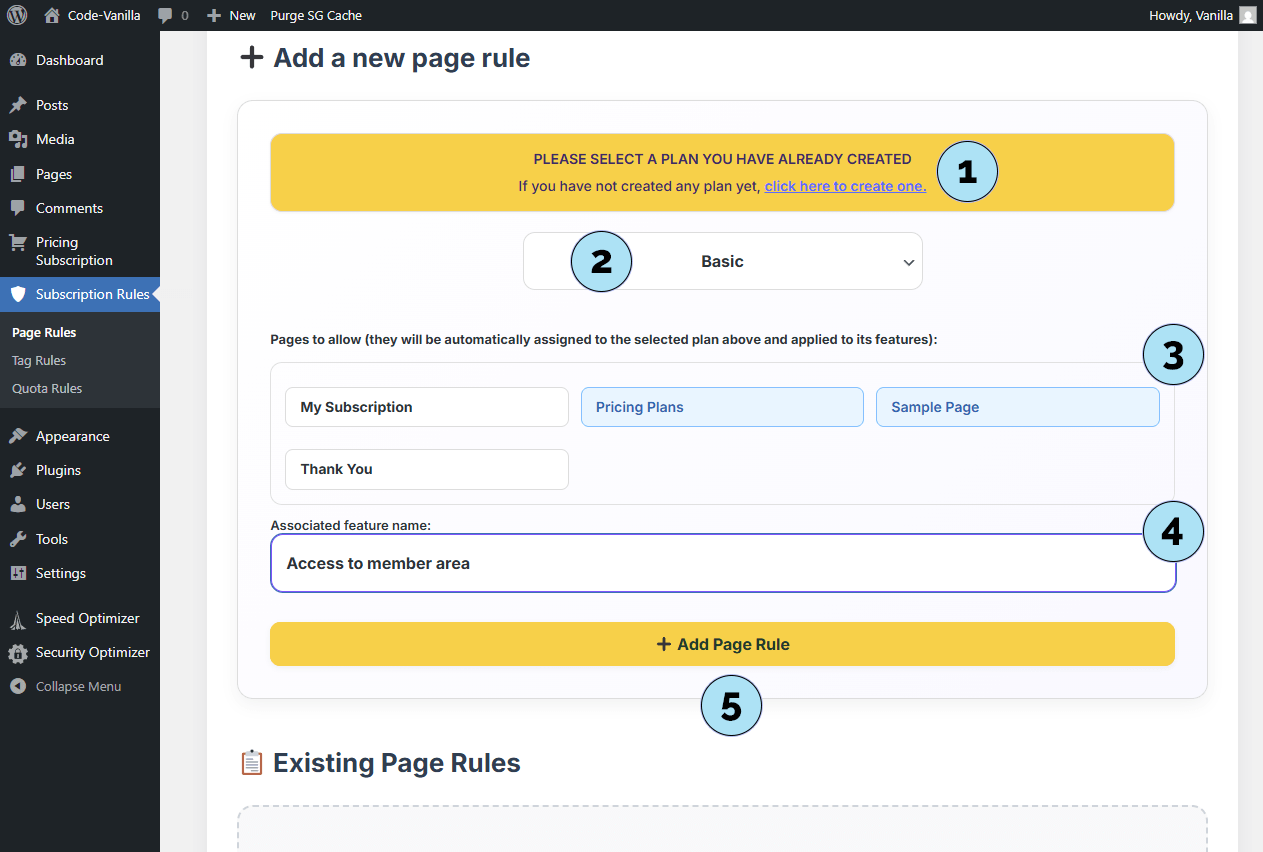
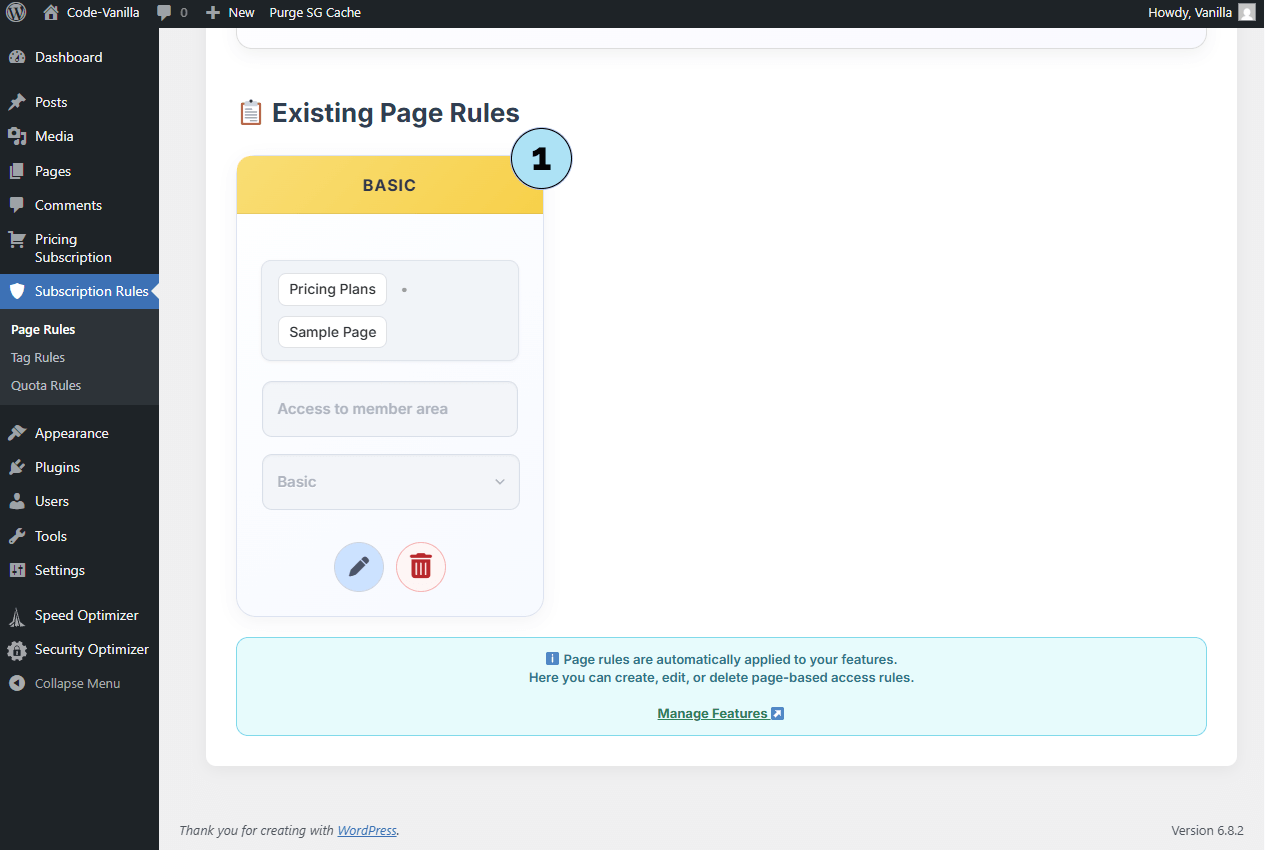
Subscription Rules – Page Rules
The Page Rules are the first type of subscription rule available in the Pricing Subscription plugin. They allow you to restrict access to specific WordPress pages based on the subscriber’s plan.
Part 1 – Create a Page Rule- Create a plan (if needed): If you haven’t already created a plan, use the Create Plan link. Remember that creating a plan requires a plan name and a Price ID from Stripe.
- Select plan: Choose the plan that will grant access to specific pages (e.g., Basic).
- Select pages: Pick the WordPress pages that subscribers with the chosen plan will be authorized to view.
- Rule name: Give your rule a descriptive name for easy identification.
- Create rule: Click the button to save and activate your Page Rule.
- Rule listing: Once created, your Page Rule appears in the rules list. It is automatically associated with the features of the selected plan.
- Integration: This rule also applies dynamically on plan cards and inside subscriber dashboards, ensuring consistency across the plugin.
With Page Rules, you can control access to your site’s content and ensure that only subscribers with the right plan can view the pages you define.
Next step: Learn how to configure Tag Rules to control access to WooCommerce products or content by tags.
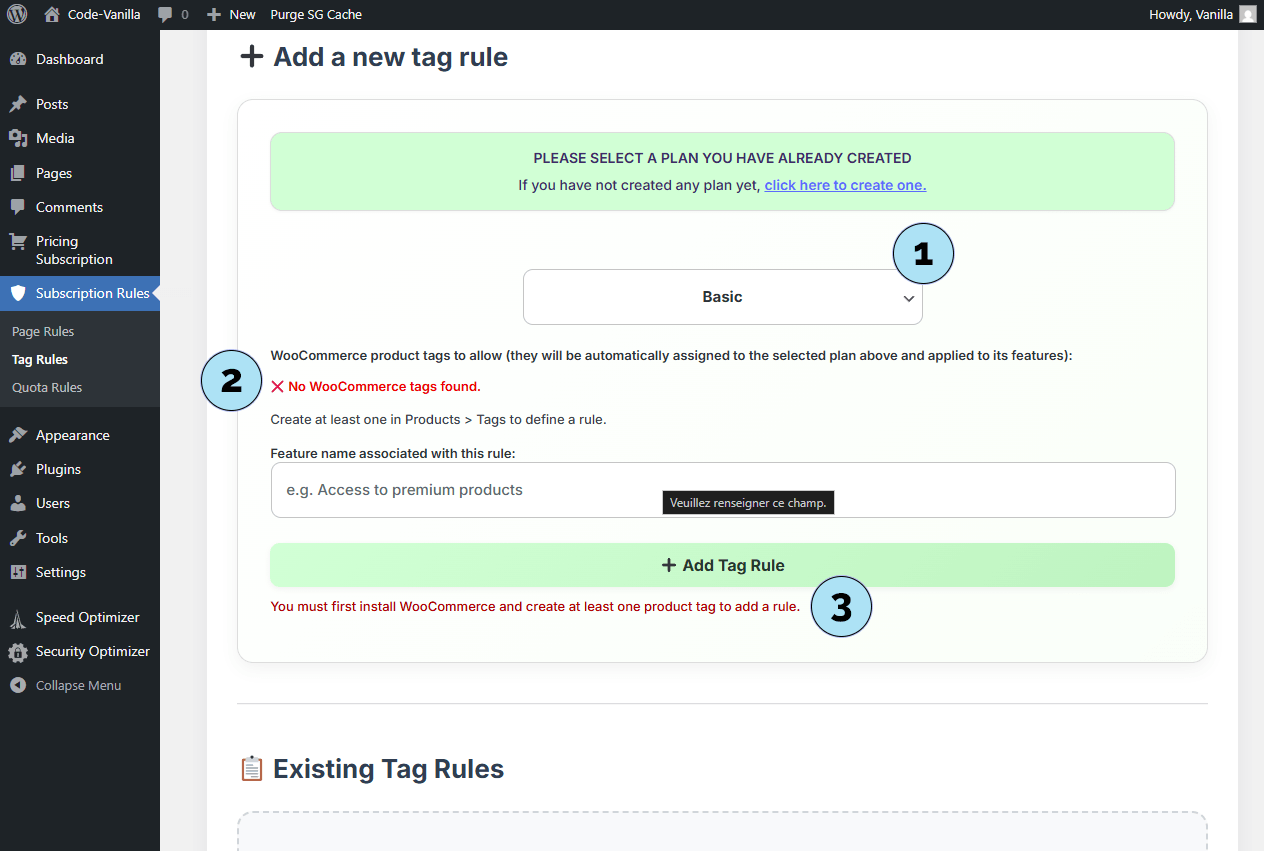
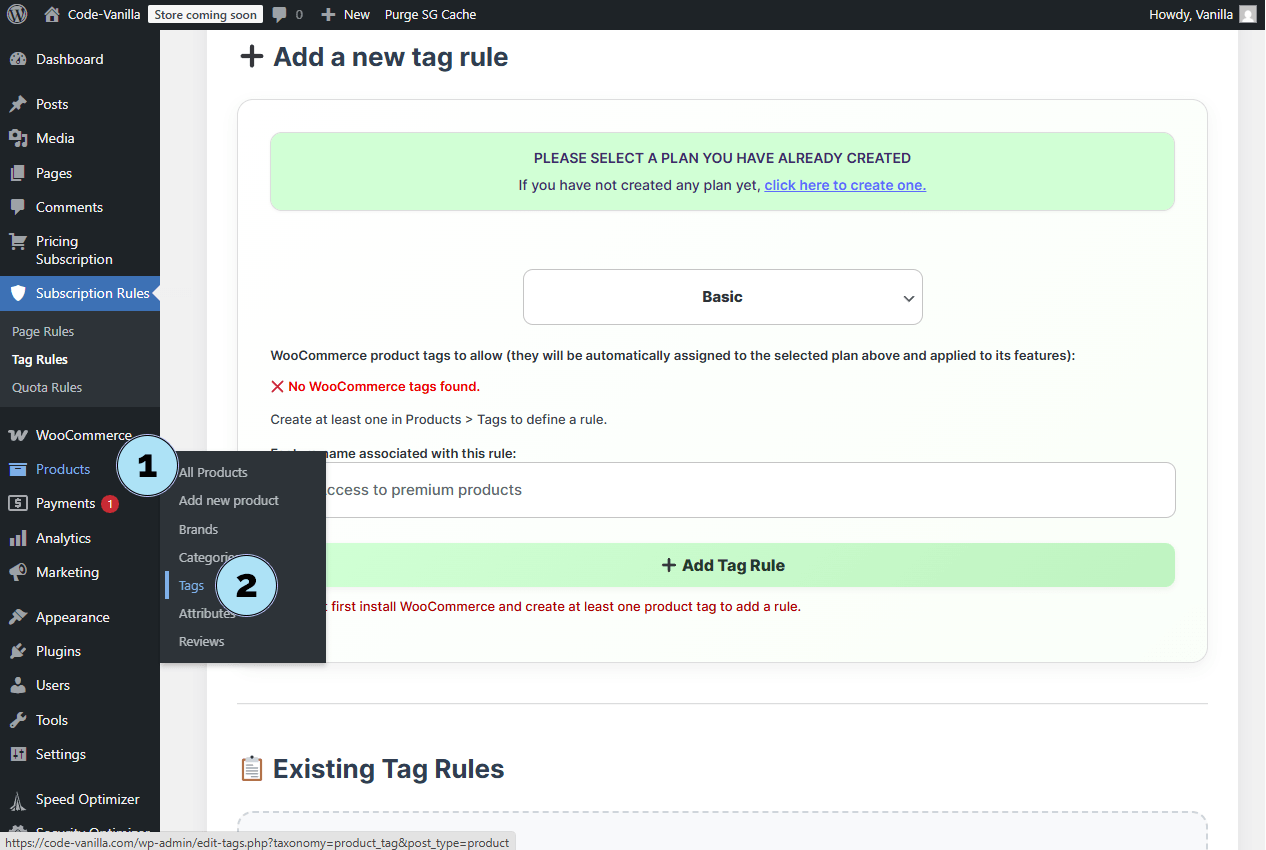
Subscription Rules – Tag Rules
The Tag Rules let you restrict access to WooCommerce products or content based on product tags. These rules require WooCommerce to be installed and active.
- Select plan: Choose the subscription plan you want to link with tag-based restrictions.
- No tags found: If WooCommerce is not installed, you will see the message No WooCommerce tags found. This is perfectly normal at this stage.
- Install WooCommerce: A notice informs you that WooCommerce must be installed and active to use Tag Rules.
Tag Rules are a powerful way to protect specific WooCommerce products or content using tags, but they depend on WooCommerce being set up first.
Next step: Install and activate WooCommerce to enable the creation of Tag Rules.
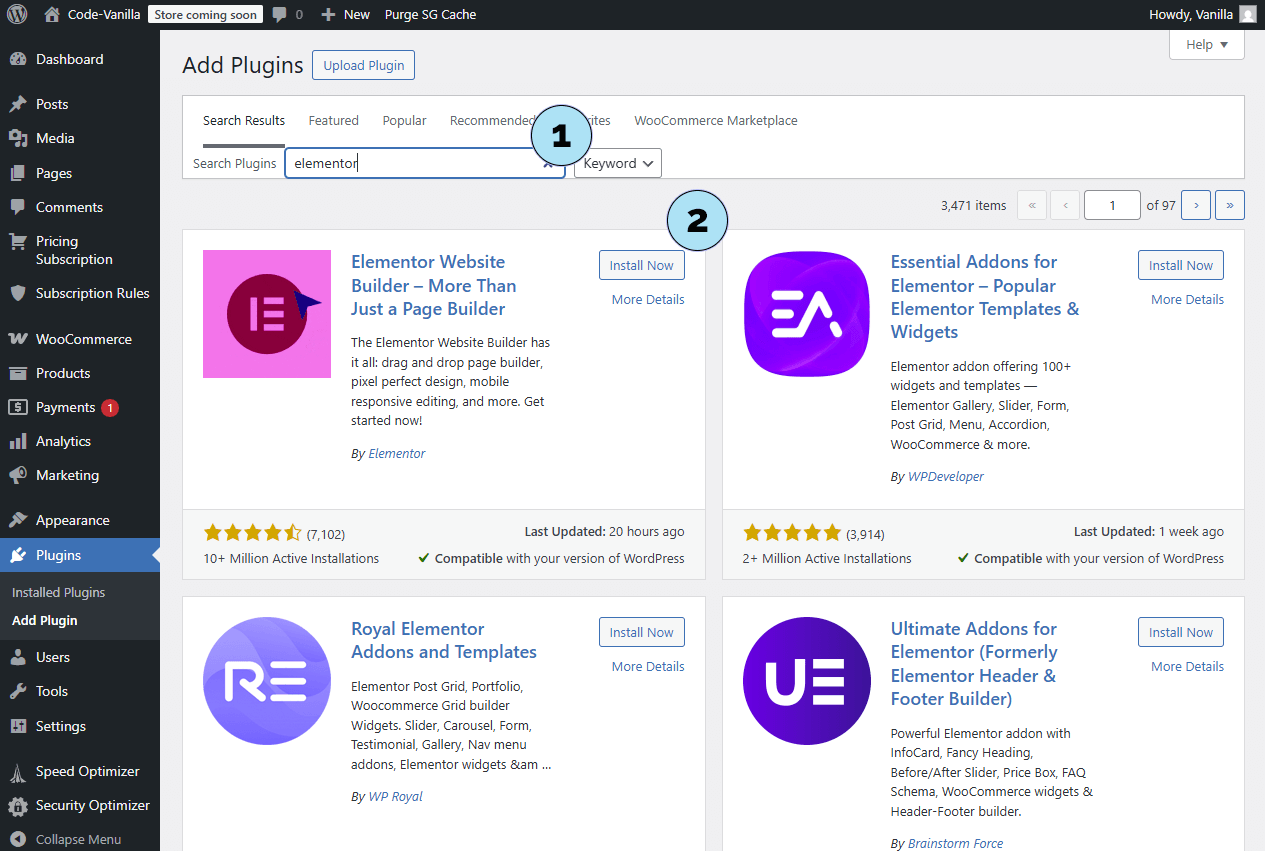
Install WooCommerce
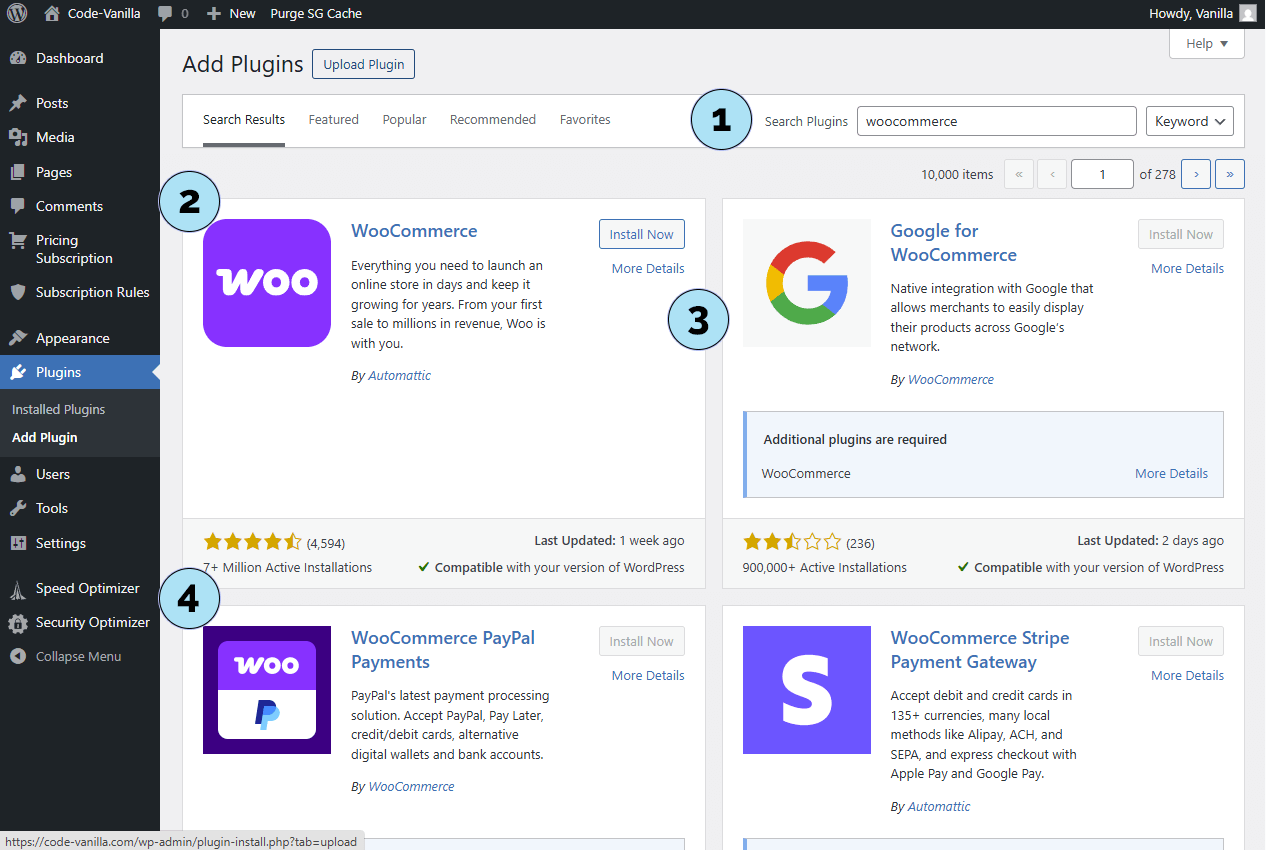
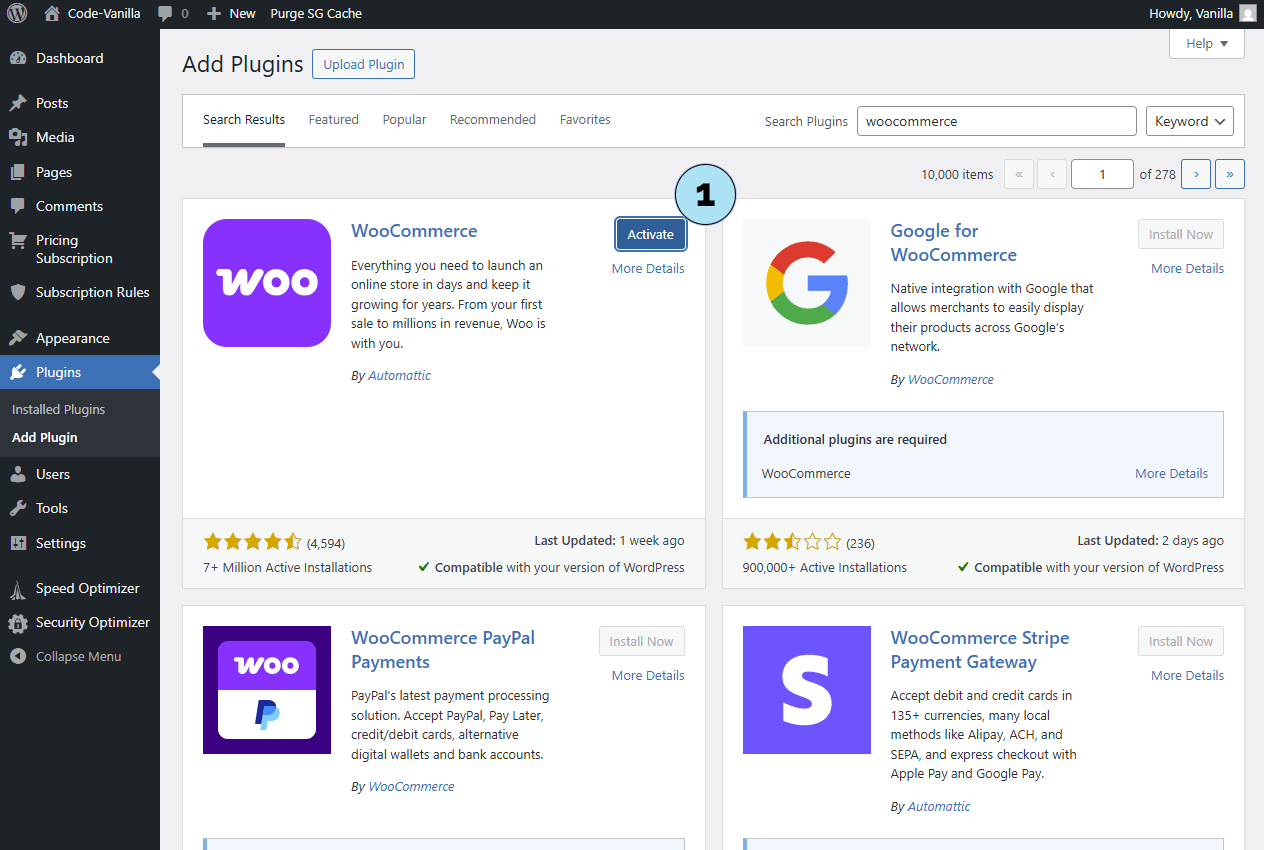
To use Tag Rules, you must first install WooCommerce. Here’s how to do it step by step.
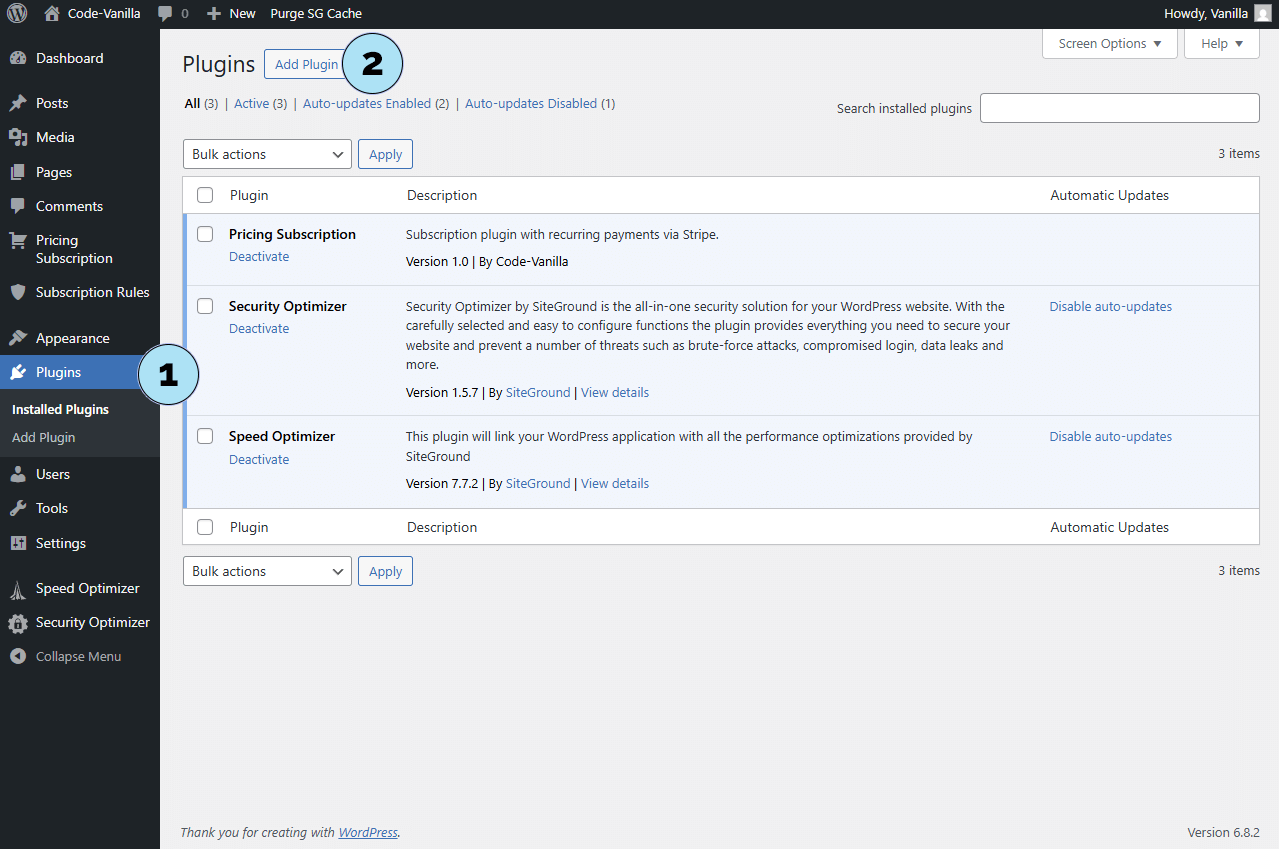
Part 1 — Access plugin installation- Go to Plugins: In your WordPress dashboard, click Plugins in the left sidebar.
- Add new plugin: Click Add Plugin at the top of the page.
- Search bar: Type woocommerce in the search field.
- Search results: WordPress will display matching plugins. Look for the official WooCommerce plugin.
- Install Now button: Click the Install Now button to begin installation.
- Verify plugin: With more than 7 million installations, you can be sure it’s the official WooCommerce plugin.
Once installed, the plugin will be ready to activate in the next step.
Next step: Activate WooCommerce to start using Tag Rules with your subscription plans.
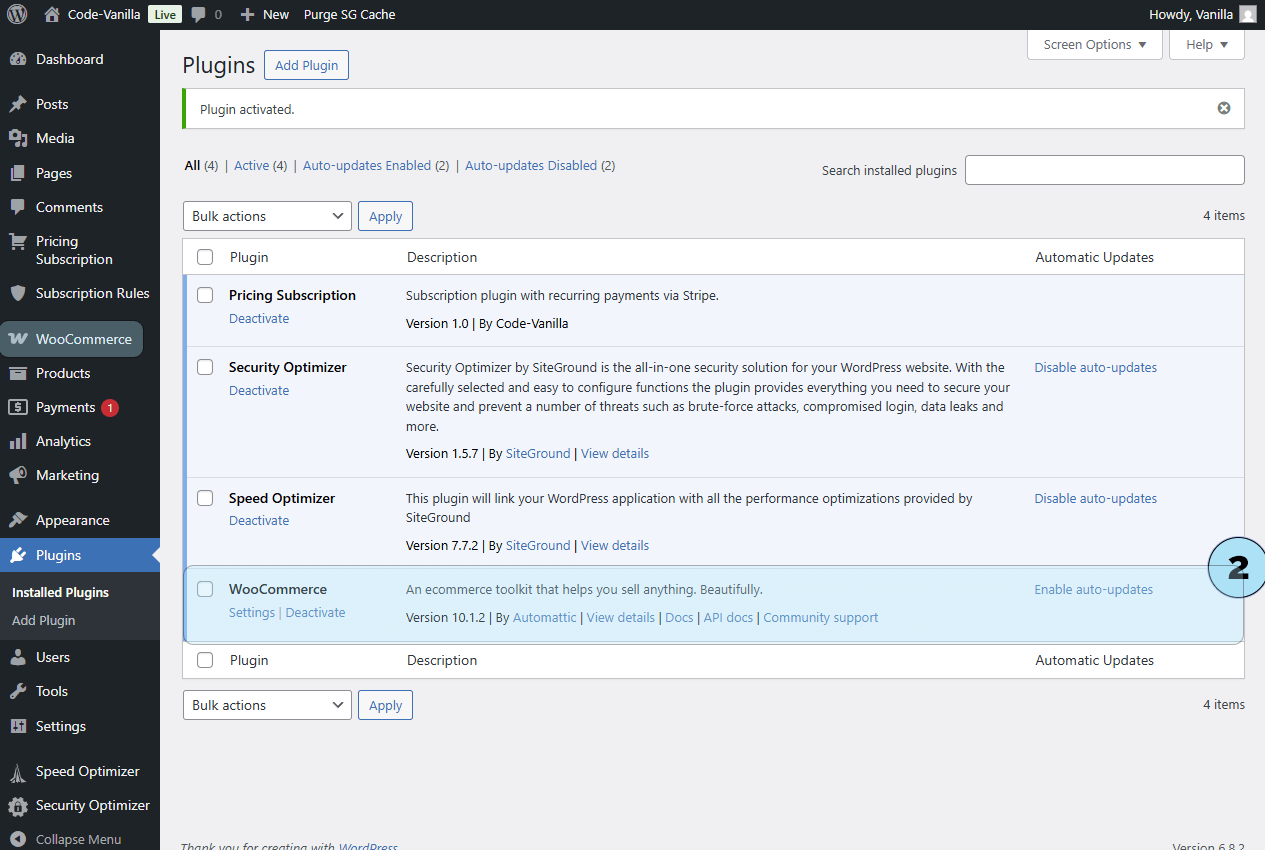
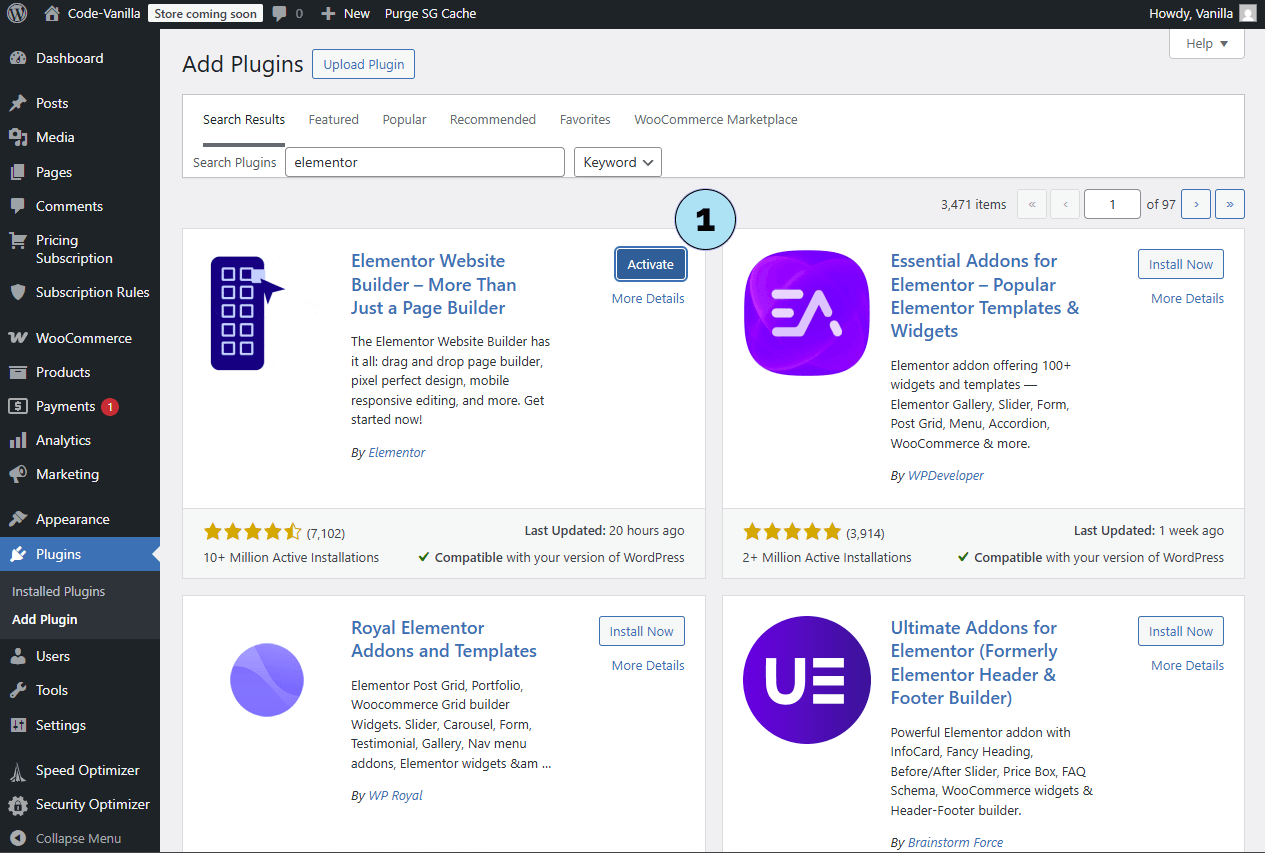
Activate WooCommerce
Once WooCommerce is installed, you need to activate it in order to start using tags and link them with your subscription rules.
- Activate button: Click the Activate button to enable the plugin.
- Confirmation: You will now see that WooCommerce is successfully installed and active in your WordPress dashboard.
WooCommerce is now ready to use, and you can create product tags that will later be connected to your subscription plans via Tag Rules.
Next step: Create tags in WooCommerce to prepare for Tag Rules.
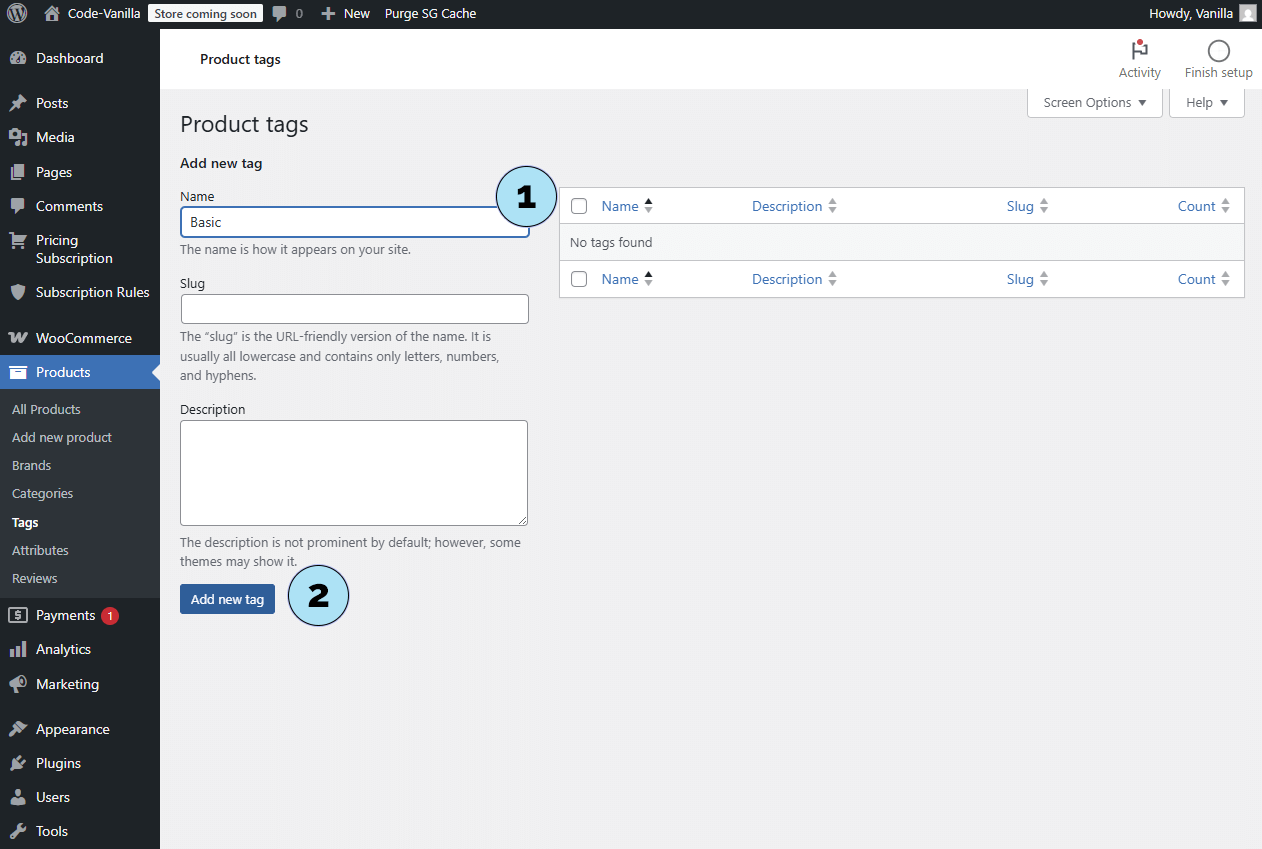
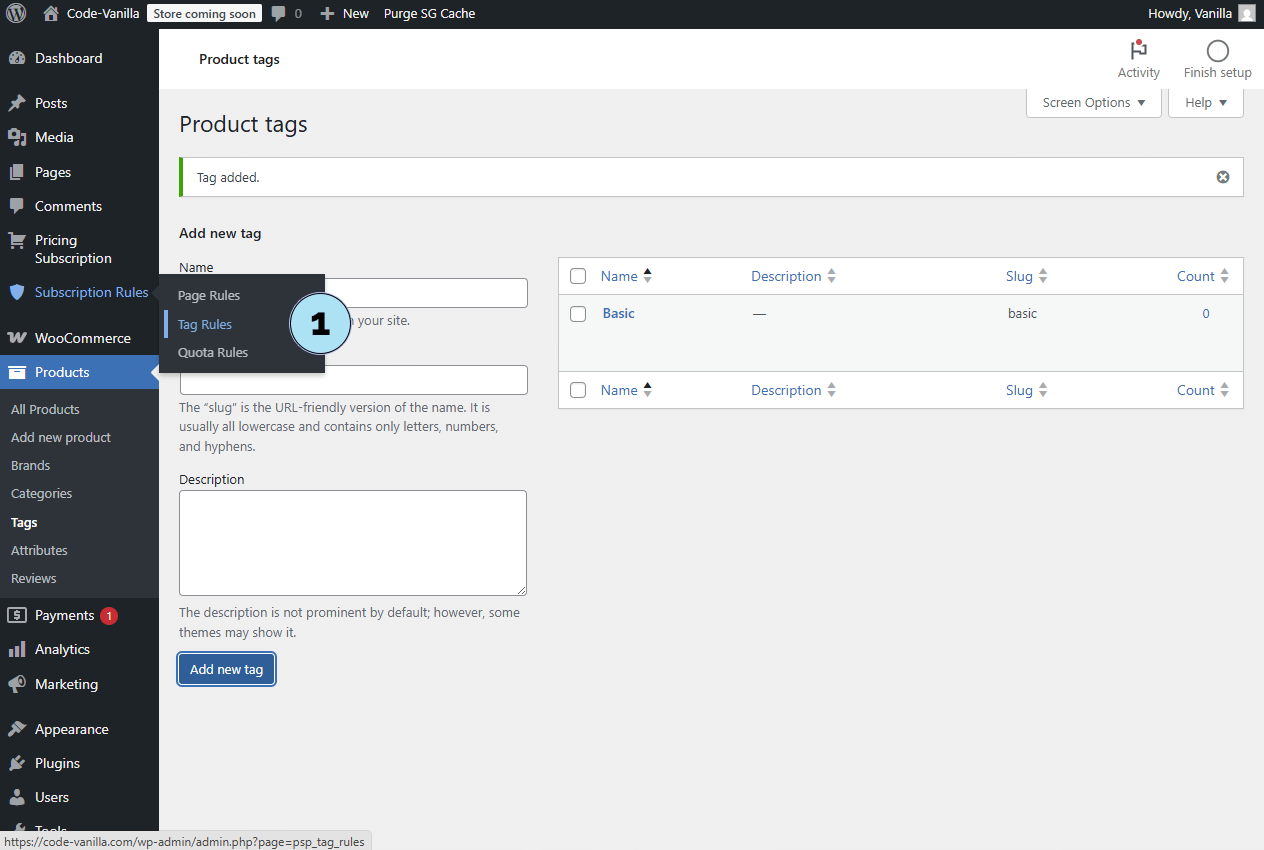
WooCommerce – Create a Product Tag
To use Tag Rules with your subscription plans, you first need to create tags in WooCommerce. These tags will later be linked to your plans in the plugin.
Part 1 – Access WooCommerce tags- Go to Products: In the WordPress sidebar menu, click Products.
- Select Tags: Click the Tags submenu to open the tag management page.
- Tag name: Enter the name of the tag you want to create (e.g., Basic, to match your Basic plan).
- Add new tag: Click Add new tag to save it in WooCommerce.
The tag is now available and can be associated with products. You will also be able to use it when creating a Tag Rule in the plugin.
Next step: Create a Tag Rule in the plugin to connect this WooCommerce tag to your subscription plan.
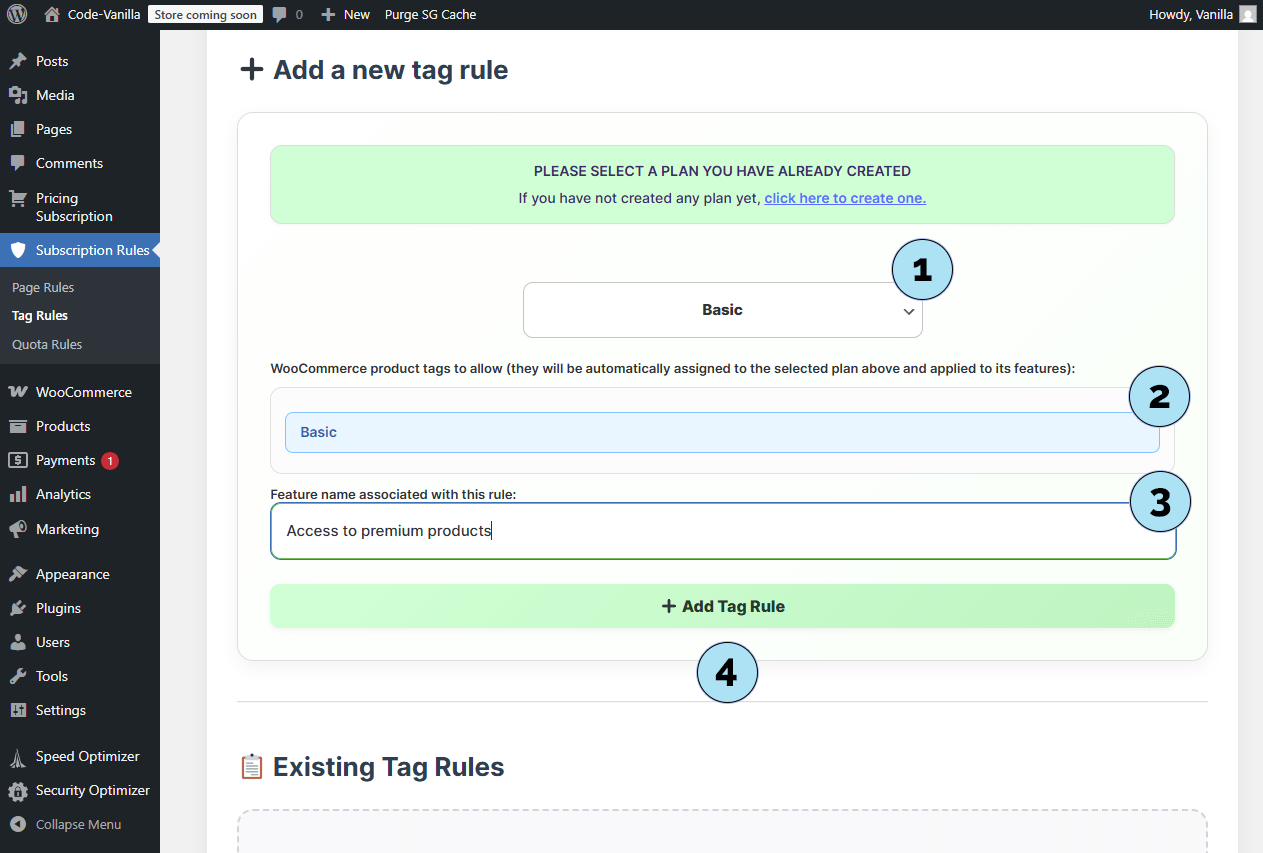
Subscription Rules – Create a Tag Rule
Now that WooCommerce is installed and a product tag is created, you can set up a Tag Rule in the plugin. Tag Rules let you grant access to WooCommerce products based on subscription plans.
Part 1 – Access Tag Rules- Open Tag Rules: In your WordPress dashboard, go to Pricing Subscription → Tag Rules to open the rules page.
- Select plan: Choose the subscription plan from the dropdown list (e.g., Basic).
- Select tags: Pick one or more WooCommerce tags from the list. Tip: You can create as many tags as you need in WooCommerce, and they will appear here.
- Feature name: Give your rule a clear name (e.g., Access to premium products).
- Create rule: Click the button to save and activate the new Tag Rule.
Your Tag Rule is now set up and linked to both your plan and the chosen WooCommerce tag.
Next step: Verify that the rule has been successfully created and is displayed in the list of Tag Rules.
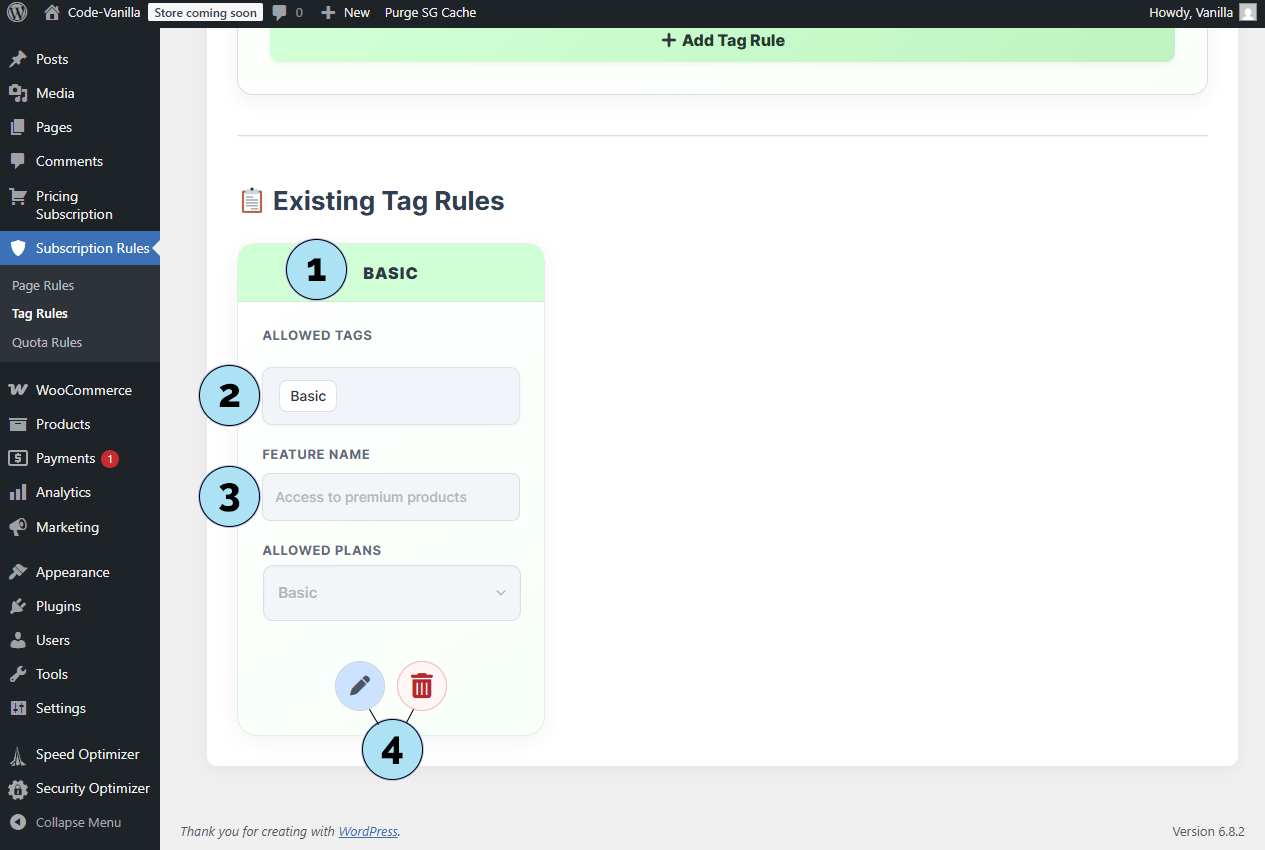
Subscription Rules – Verify a Tag Rule
After creating a Tag Rule with the Add Tag Rule button, you can verify it directly in the rules list at the bottom of the page.
- Plan association: The card shows the subscription plan you selected when creating the rule.
- Allowed Tags: Lists the WooCommerce tags that are authorized for this plan. Only subscribers of this plan will have access to products carrying these tags. Example: If you have 100 WooCommerce products and 50 of them are tagged, only subscribers of the linked plan can view those 50. The remaining 50 products without tags remain accessible to everyone.
- Feature name: Displays the name you defined for this rule (e.g., Access to premium products).
- Action buttons: Use the Edit button to update the rule, or the Delete button to remove it instantly and dynamically.
With this, your Tag Rule is now active and linked to both your subscription plan and WooCommerce tags.
Next step: Create a Quota Rule to limit usage by number or frequency.
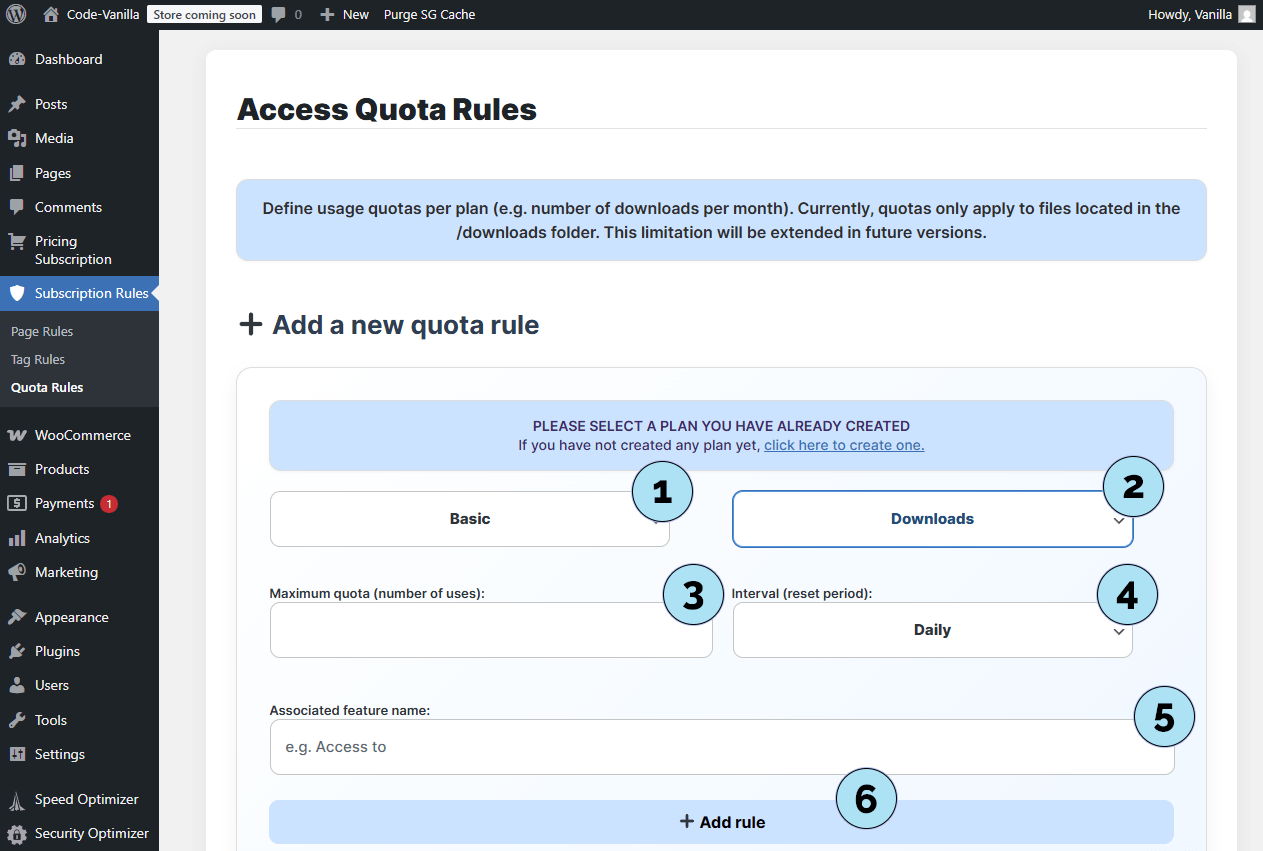
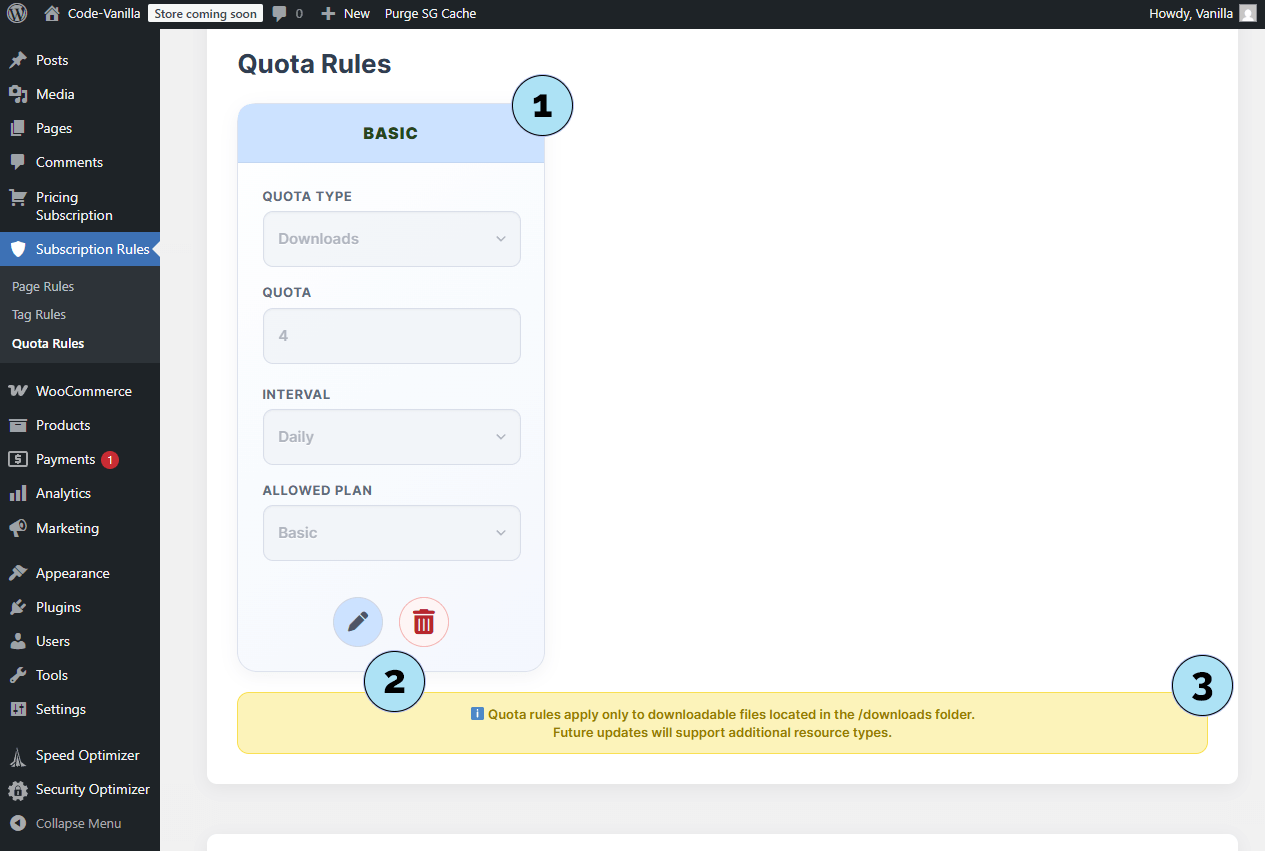
Subscription Rules – Create a Quota Rule
A Quota Rule sets a limit on how many times a subscriber can perform a specific action (e.g., downloads) within a given period (Day, Week, Month). This helps you control access and usage fairly across your subscription plans.
Part 1 – Create a Quota Rule- Select plan: Choose the plan to which this quota will apply from the dropdown menu.
- Quota type: Select the type of quota (e.g., Downloads).
- Maximum quota: Enter the maximum number allowed (numeric value).
- Interval: Set the reset period for the quota (Day, Week, or Month).
- Feature name (Optional): Give the rule a descriptive name, which will also appear in the plan’s features list.
- Create rule: Click the button to save and add the quota rule.
- Rule card: Once created, the quota rule appears in a card format showing all its details.
- Action buttons: Use the Edit button to update the rule or the Delete button to remove it instantly.
- Notice: Quota Rules only apply to files located in the plugin’s
/downloadsfolder.
Quota Rules are especially useful for digital products, ensuring subscribers have controlled access based on your business model.
Next step: Don’t worry — we have created a Download Button for quota-protected files, which we will explore next.
Quota Rules – Upload a File
Before using a download quota, you need to upload the file that subscribers will access. The file will be stored in the plugin’s /downloads folder.
- Upload block: Open the upload panel dedicated to quota-protected files.
- Select a file: Choose a file from your computer (e.g., PDF, ZIP, image, audio). Make sure it complies with your site’s legal and size limits.
- Upload: Click the upload button to send the file. Once completed, the file is added to the
/downloadsdirectory and becomes available for your quota rules.
Tip: Use clear filenames (e.g., Create Your Own Video Game.mp4) so you can quickly identify files when generating download buttons.
Next step: Generate a Download Button linked to this file and controlled by your quota rules.
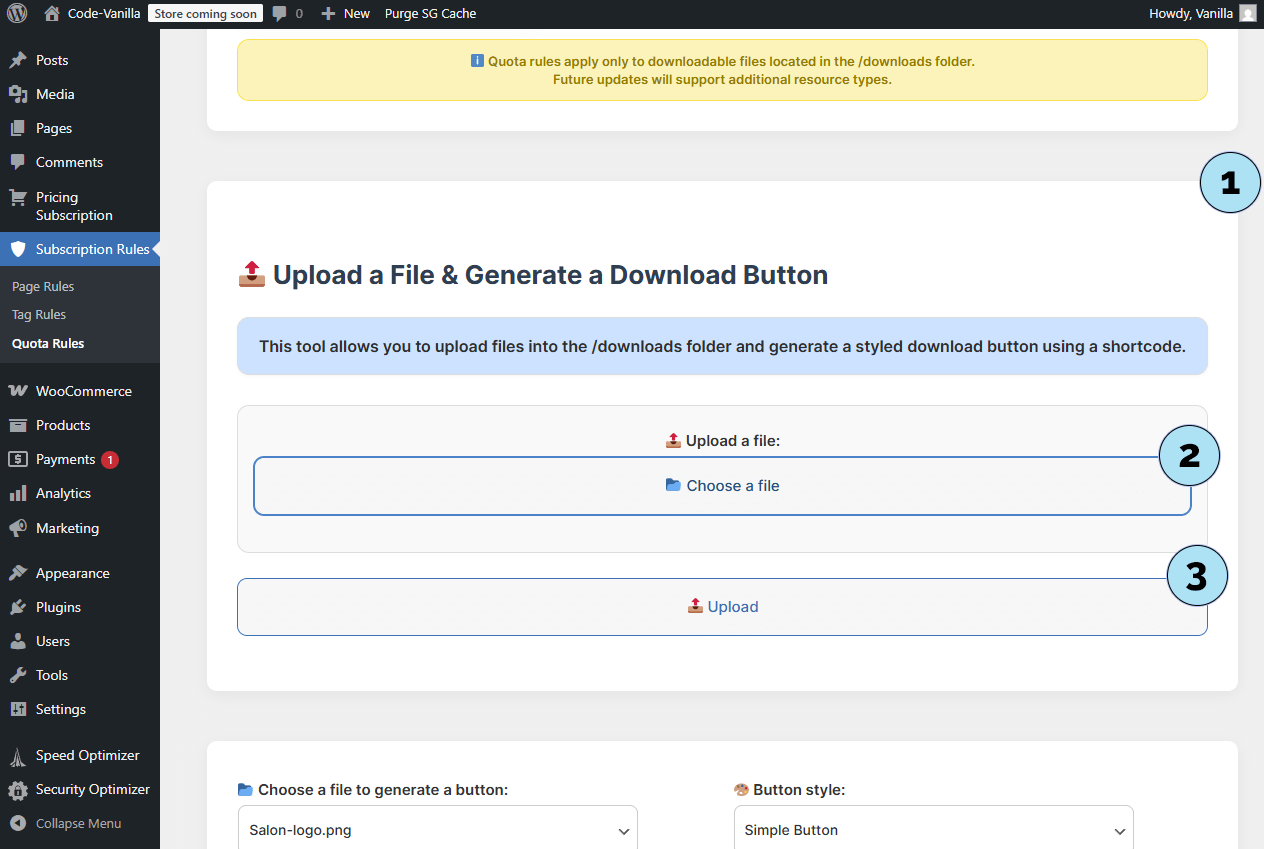
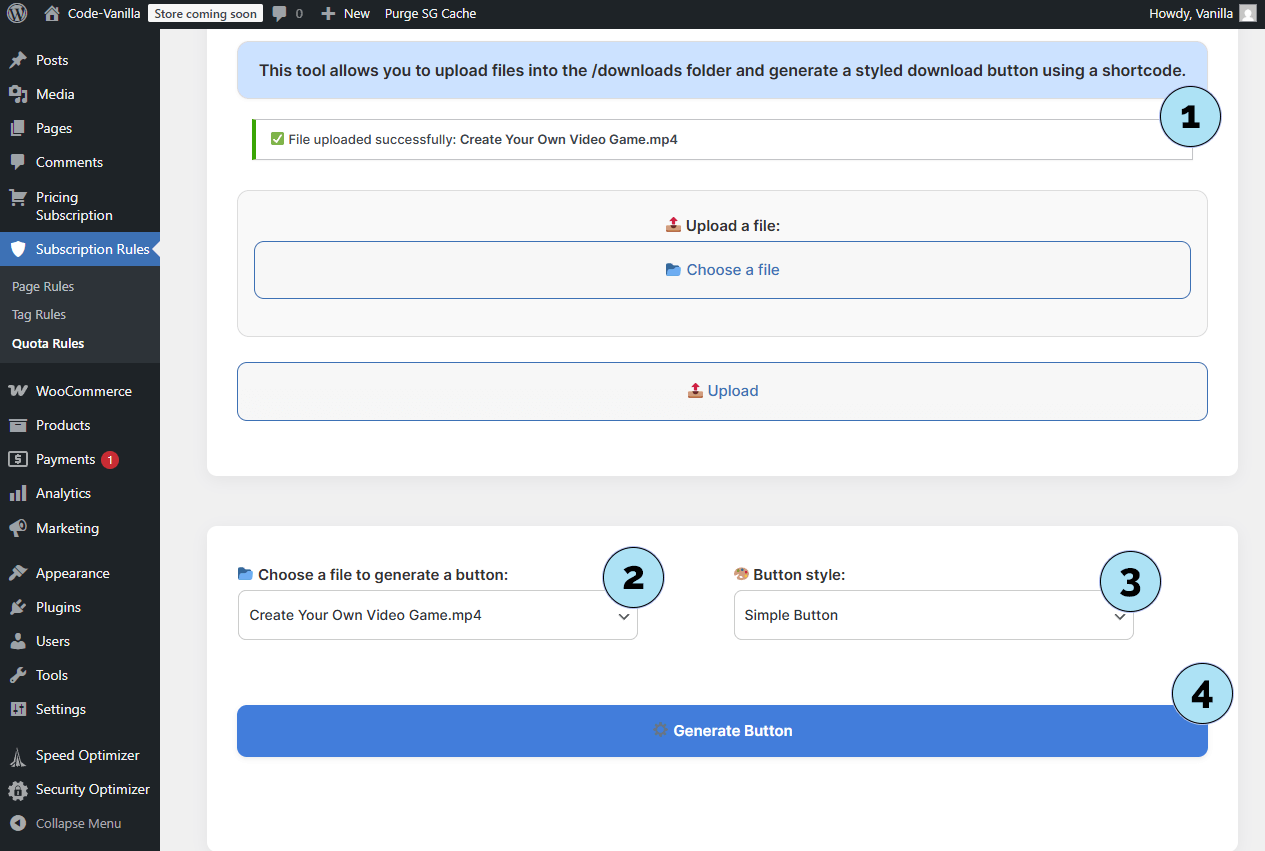
Quota Rules – Generate a Download Button
- Upload confirmation: A notice confirms your file was uploaded successfully and is now available in the plugin’s
/downloadsfolder. - Select file: Choose the file that subscribers will download via this button.
- Button style: Pick a design from 18 ready-made styles, all fun and original.
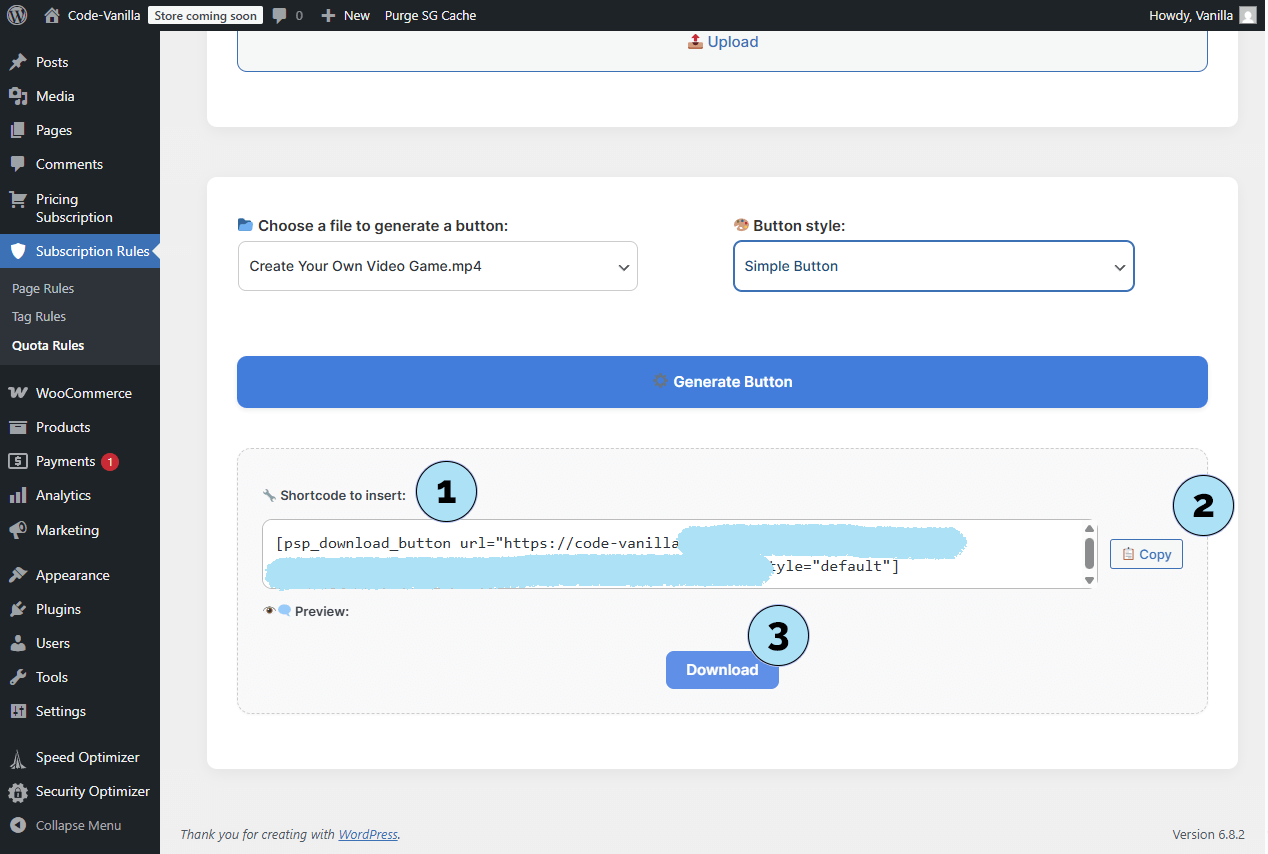
- Generate button: Click Generate button to create a download button linked to your file and controlled by your Quota Rule.
- Shortcode: The plugin outputs a shortcode you can place anywhere on your site.
- Copy action: Use the copy button to quickly paste the shortcode where you want it displayed.
- Live preview: See a preview of the generated button. Feel free to regenerate with different styles until you find your favorite.
Next step: Understand how Subscription Rules affect access on the user side (what subscribers can see/download based on their plan).
How Subscription Rules Work (User Side)
Subscription Rules define what subscribers can access based on the plan they purchased. Here’s how each rule type behaves on the front end.
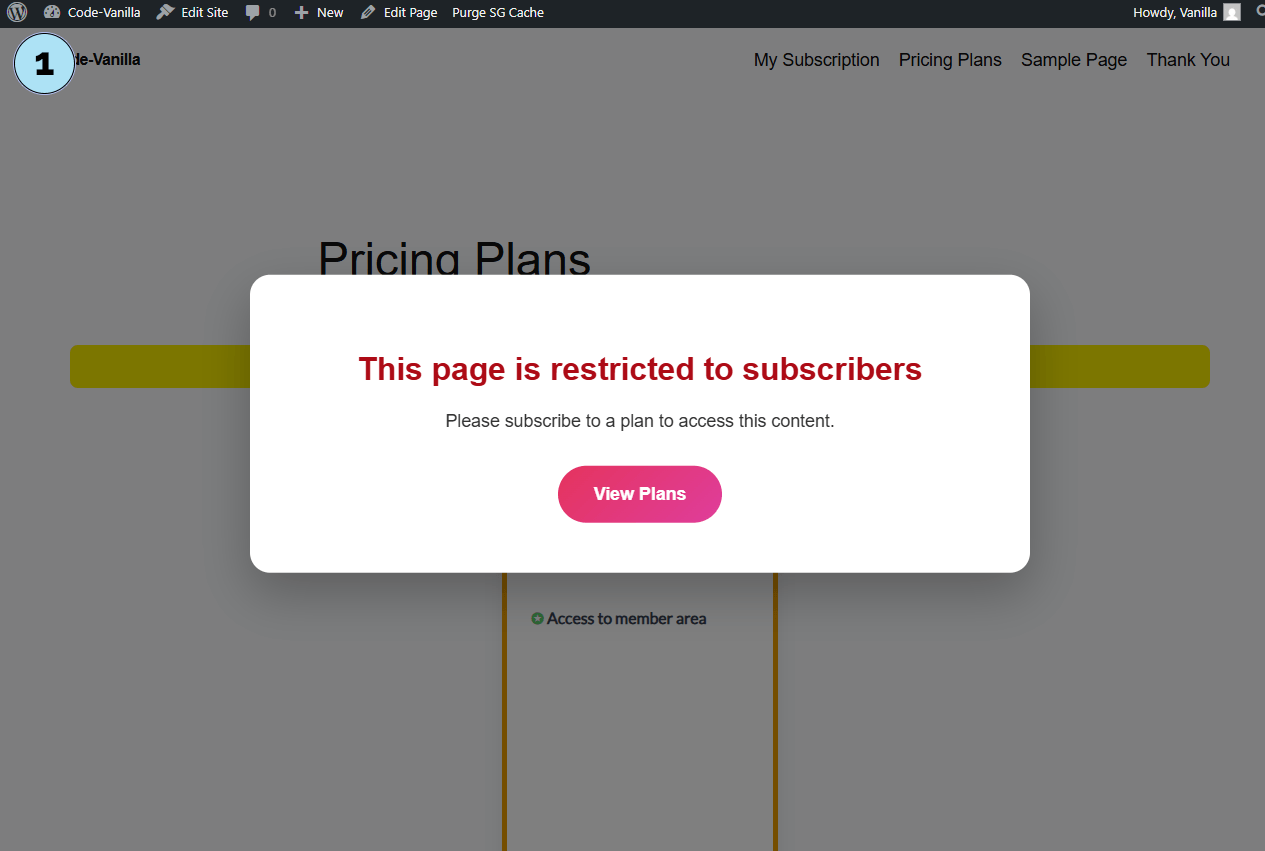
Part 1 — Page Rules- Authorized pages: If a user is subscribed to the required plan, they can access the pages selected in Page Rules.
- Access denied (modal): If the user is not subscribed, or does not have the right plan, access is denied and a modal prompts them to subscribe. The user can click the button in the modal to choose a plan.
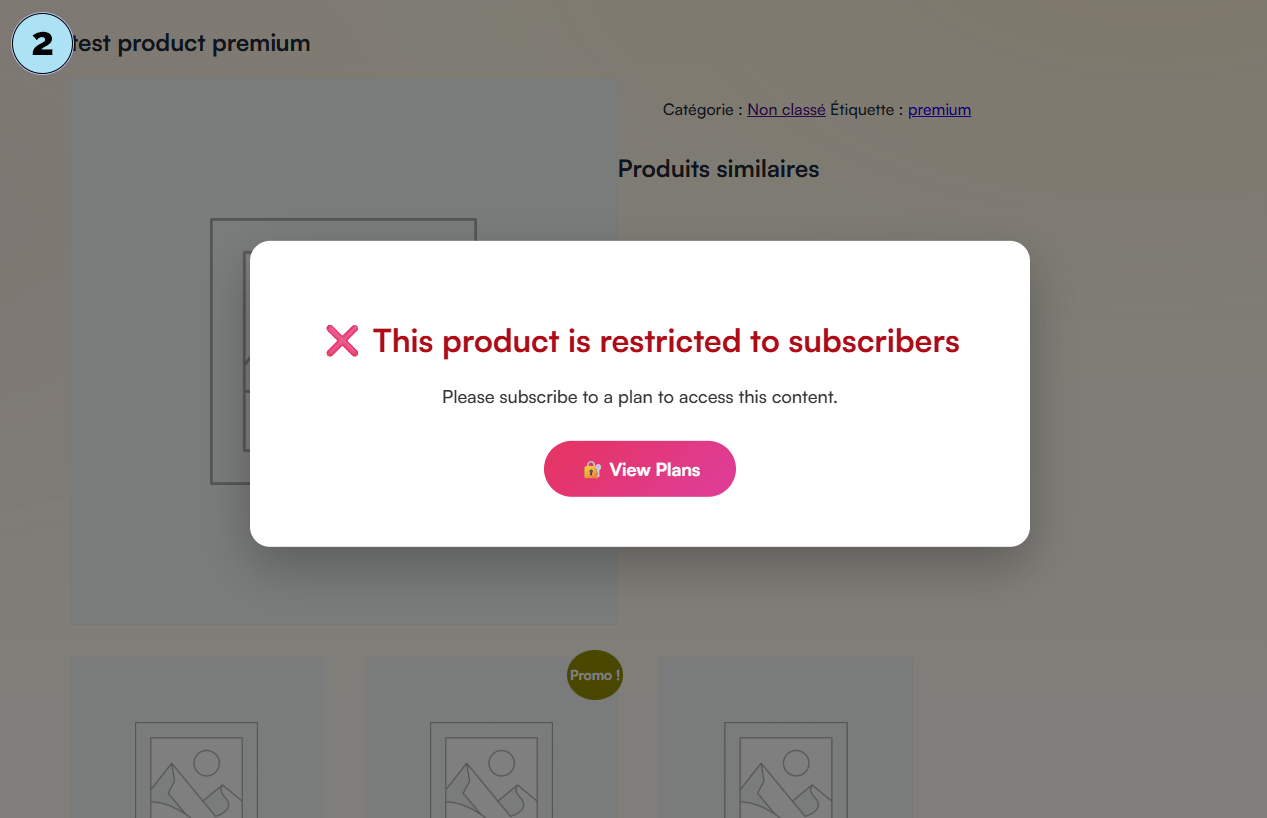
Tag Rules authorize access to products by WooCommerce tags, depending on the subscriber’s plan.
- Example: A Pro subscriber can access products tagged Pro. They cannot access products tagged Premium unless you grant it.
- Tiered strategy (recommended):
- Basic plan → tag Basic
- Pro plan → tags Basic + Pro
- Premium plan → tags Basic + Pro + Premium
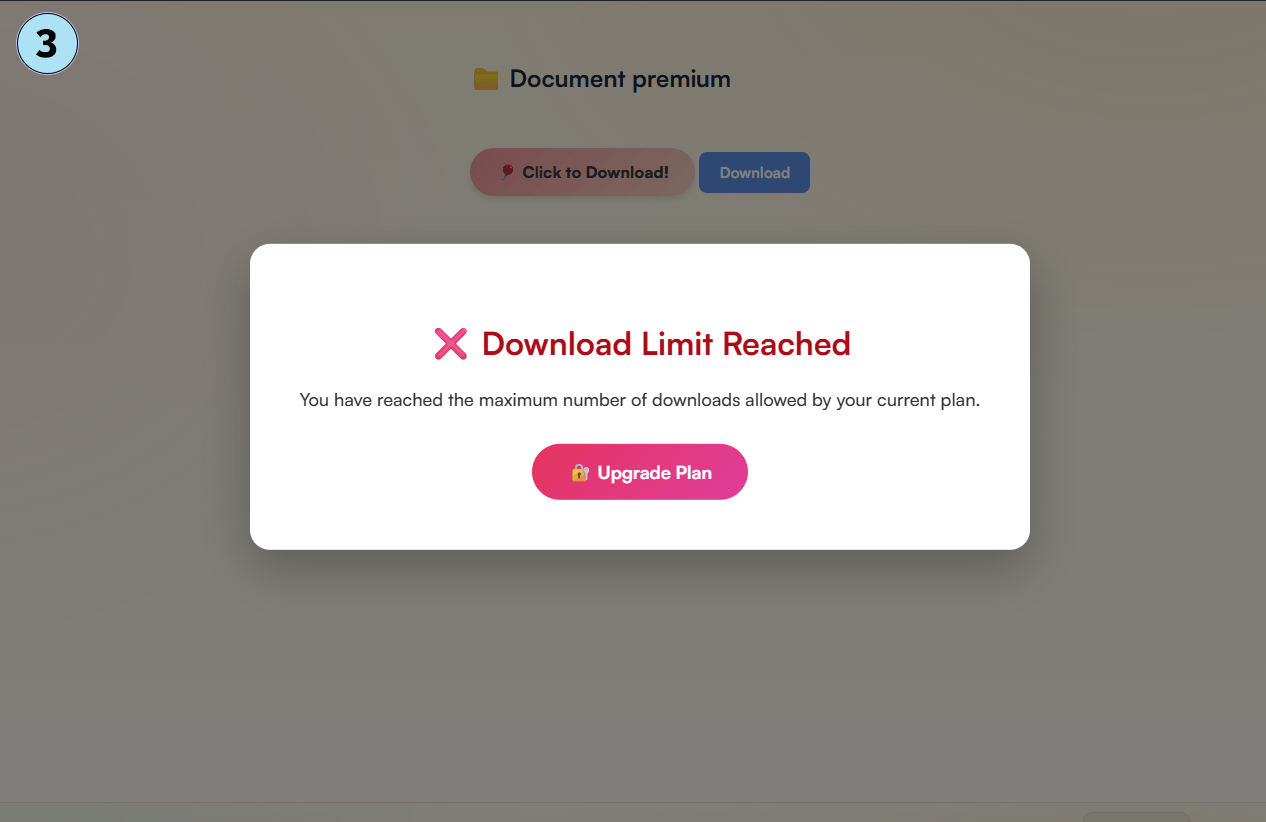
- Limited downloads: Set how many downloads a subscriber can make for a given plan within a period (Daily, Weekly, Monthly).
- Global across buttons: The quota counts across all generated download buttons. If a plan allows 2 downloads, the user can download any two files (or the same file twice) until the quota resets.
- When quota is reached: The user can no longer download until the next reset. You may encourage upgrading to a higher plan for a larger quota.
Combined together, these rules let you shape a clear access strategy: pages for members only, tagged products by plan, and download limits by period.
Next step: Discover Features — they play a key role in how plan benefits are displayed and communicated across your site.
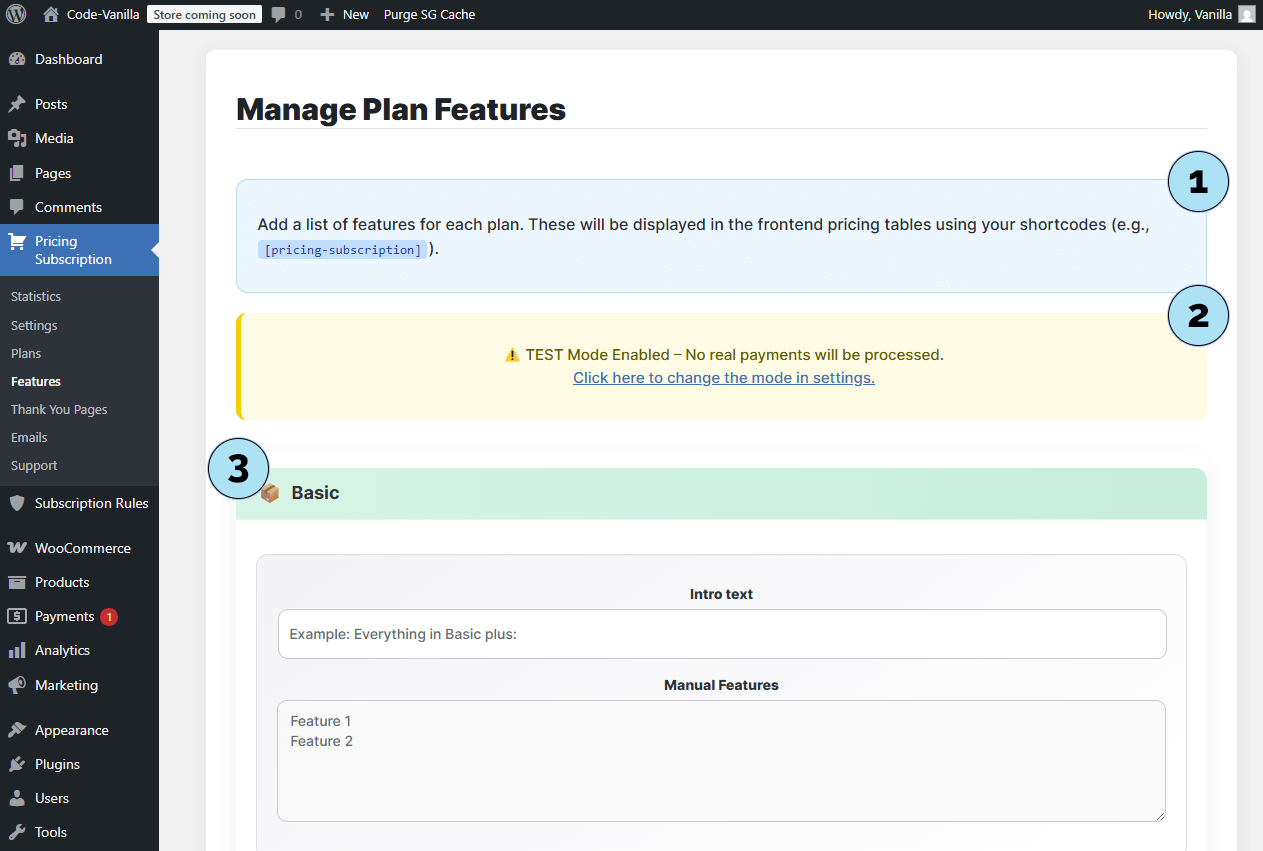
Manage Plan Features
The Features section is a central element of the Pricing Subscription plugin. Features can be created manually or generated automatically from the subscription rules you defined earlier (Page, Tag, or Quota Rules).
Part 1 — Features page overview- Access: Open Pricing Subscription → Features to reach the Manage Plan Features page.
- Notice: A message explains that features are displayed on your plans via the shortcode
[pricing-subscription], which is automatically inserted on the/pricing-planspage when the plugin is installed. - Selected mode: Shows whether you are in Test or Live mode. A link in the notice lets you switch between the two.
- Plan list: All plans for the current mode appear here. In this example, we see the Basic plan (Test mode).
- Intro text: Optionally add an introduction (e.g., Everything in Basic plus). Since this is the Basic plan, such text is not necessary.
- Manual features: Add features manually as plain text. These are not linked to rules and are fully customizable. Examples: Unlimited access to all content, 24/7 support, Priority email support, Monthly technical maintenance, Automatic updates included.
- Automatic features (from rules): Features from your Subscription Rules (Page, Tag, Quota) are automatically displayed and linked to the plan. Yes, they also appear on the front end in your plan cards — everything is designed to be automated.
Once you have entered your manual features, click Save Features to validate them. Your features will then be displayed dynamically on the front end, alongside rule-based features.
Next step: Let’s look at how plans and their features are displayed to users on the front end.

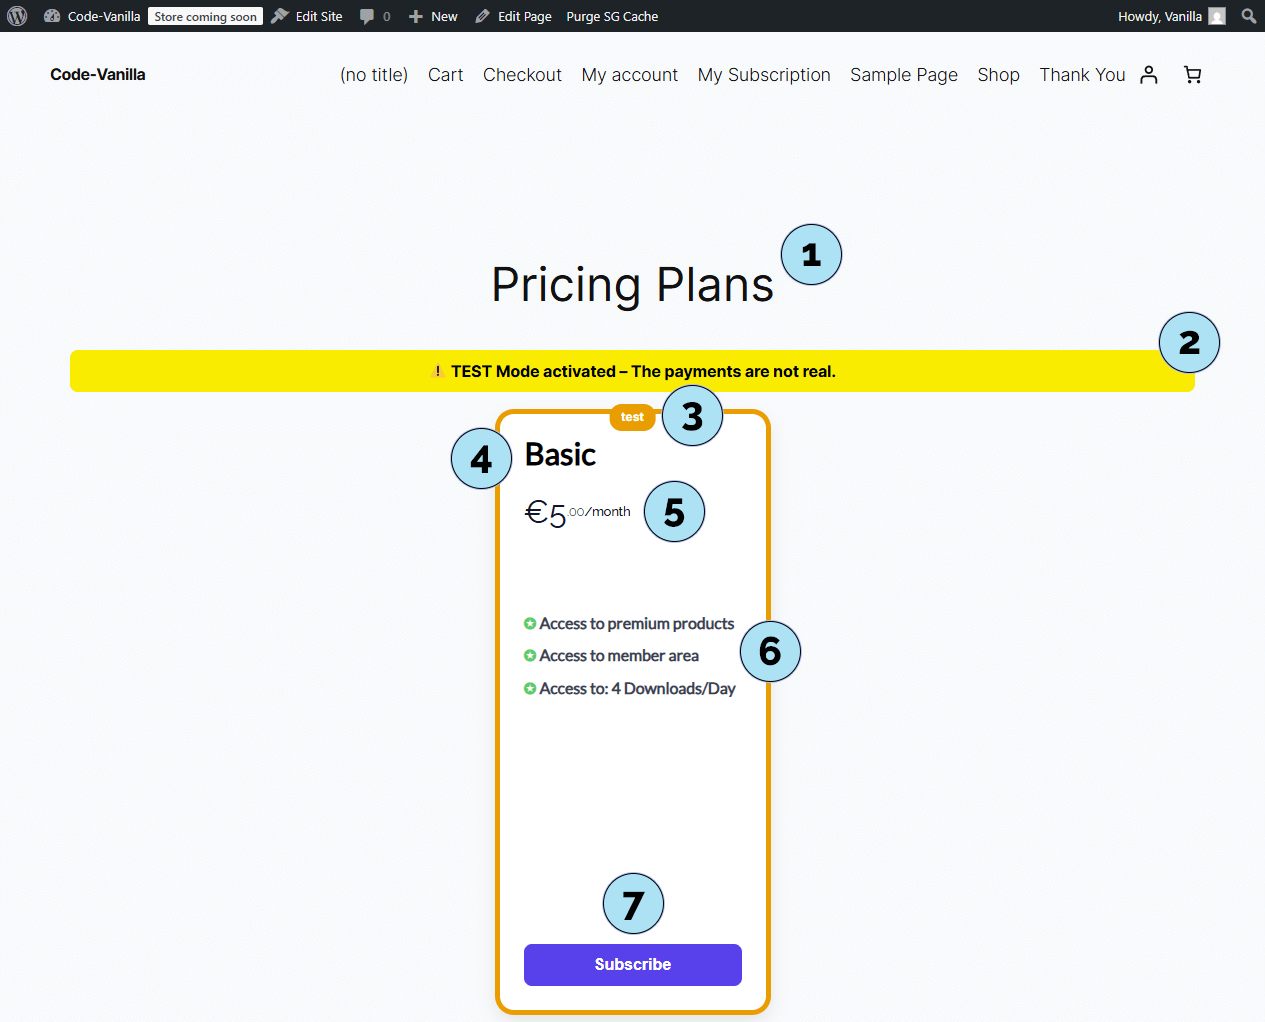
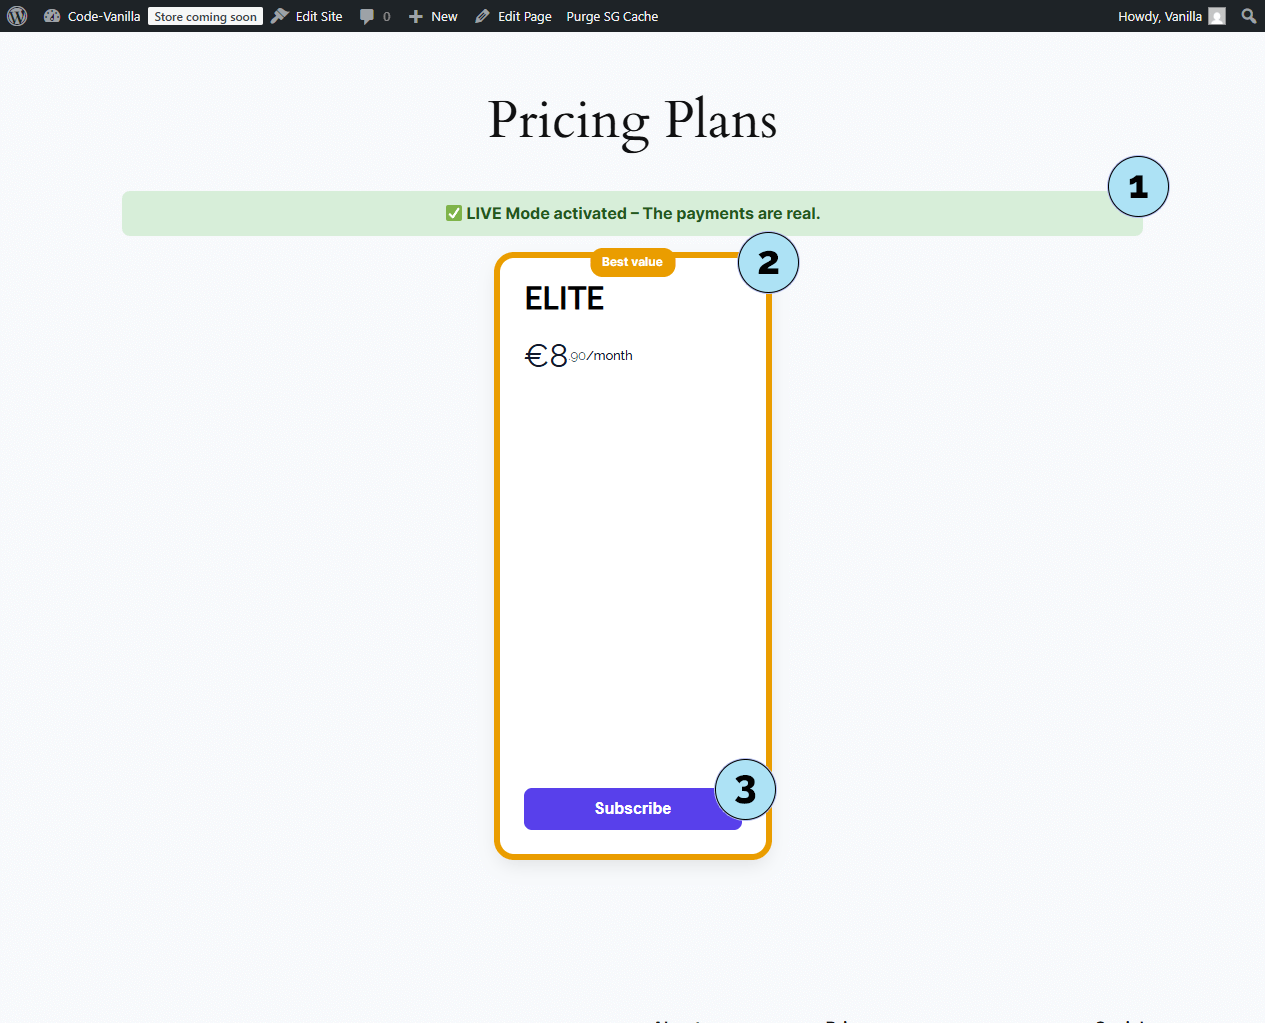
Frontend – Plan Display & Payment
We have now completed all the steps: creating a plan in Stripe, setting up a Basic plan in the plugin, and assigning features (manual or rule-based). Here’s how everything looks to your users on the front end.
Part 1 — Plan display on your site- Page title & content: The title of your pricing page and its content. You can customize this page freely with Elementor (Optional Payments), or a theme (Free or Paid, we’ll cover this later).
- Mode banner: A banner shows whether you are in Test or Live mode.
- Plan badge: Displays the optional badge you added earlier.
- Plan name: The plan name (e.g., Basic).
- Plan price: Pulled directly from Stripe (e.g., €5/month).
- Subscription rules: Any rules (Page, Tag, Quota) automatically appear as features of the plan.
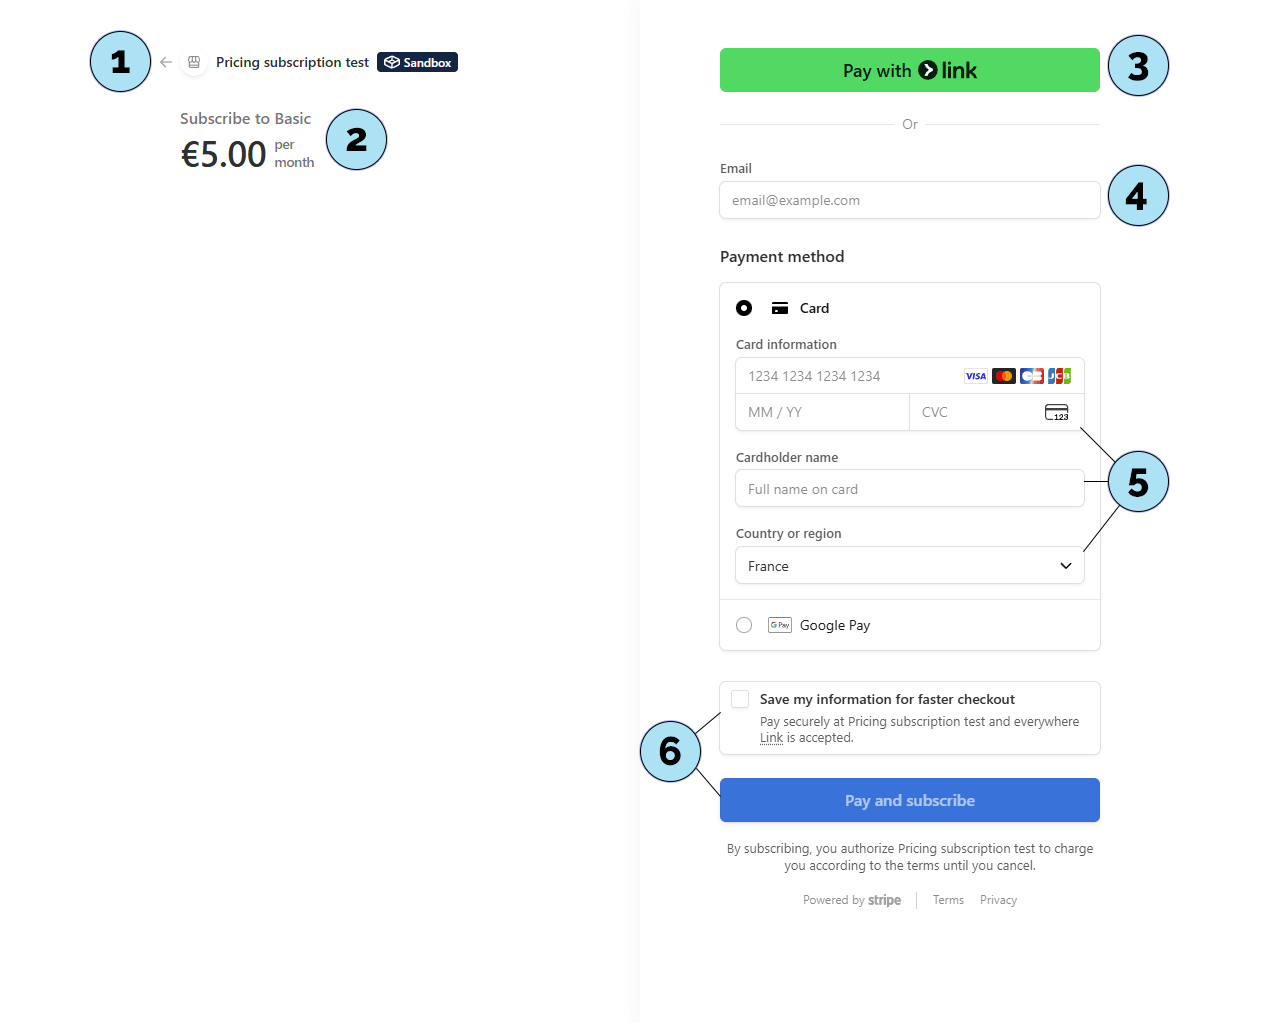
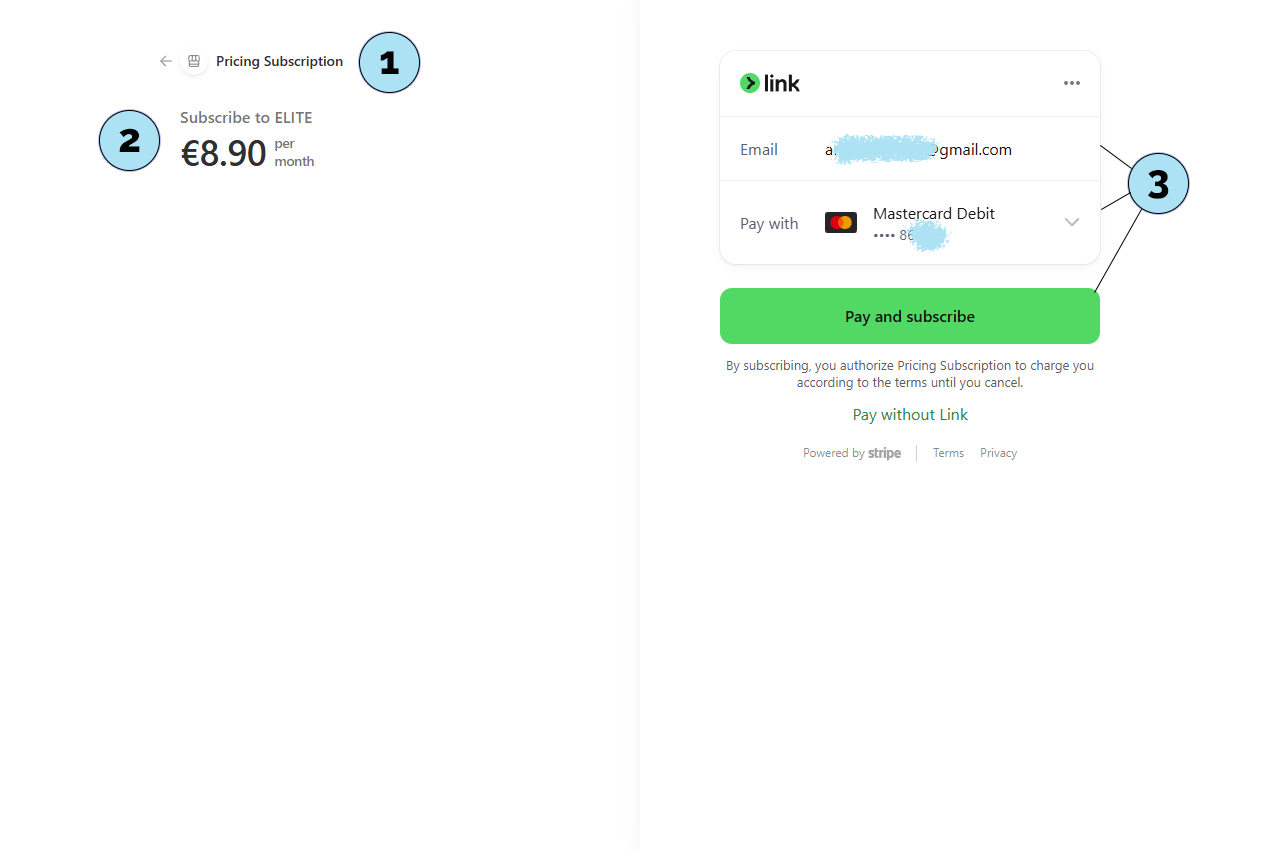
- Subscribe button: Redirects the user to Stripe’s secure checkout to complete the subscription.
- Sandbox account: Payments are simulated here in Test Mode; no real transactions occur.
- Plan details: Confirmation of the selected plan (e.g., Basic at €5/month).
- Payment methods: Options such as Link, credit card (with name and country), or Google Pay.
- Email field: Enter an email address (real or fictitious in test mode).
- Save payment info: Option to save details for faster checkout in the future.
- Pay & Subscribe: Finalize the subscription. Once payment is processed, the user is redirected to the Thank You Page template you selected in the plugin.
This flow ensures a smooth and secure checkout experience for your subscribers, while keeping everything connected to your WordPress site.
Next step: Configure the User Dashboard, where subscribers can manage their plans and account. Many elements here are automated and dynamic right after plugin activation.
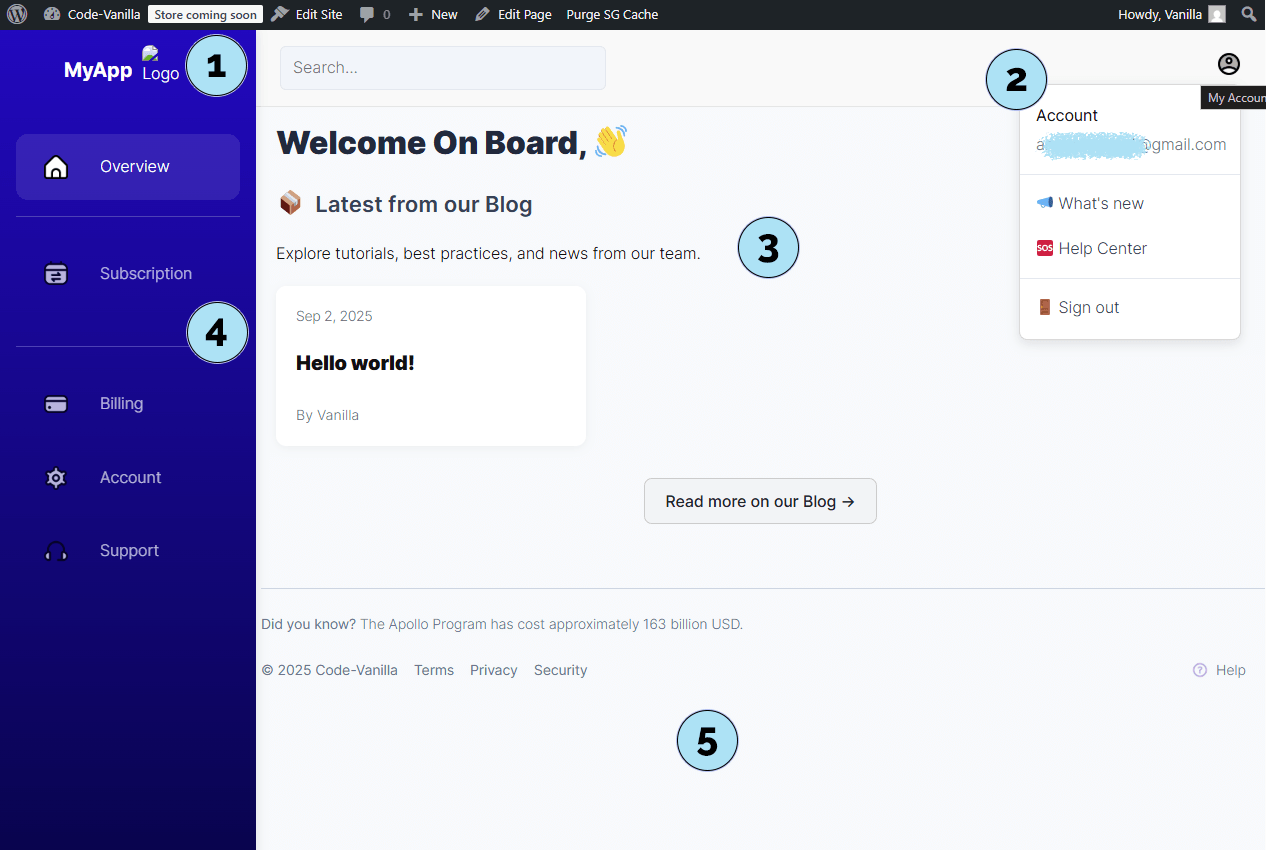
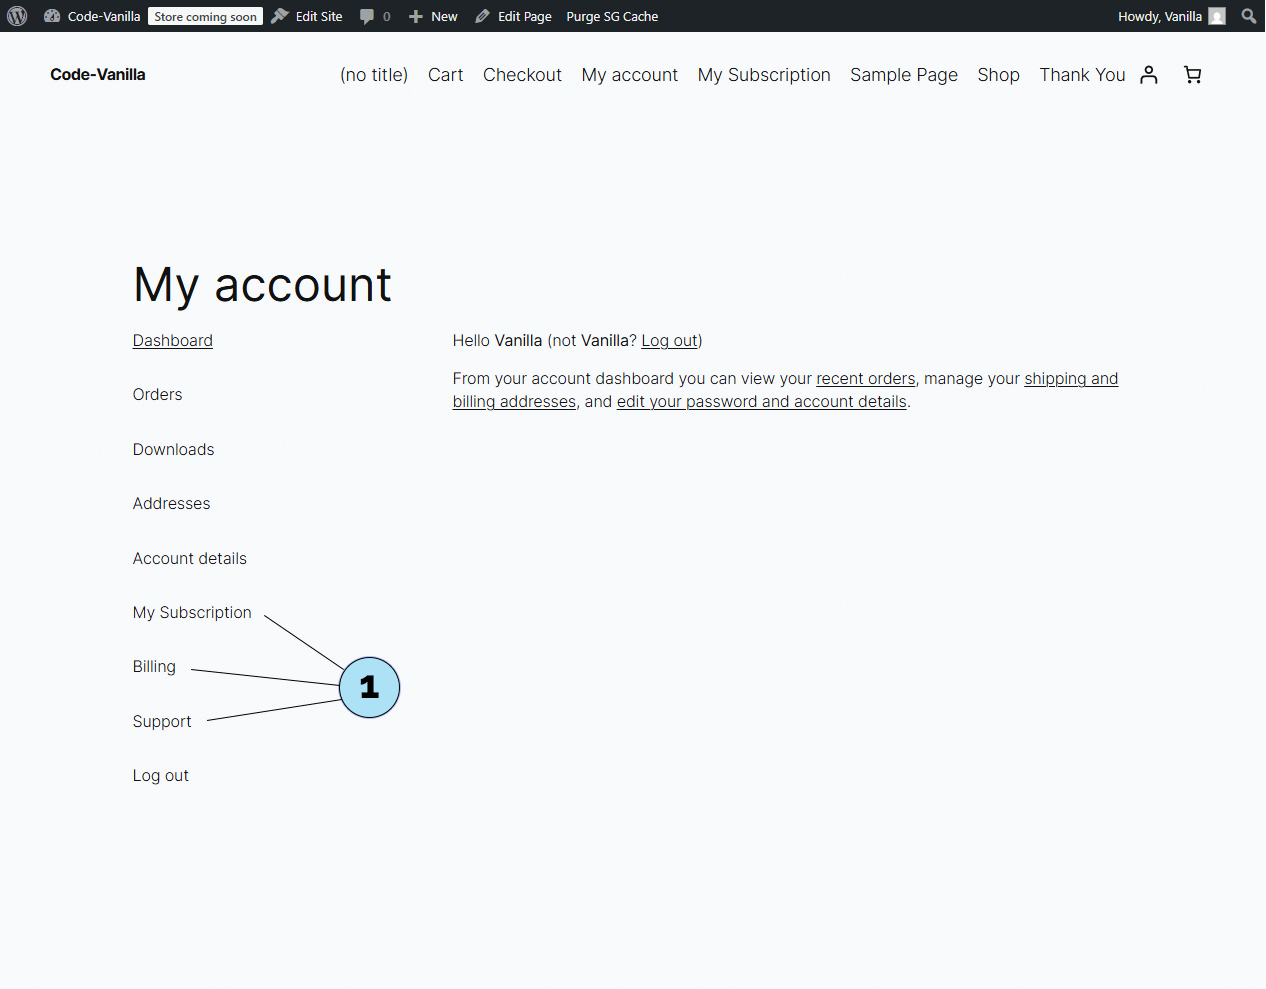
User Dashboard – Overview
The Subscription Dashboard is designed for your subscribers and becomes available once a user subscribes to your platform.
Part 1 — Old User Dashboard Overview- Platform title & logo: Both are displayed in the header and can be customized from WordPress → Pricing Subscription → Settings (scroll to Dashboard Logo Settings). Update your title/logo and save your settings.
- Account icon & menu: Clicking the account avatar opens a dropdown with quick links:
What’s new (redirects to
/blog), Help Center (dashboard support), and Sign Out. No configuration is required here. - Main panel: Shows a welcome message and the latest posts from your blog. The default WordPress sample post appears initially; new posts will automatically display here to keep users informed.
- Sidebar navigation: The left menu includes Overview (current view), Subscription, Billing, Account, and Support. We will explore each section next.
- Footer: Includes the Did you know? area and links managed under Pricing Subscription → Settings → Footer Subscription Dashboard Links Settings.
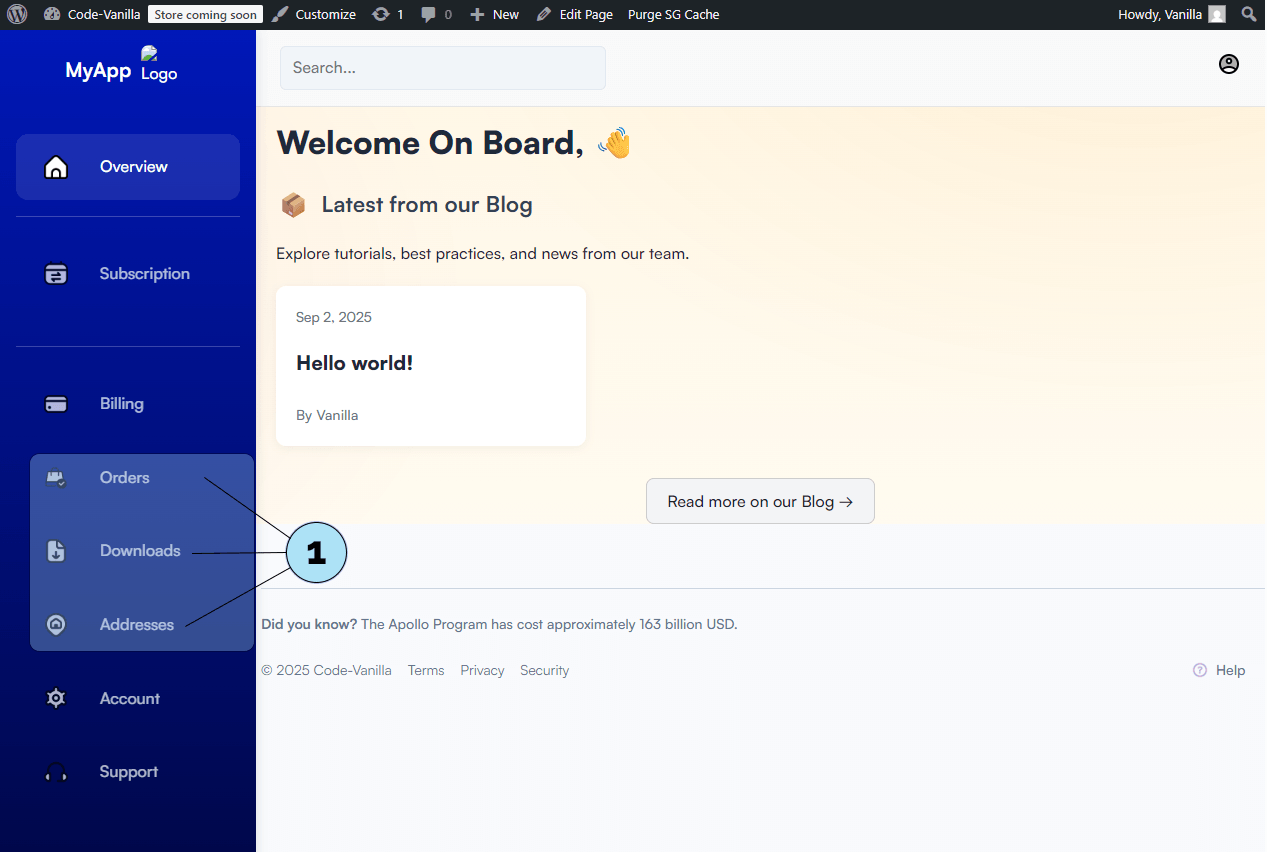
- Sidebar navigation: The left menu now includes Overview (current view), Subscription, Billing,Orders , Downloads , Adresses, Account, and Support.
Next step: Open the Subscription section to view plan status, renewal dates, and quick actions.
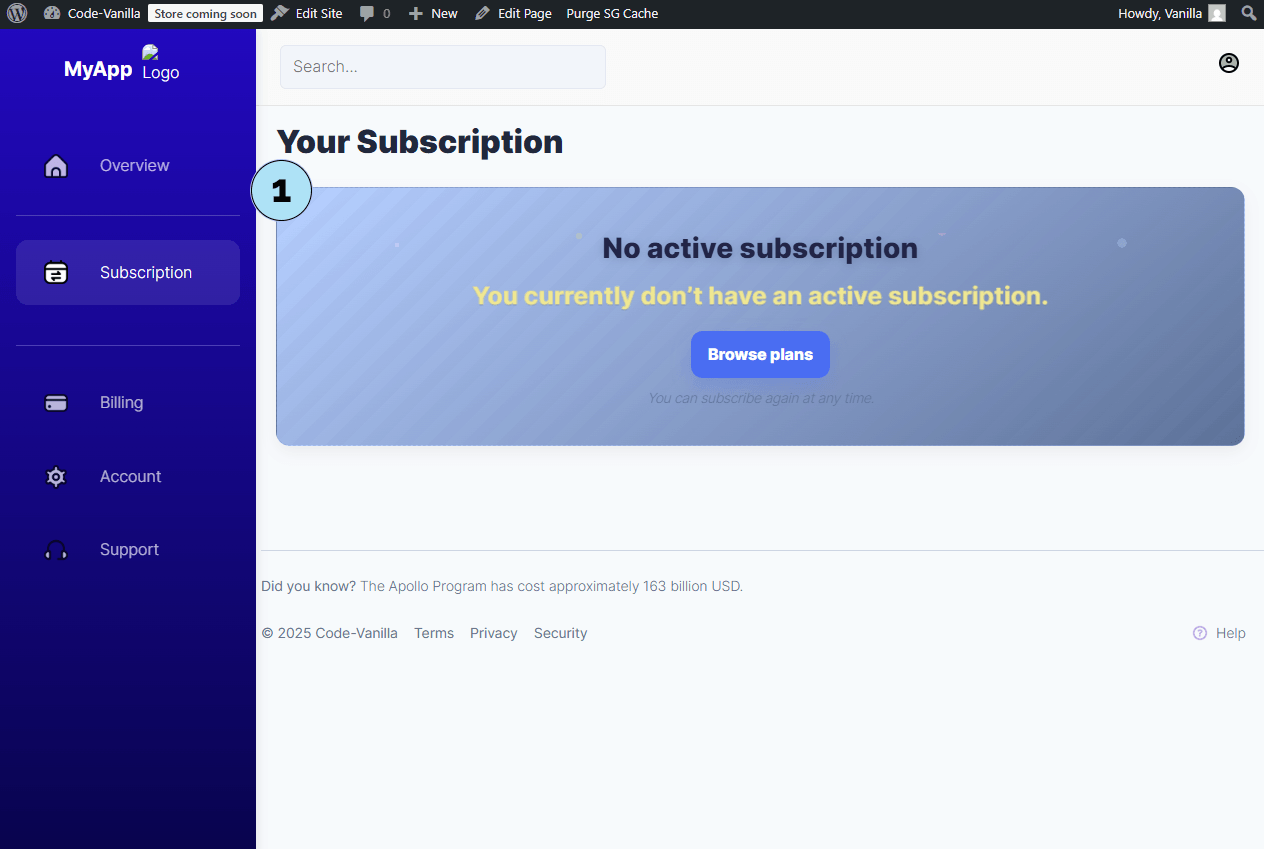
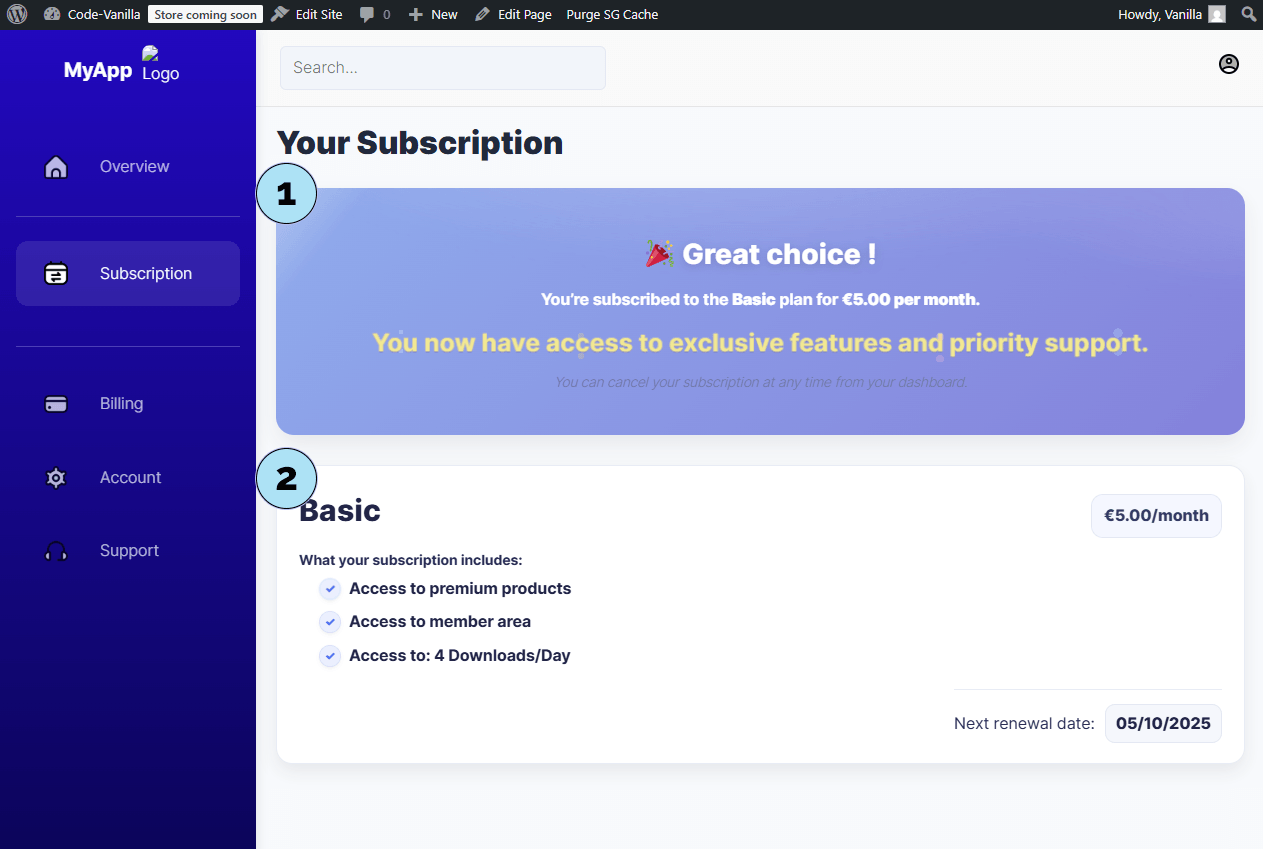
User Dashboard – Subscription Section
The Subscription section shows the current status of the user’s subscription. It adapts automatically depending on whether the user is subscribed or not.
Part 1 — No active subscription- Status banner: If the user has no subscription, a clear banner displays No active subscription.
- Subscribe button: A button is provided to redirect the user to choose a plan and subscribe.
- Congratulations banner: When a subscription is active, the user sees a celebratory banner confirming their subscription.
- Subscription card: Displays all relevant details of the plan, including:
- Plan information,
- Features (manual + automatic from Subscription Rules),
- Renewal date.
This ensures users always know their current subscription status and what benefits are included in their plan.
Next step: Explore the Billing section to view payment details and history.
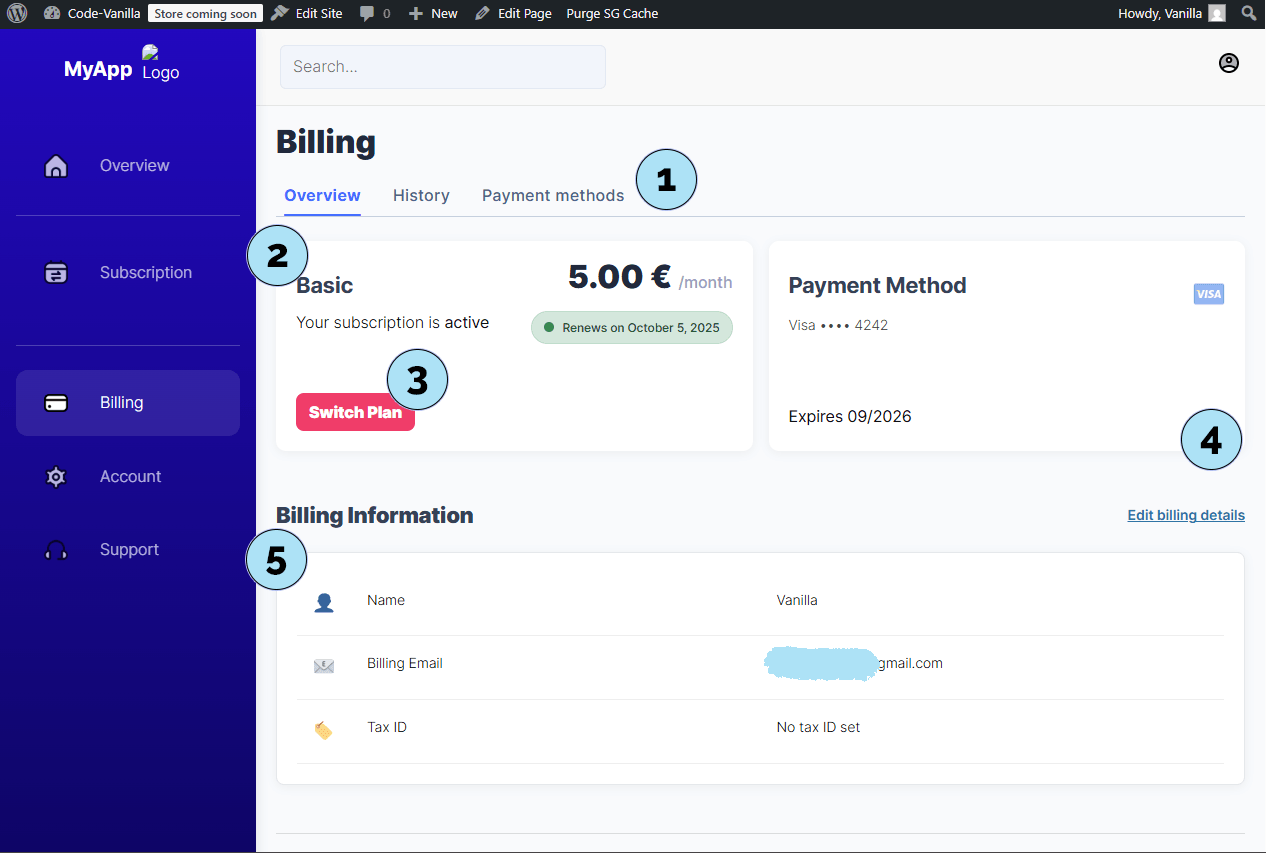
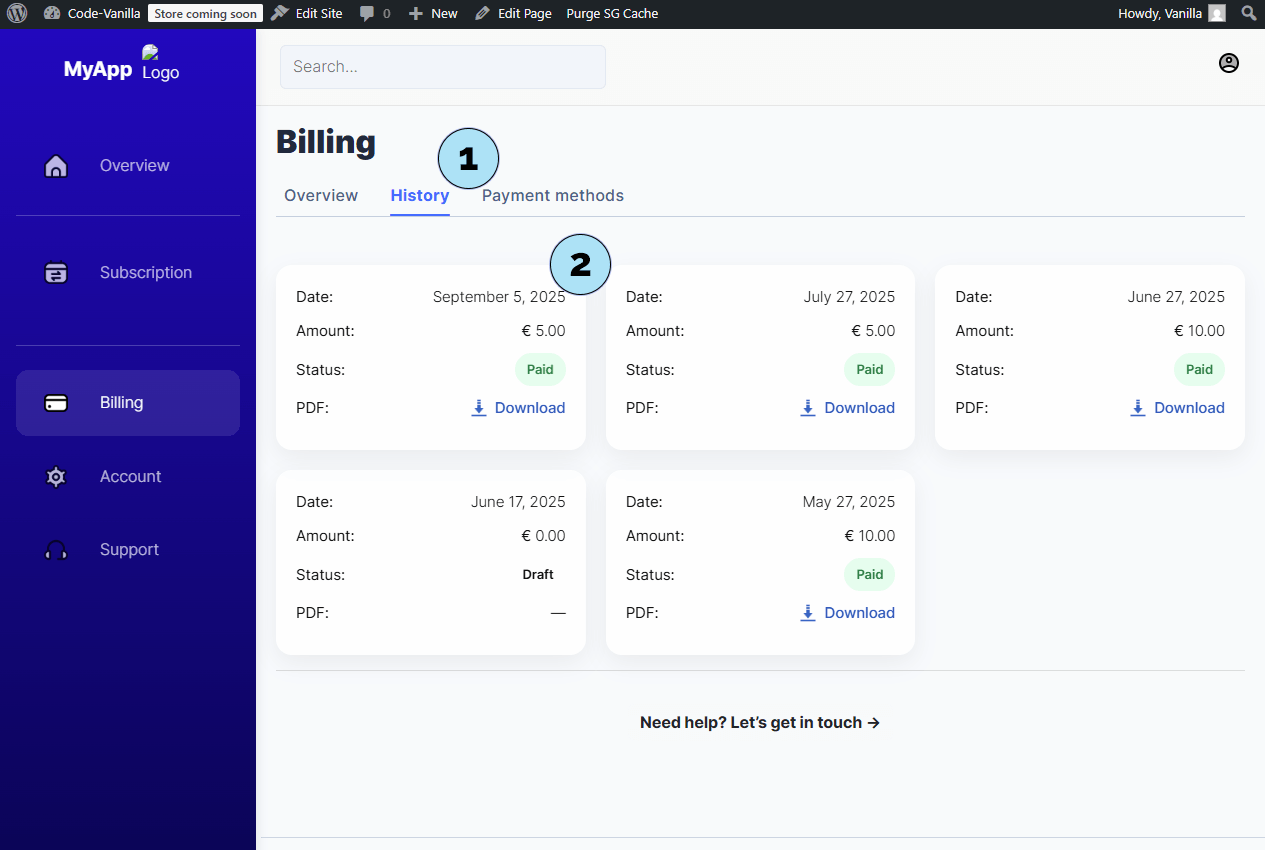
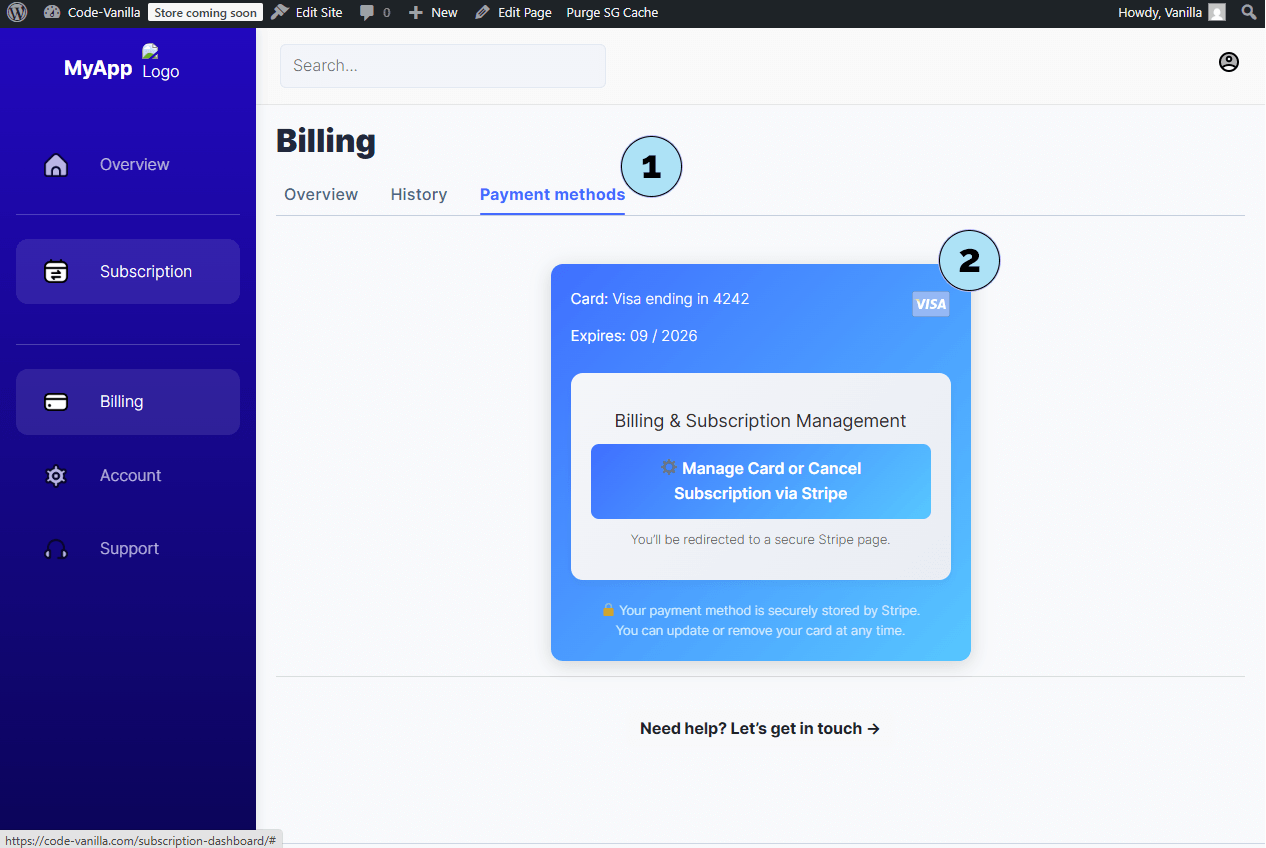
User Dashboard – Billing
The Billing section centralizes plan information, invoices, and payment methods for your subscribers.
Part 1 — Overview tab- Tabs: Switch between Overview, History, and Payment Methods.
- Current plan: Displays the subscriber’s active plan with all key details.
- Change plan: A link redirects to
/pricing-plansto pick a different plan. - Payment method: Shows masked card number, card brand/type, and expiry date.
- Billing info: Edit link to update billing details.
- Open History: Click the History tab to view past payments.
- Invoices list: Small cards show date, amount, and payment status. Each invoice can be downloaded as a
.pdf.
- Open Payment Methods: Click the Payment Methods tab.
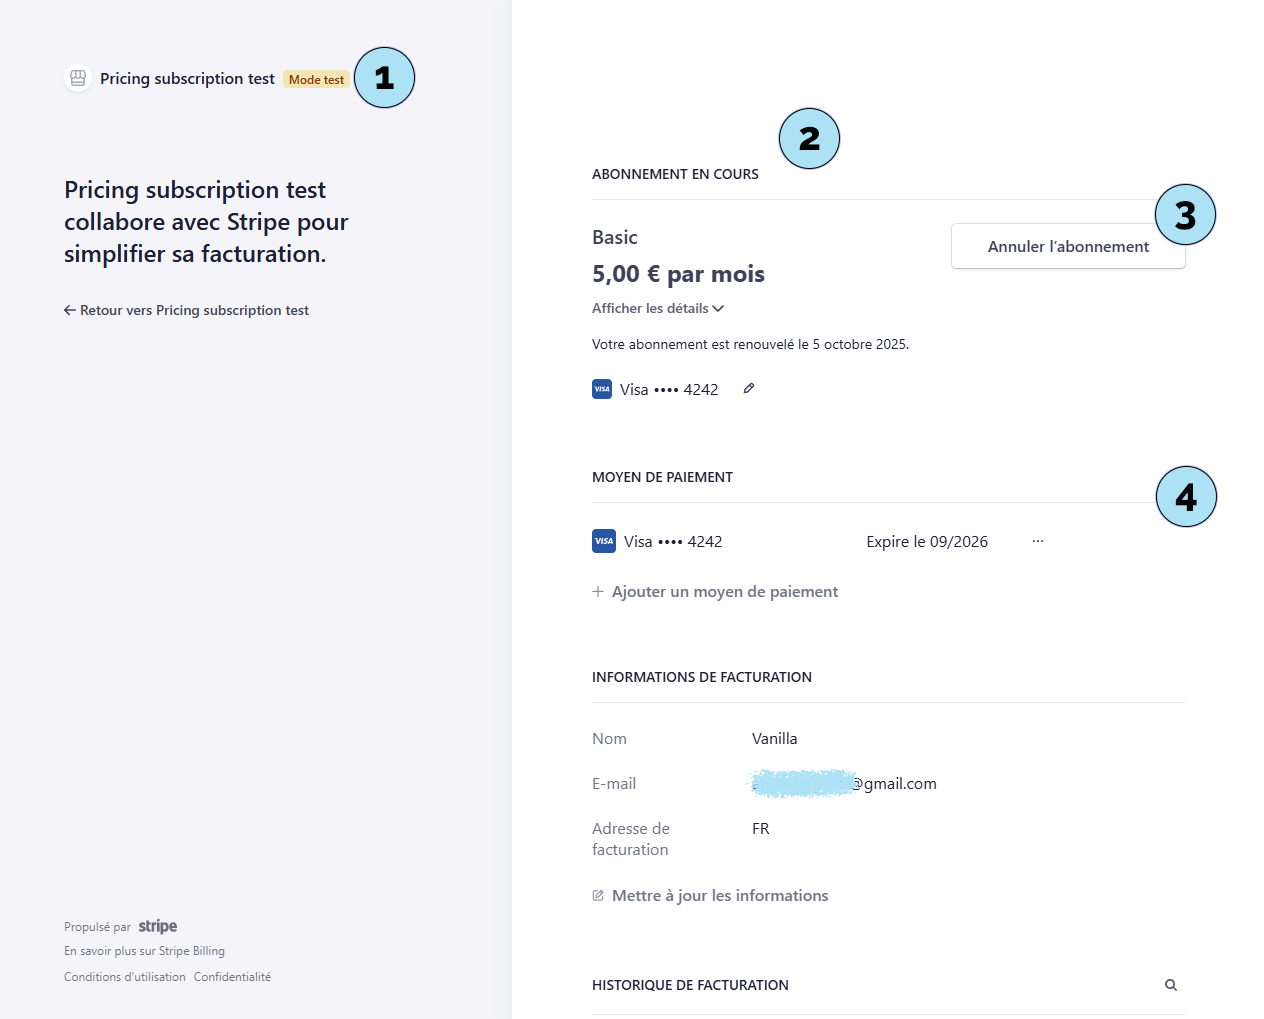
- Instructions & actions: A button opens Stripe’s portal to manage cards (add/set default) or cancel the subscription if needed.
- Test mode indicator: The portal clearly shows when Test mode is active.
- Active subscription: Full details for the subscriber’s current plan.
- Cancel subscription: A dedicated button lets the user cancel from the portal.
- Payment method management: View the current card and use the three-dot menu to set default or add a new method. Billing information appears below.
This flow keeps everything transparent: users can view their plan, download invoices, and manage payment methods securely.
Next step: Open the Account section to update profile and account preferences.
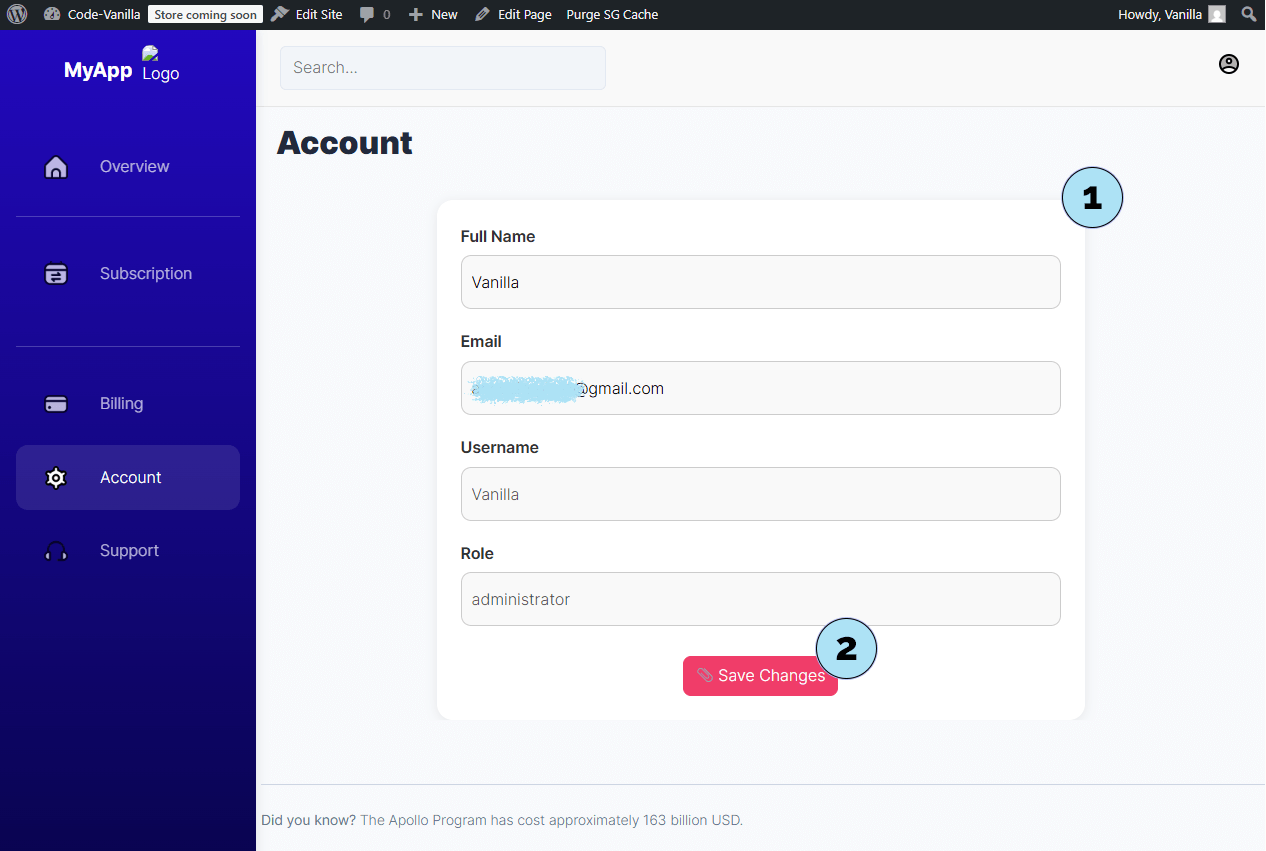
User Dashboard – Account
The Account section provides a simple form interface where subscribers can update their personal details.
- Contact information: Users can edit their name and email address. These updates are synchronized both with Stripe and your WordPress site.
- Save changes: A button is available to validate and save preferences instantly.
This ensures user data is always up to date across your subscription system and payment provider.
Next step: Explore the Support section, where subscribers can request help directly from their dashboard.
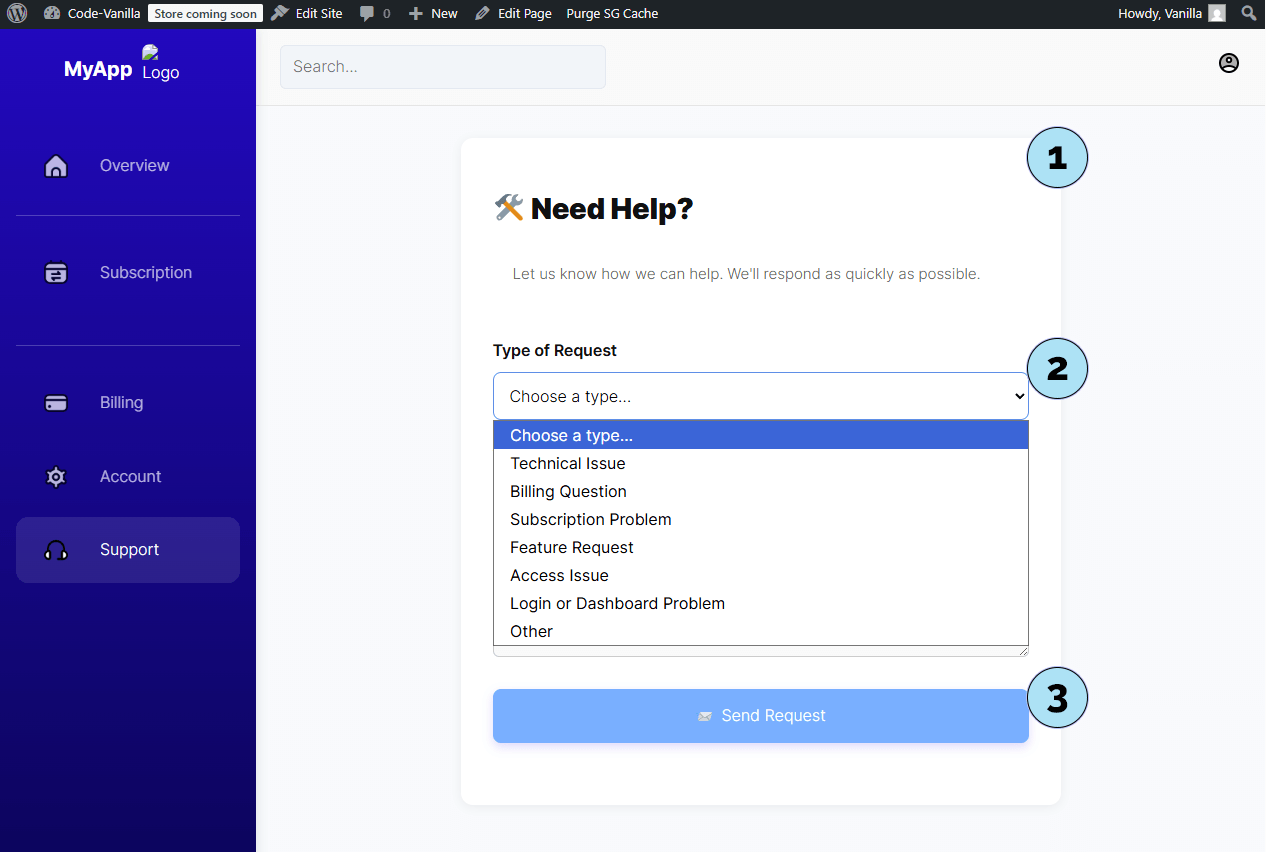
User Dashboard – Support
The Support section lets subscribers send a quick request to the site administrator directly from the dashboard — no email app needed.
- Support form: A simple, built-in form is displayed for users to contact you.
- Request type & message: Users can choose from several request types (as shown in the screenshot) and write a message describing their issue.
- Send to WordPress admin: The message is submitted directly to your WordPress back office under Pricing Subscription → Support, where you can review and respond.
This provides a streamlined, centralized way for subscribers to reach out without leaving the dashboard.
Next step: Send a test message from this section and see how it appears in the Support area on the admin side.
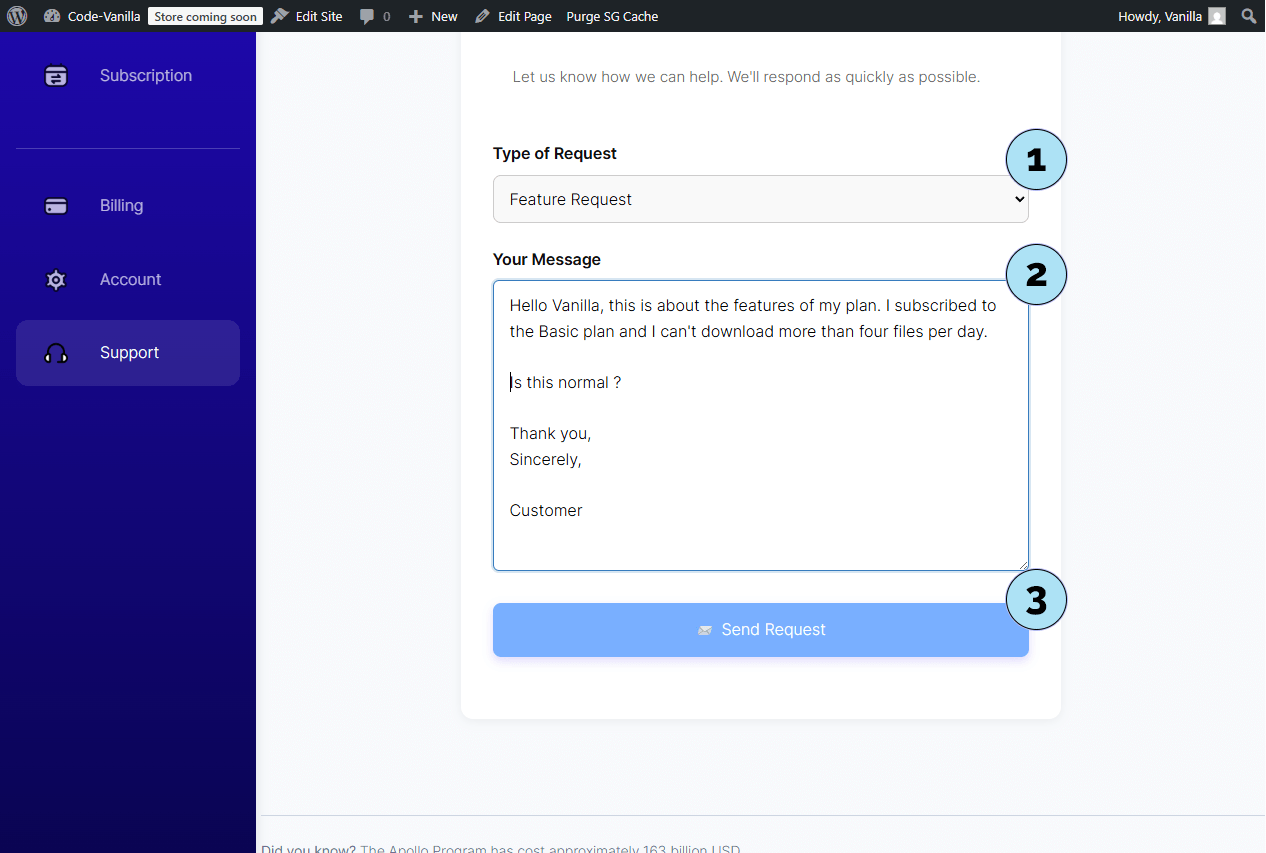
Support – Send a Request
Subscribers can send support requests directly from the dashboard. Here’s how the process looks for both the user and the admin.
Part 1 — User side (send request)- Request type: Select the type of request from the dropdown (e.g., Feature Request).
- Message body: Write the content of your message to the support team.
- Send Request: Click the button to submit your request. A confirmation will indicate the request was sent successfully.
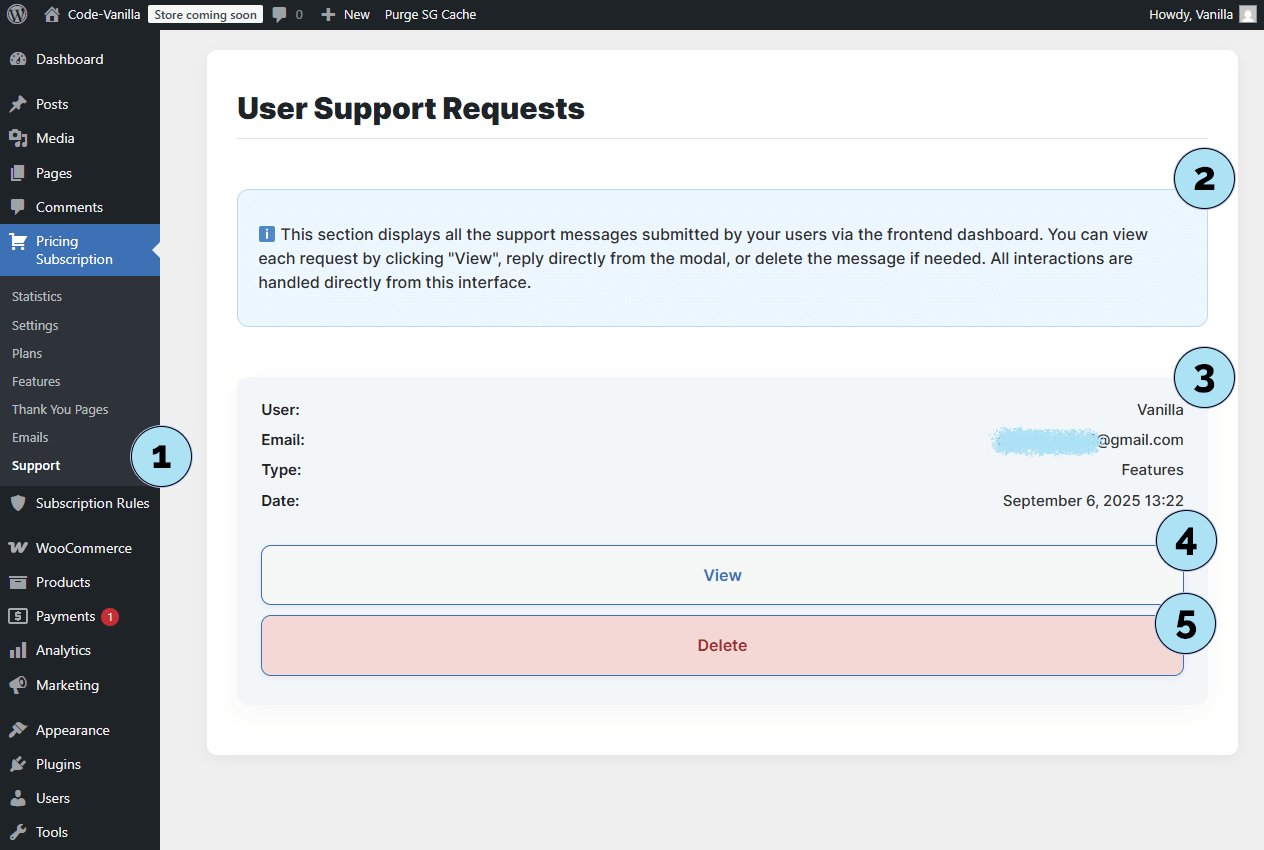
- Support submenu: Open Pricing Subscription → Support to access incoming requests.
- Notice: A banner explains how this section is managed.
- Request details: Each entry displays the user’s contact info, request type, and submission time
(Note: time may vary depending on
Settings → General → Timezone). - View button: Click to open the full request.
- Delete button: Remove the request permanently if no longer needed.
This workflow ensures user messages are instantly visible in your WordPress admin, making it easy to manage and respond quickly.
Next step: See what happens when you click View on a support request inside the plugin.
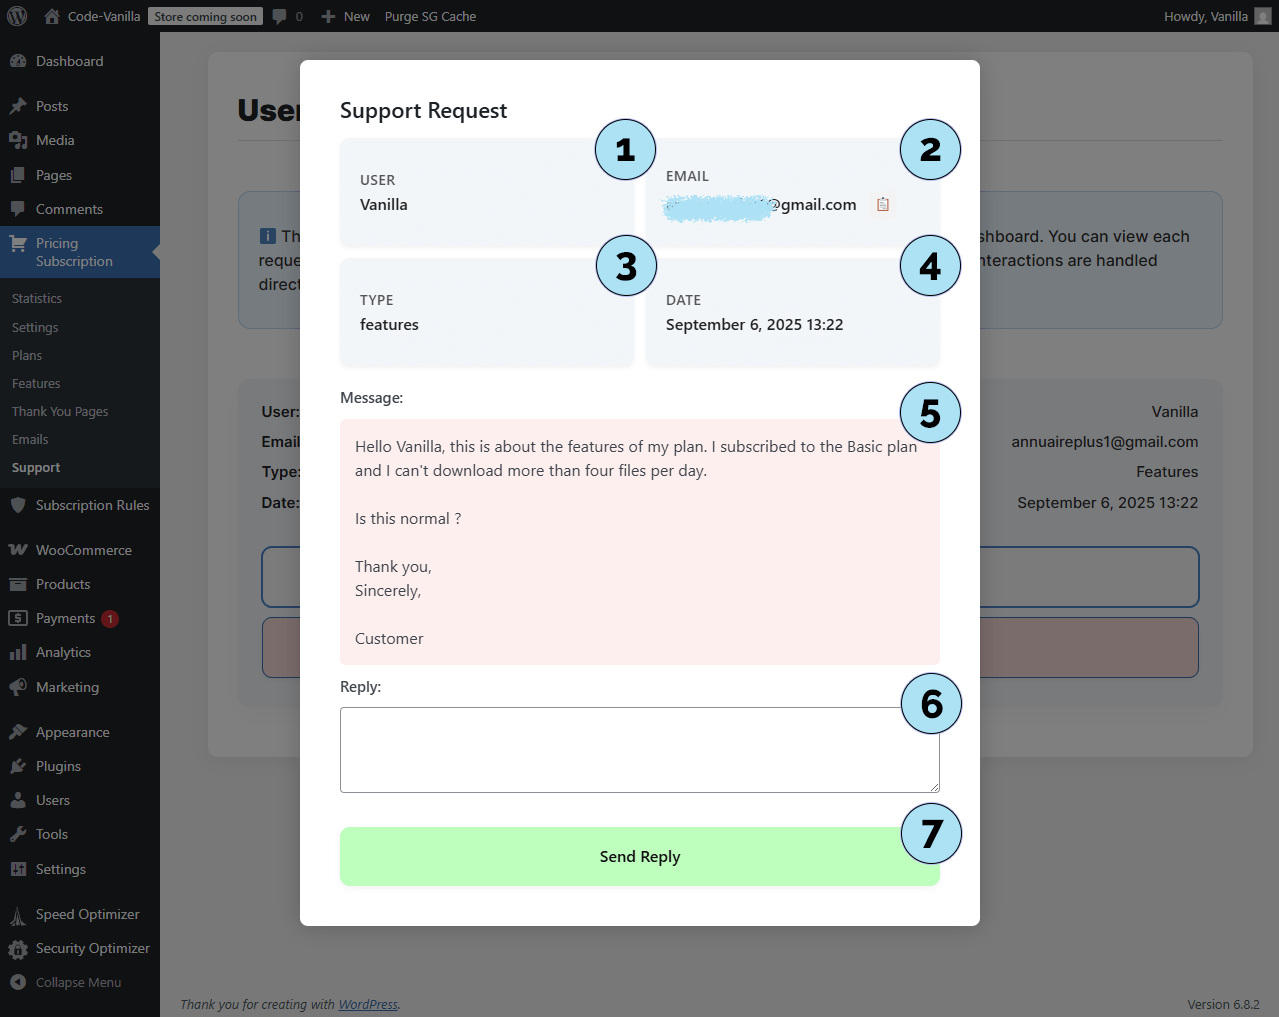
Support – View a Request
When you click View on a support request, the full details and reply form are displayed inside your WordPress admin.
- User name: Shows the name of the subscriber who submitted the request.
- Email address: Displays the user’s email along with a small notebook icon. Click this icon to quickly copy the email address if you prefer responding via your email client.
- Request type: Indicates the selected type of request (e.g., Feature).
- Date & time: Displays the exact timestamp of the request. Timezone is based on your WordPress settings (Settings → General → Timezone).
- Message body: The full content of the request submitted by the user.
- Admin reply field: A text area is available for you (the administrator) to type your direct response.
- Send reply: Click the button to send your response instantly back to the user.
This interface makes it easy to manage, track, and respond to all user requests without leaving your WordPress dashboard.
Next step: Let’s explore the elements that have been added to the WooCommerce dashboard to integrate with the Pricing Subscription plugin.
WooCommerce Dashboard – Pricing Subscription Add-ons
The WooCommerce dashboard includes a few extra panels added by the Pricing Subscription plugin. These mirror what you already saw in the Subscription Dashboard and give merchants a quick glance inside WooCommerce.
- Quick panels: You will find three compact sections that reflect the user dashboard:
- My Subscription – current plan status and renewal info,
- Billing – recent invoices and payment method summary,
- Support – A simple, built-in form is displayed for users to contact you..
These add-ons are designed for a fast overview directly from WooCommerce without leaving the store admin.
Next step: Switch to Live Mode on Stripe and connect your live keys to start accepting real payments.
Stripe – Activate Live Mode
Once you have finished testing in Sandbox mode, it’s time to switch to Live Mode in Stripe to start accepting real payments.
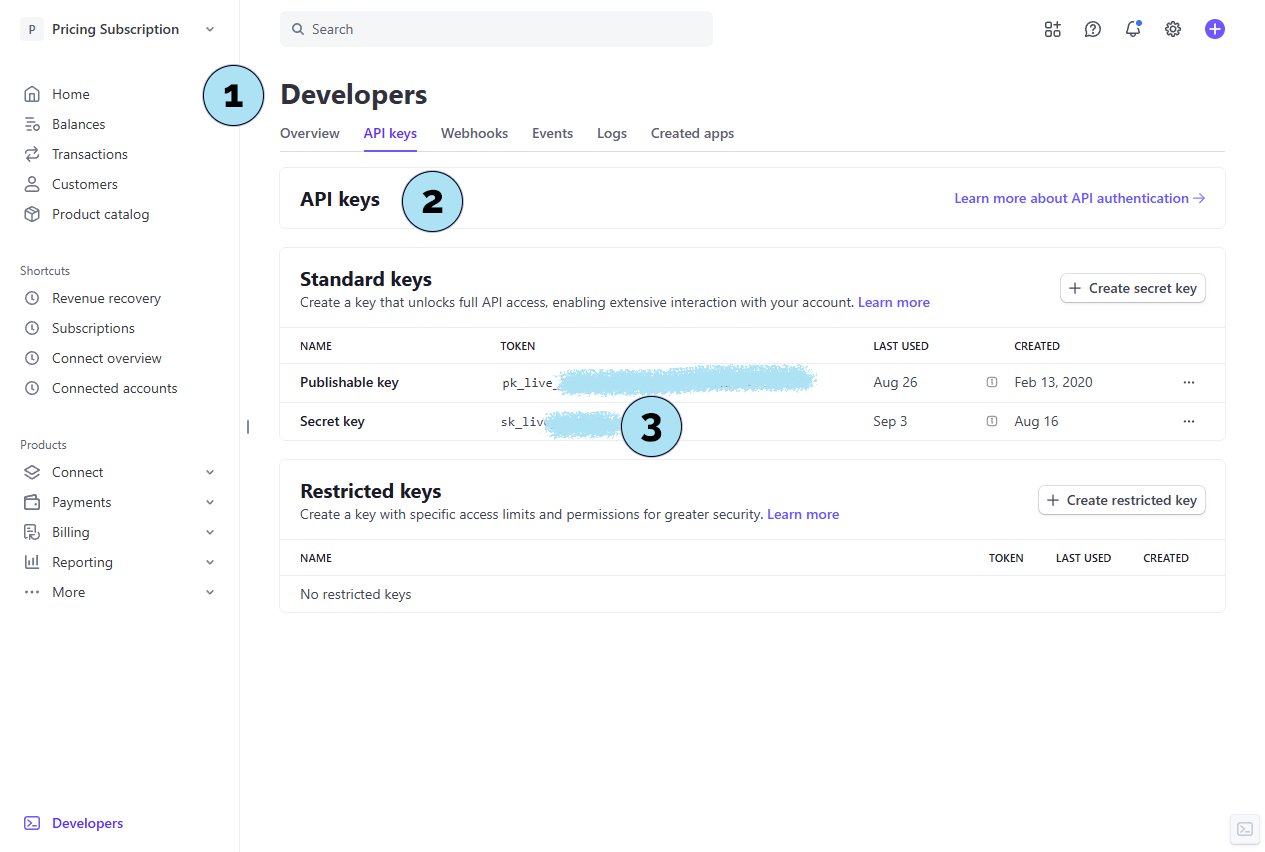
Part 1 — Exit Sandbox- Exit sandbox: Click the Exit sandbox button. You will automatically be redirected to Live Mode in Stripe.
- Open Developers: From the Stripe sidebar, click Developers. This section contains all technical settings, including API keys.
- API keys tab: Inside Developers, click the API keys tab to reveal the panel.
- Publishable & Secret key: The panel shows both keys. The Secret key is the one required by the plugin.
- Copy & store safely: Copy your Live Secret key and save it in a secure location (e.g., a private notepad). For security reasons, Stripe only allows the key to be copied once. If lost, you can always generate a new one.
Tip: Never share your Live Secret key. Keep it private and secure.
Next step: Copy and paste your Live Secret key into WordPress → Pricing Subscription → Settings, just like you did for the Test key earlier.
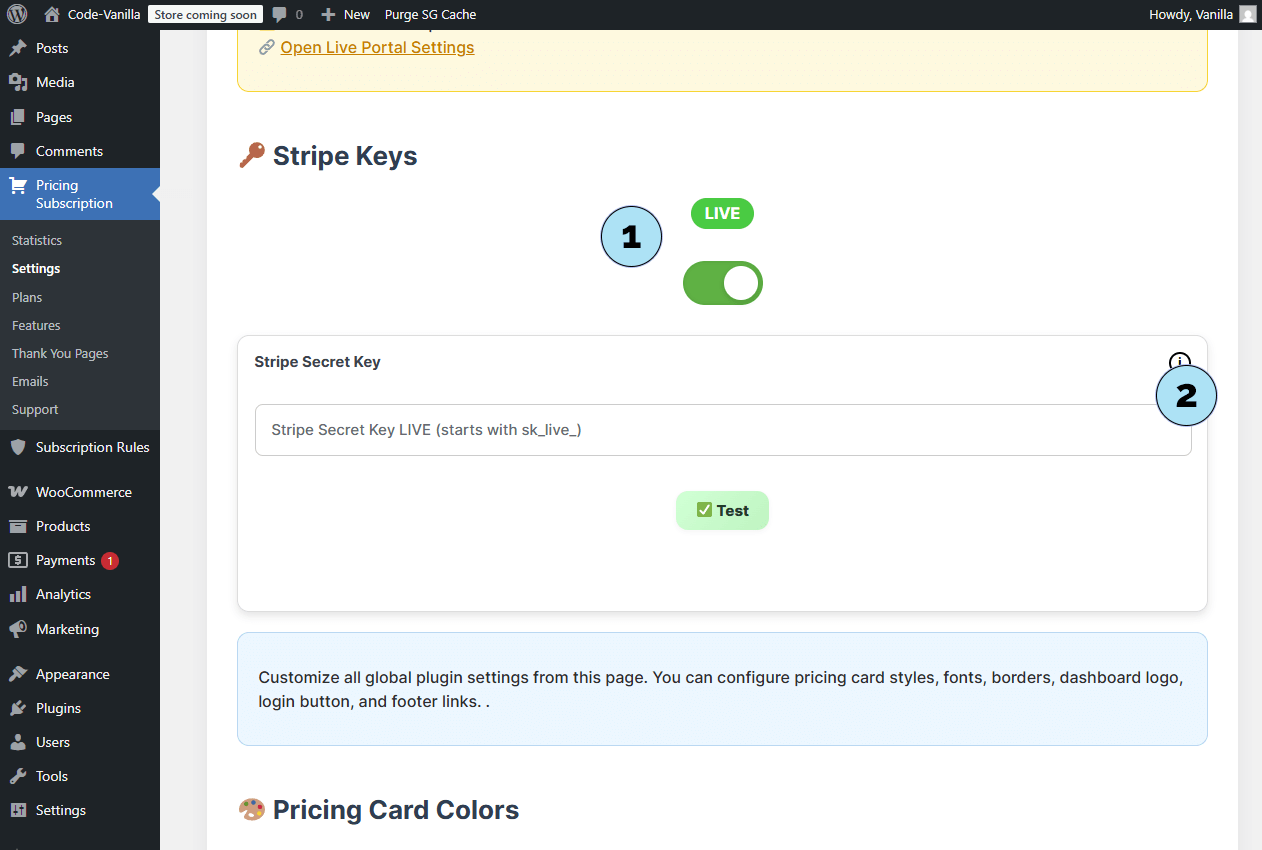
Plugin Settings – Insert Stripe LIVE Key
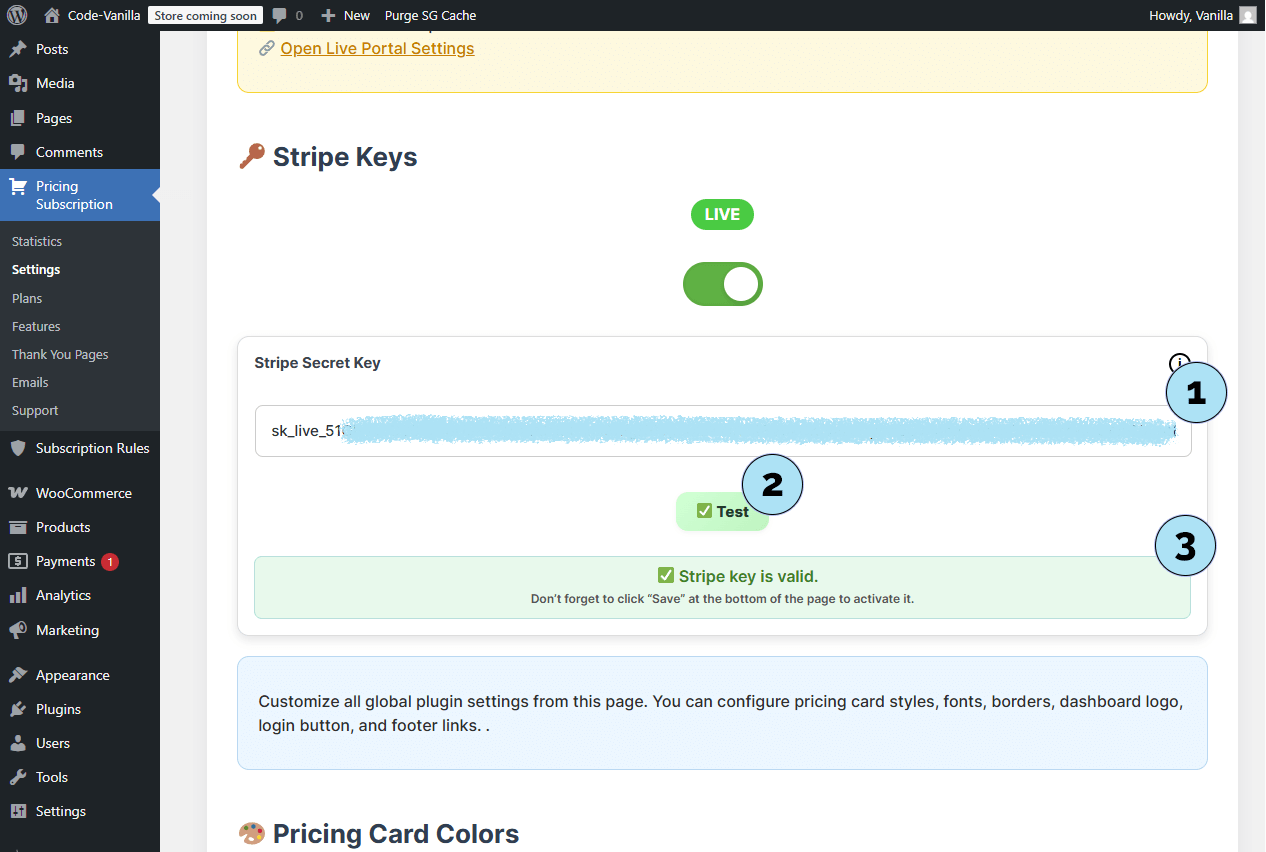
Now that you have your Stripe Live Secret key, you need to insert it into the plugin settings.
Part 1 — Switch to Live Mode- Mode switch: Use the toggle button in Pricing Subscription → Settings to switch from Test to Live mode.
- Confirmation banner: A small green label with LIVE confirms that Live mode is active.
- Insert key: Paste your Live Secret key into the field Stripe Secret Key Live.
- Key inserted: The Live key now appears in the field.
- Test button: Click the Test button to verify that the key is valid.
- Validation message: A success message confirms the key is working properly.
- Save settings: When using a key for the first time, you must scroll down and click Save at the bottom of the page. This ensures the key is stored permanently in the system.
Once saved, your plugin is fully connected to Stripe Live and ready to handle real subscriptions and payments.
Next step: Create a Live product in Stripe, following the same process as for Test products.
Stripe – Create a Live Product
With Live mode activated, you can now create real subscription products in Stripe. The process is identical to what we saw earlier in Test mode, so here is a quick walkthrough.
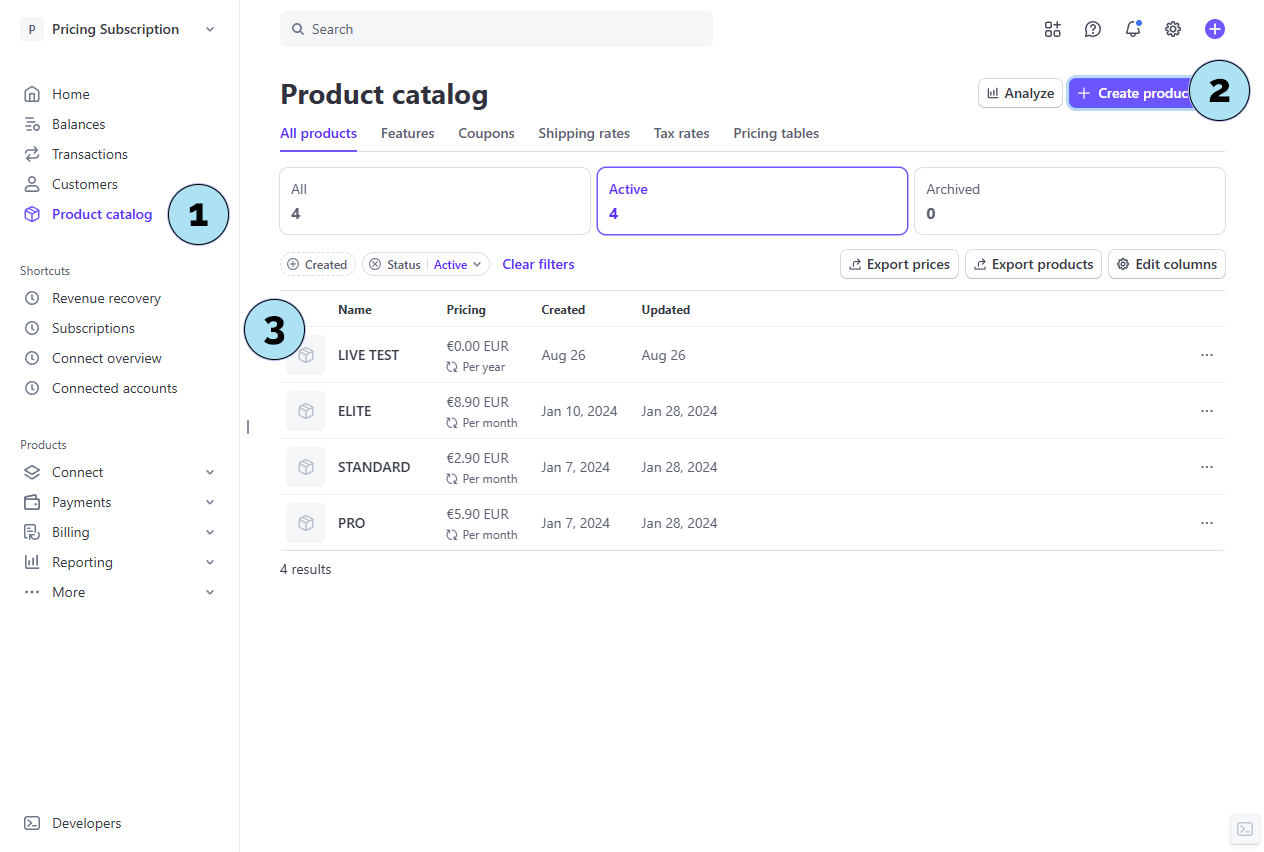
Part 1 — Access Product Catalog- Open Product Catalog: From the Stripe sidebar, click Product catalog. This opens the page listing all your products.
- Create product: Add a new subscription product with the same parameters as in Test mode (name, description, price, recurrence, etc.).
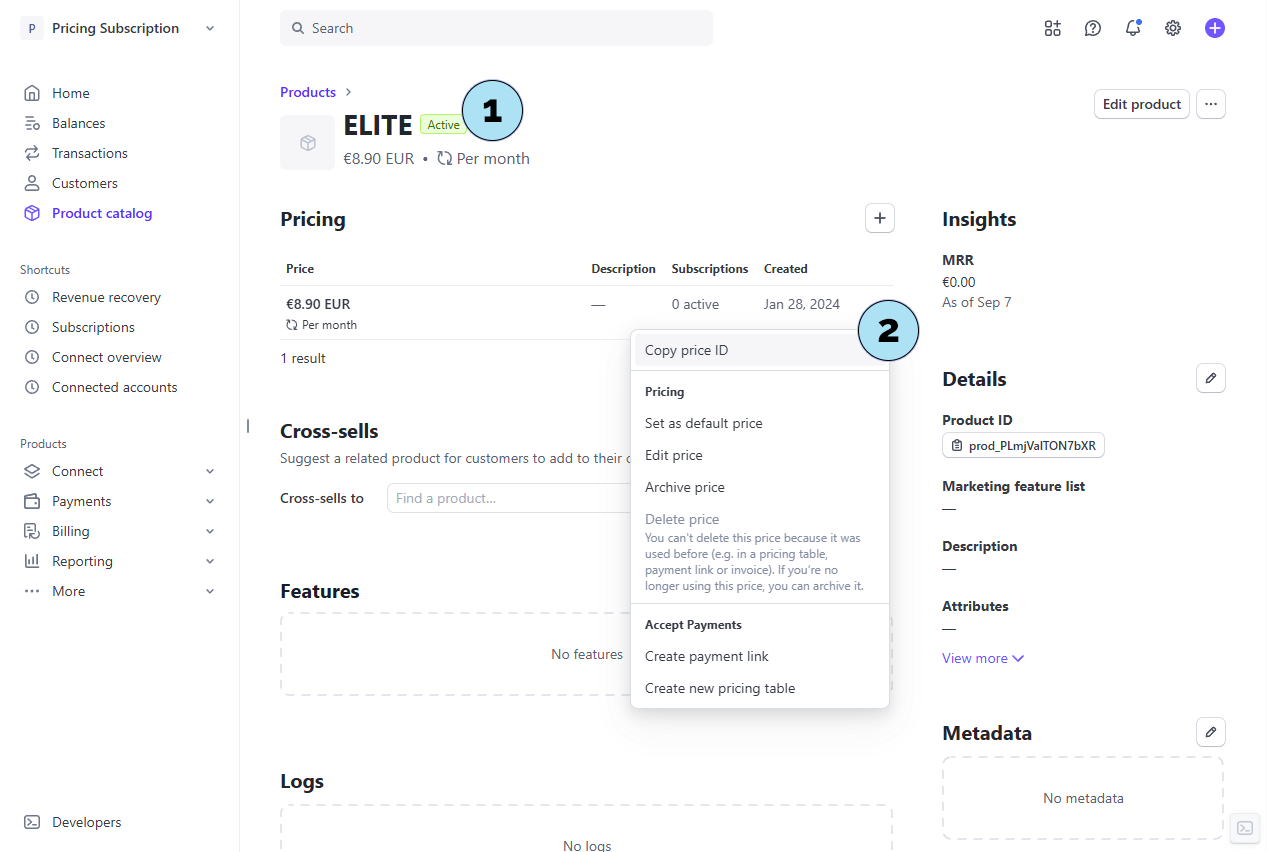
- Existing products: Once created, your products appear in the catalog. For example, here we click on the ELITE product.
- Open product details: Inside the ELITE product, we see the subscription set at €8.90/month.
- Copy Price ID: Next to Created, click the three dots menu and select Copy price ID. Save this Price ID securely (e.g., in a private notepad) — you will need it to link the plan in the plugin.
Reminder: Price IDs are unique to Live mode and cannot be reused from Test mode. Always create and copy fresh IDs for Live plans.
Next step: Insert the Live Price ID into the plugin to create a Live plan in Pricing Subscription → Plans.
Plans – Switch to Live and Prepare a Live Plan
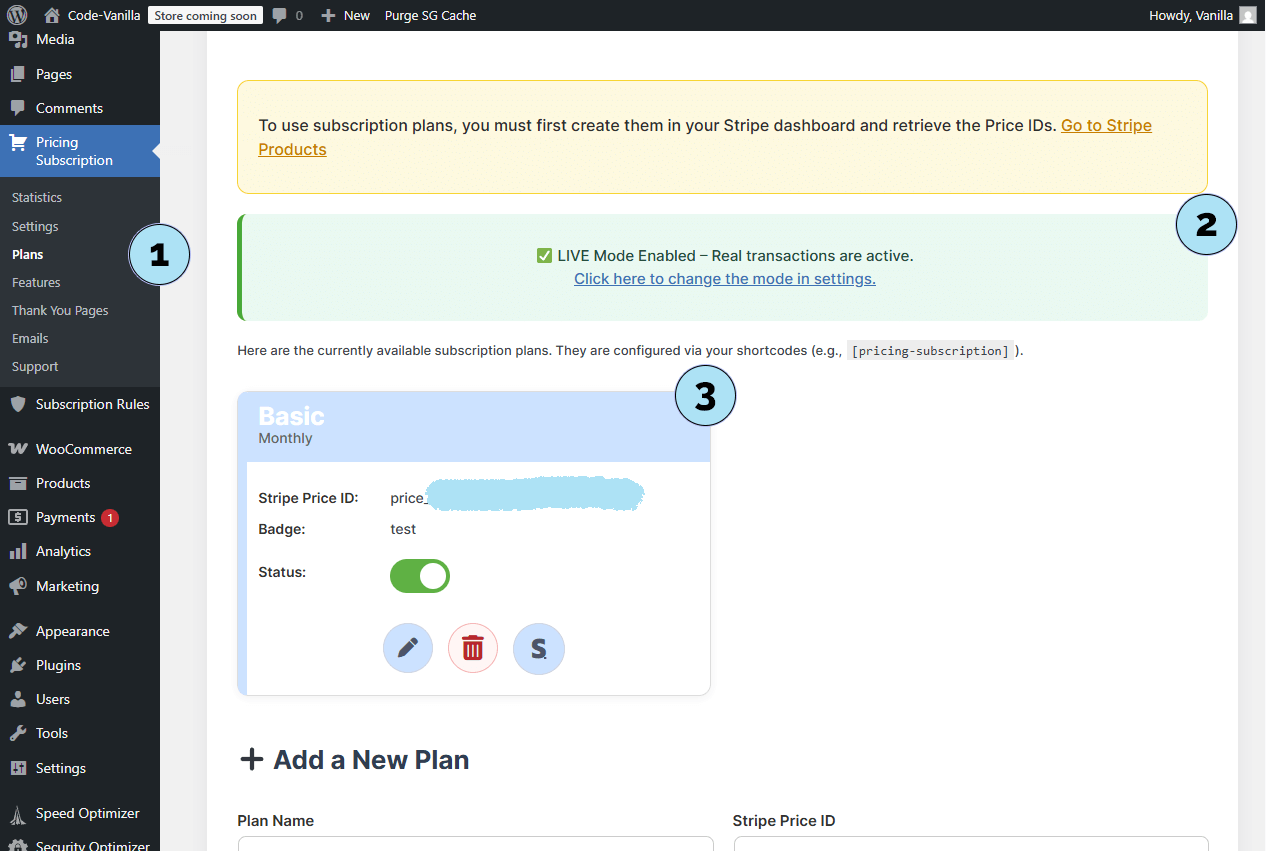
- Open Plans: In your WordPress admin, go to Pricing Subscription → Plans.
- Live mode enabled: A notice confirms Live mode Enabled — Real transactions are active.
- Test plan reminder: The Basic plan we created earlier was a Test plan and will not work in Live mode. Let’s verify on the front end.
- Pricing page: Visit
/pricing-planson the user side. - No live plans yet: The page shows No plans available at the moment because the Test plan doesn’t appear in Live mode.
Next step: Delete the old Test plan in Pricing Subscription → Plans and create a brand new Live plan using the Live Price ID you copied from Stripe.
Plans – Replace Test Plan with a Live Plan
- Open Plans: Go to Pricing Subscription → Plans.
- Delete: Click the Delete button on the Test plan entry. A small log/confirm dialog appears at the top.
- Confirm: Click OK to confirm deletion of the Test plan.
- Plan name: Add a new plan (Live mode is active). Example: ELITE.
- Price ID (Live): Paste the Live Price ID you copied from Stripe.
- Badge (optional): Add a short label (e.g., Best value).
- Add plan: Click to save and add the plan to your Live plans.
- Pricing page: Refresh
/pricing-plans. You should instantly see your new Live plan. - Plan card: The plan displays with the Best value badge. (No features yet if none are set.)
- Subscribe: Click the button to proceed to Stripe checkout.
- Business space: Confirms your Stripe space (e.g., pricing subscription).
- Amount & interval: Shows the Live price (e.g., €8.90/month).
- Payment details: Email, payment method, and the final Pay & Subscribe button. Security note: Card data never passes through WordPress or this plugin—Stripe handles all sensitive information.
Your Live plan is now active and visible to customers. Real payments will be processed by Stripe.
Next step: Review common error cases during plugin activation and how to resolve them.

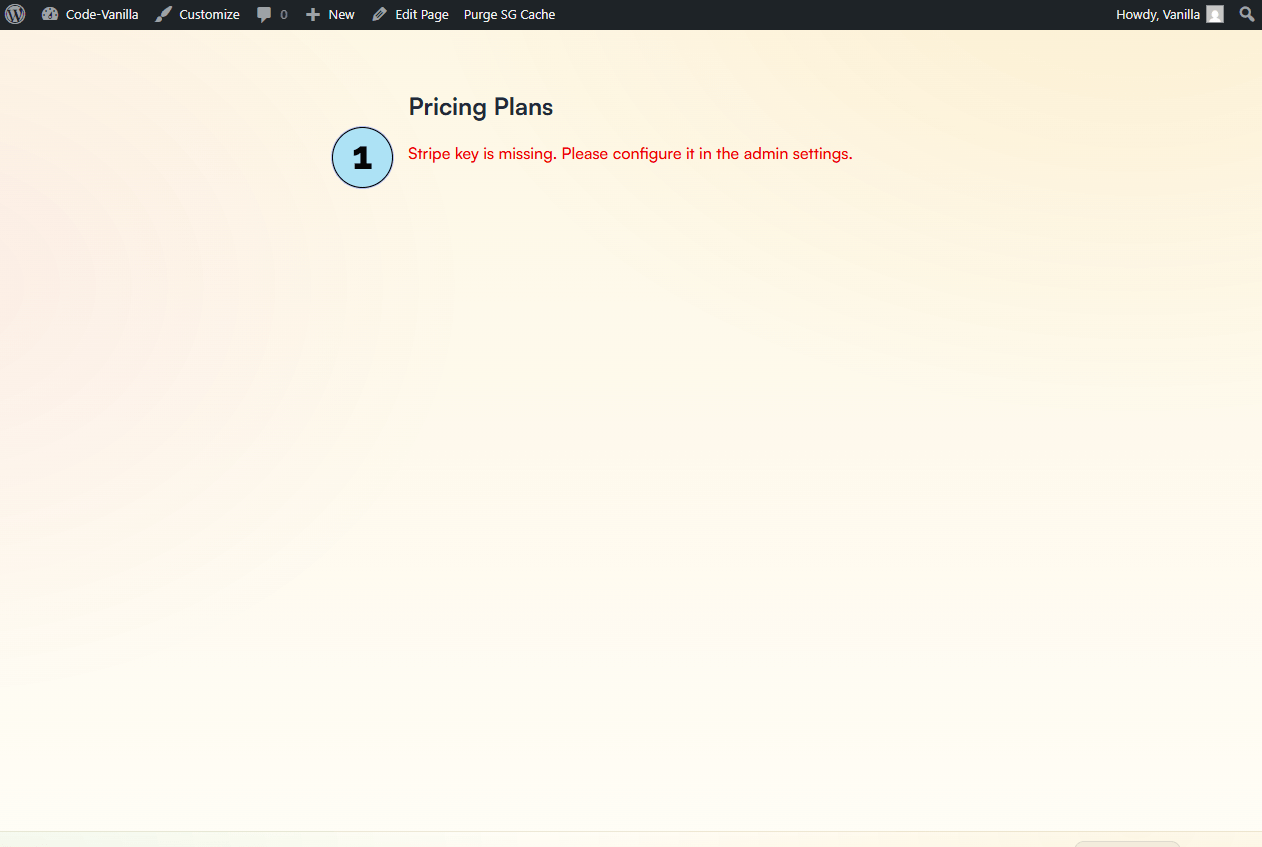
Common Activation Errors & Fixes
Here are the most common messages you may see right after activating the plugin, and how to fix them quickly.
Part 1 — Stripe key is missing- Message: “Stripe key is missing, Please configure it in the admin settings.”
- Cause: No Stripe key has been set yet (Test or Live).
- Fix: Go to Pricing Subscription → Settings and paste your Stripe Secret Key (Test or Live), then Save at the bottom the first time you add a key.
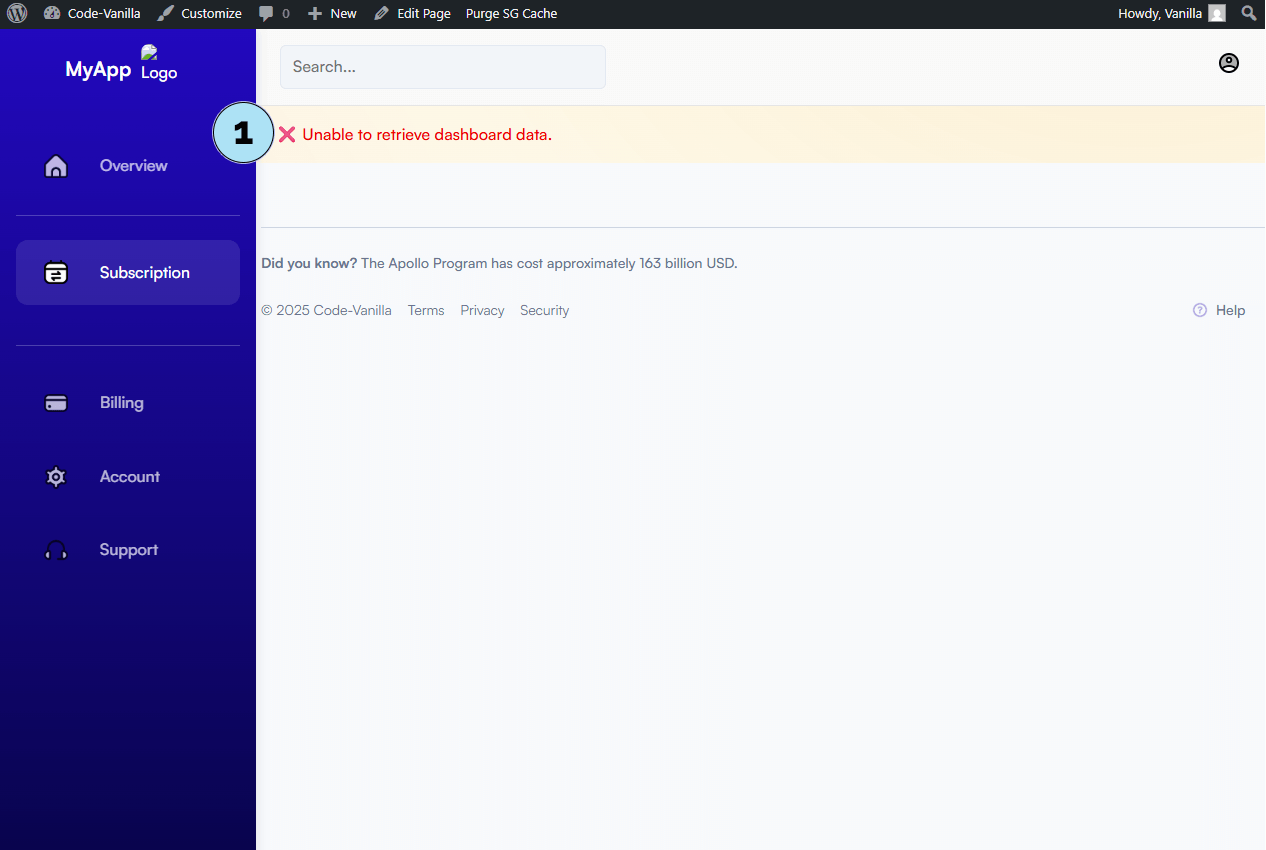
- Message: “Unable to retrieve dashboard data.”
- Cause: The dashboard cannot fetch Stripe data because no valid key/connection is configured.
- Fix: Add a Stripe key in Pricing Subscription → Settings (any mode), and Save if it’s your first time. The dashboard will then display data as expected.
- Message: “No WooCommerce tags found.”
- Cause: WooCommerce is not installed/activated, or no product tags exist yet.
- Fix: Ensure WooCommerce is active. Then create tags via Products → Tags so you can use Tag Rules in the plugin.
Once these items are configured (Stripe keys saved, WooCommerce + tags ready), your plugin will run smoothly.
Next step: Let’s look at the login modal we built for quick access to the user dashboard.
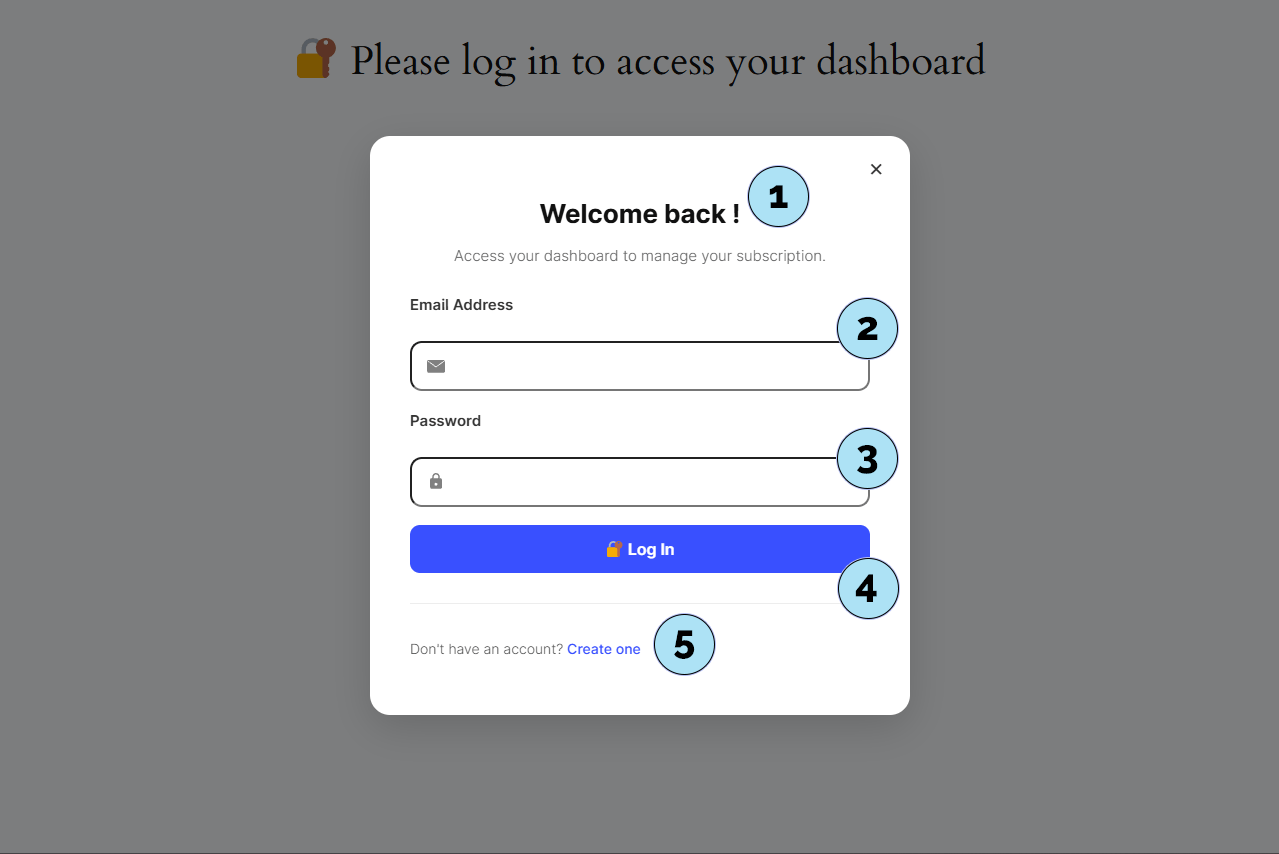
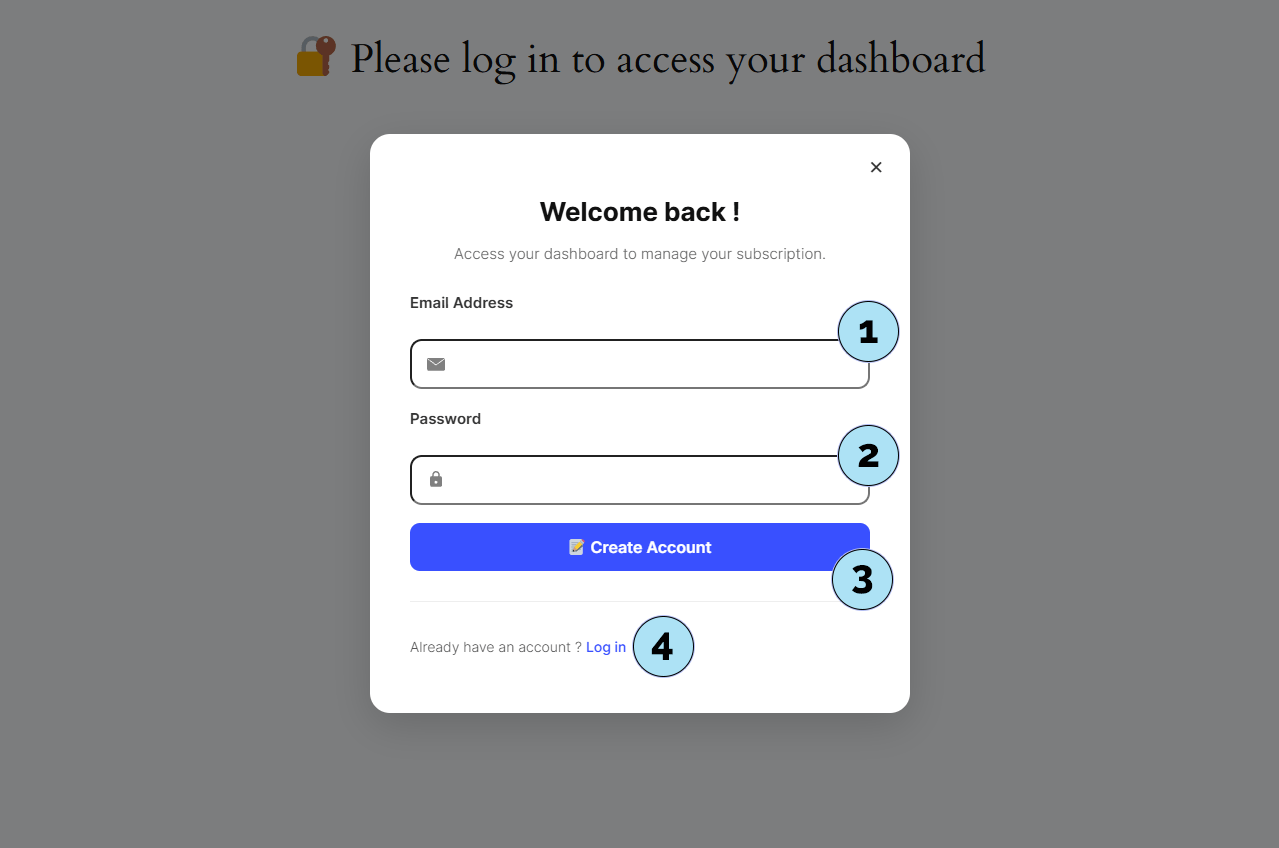
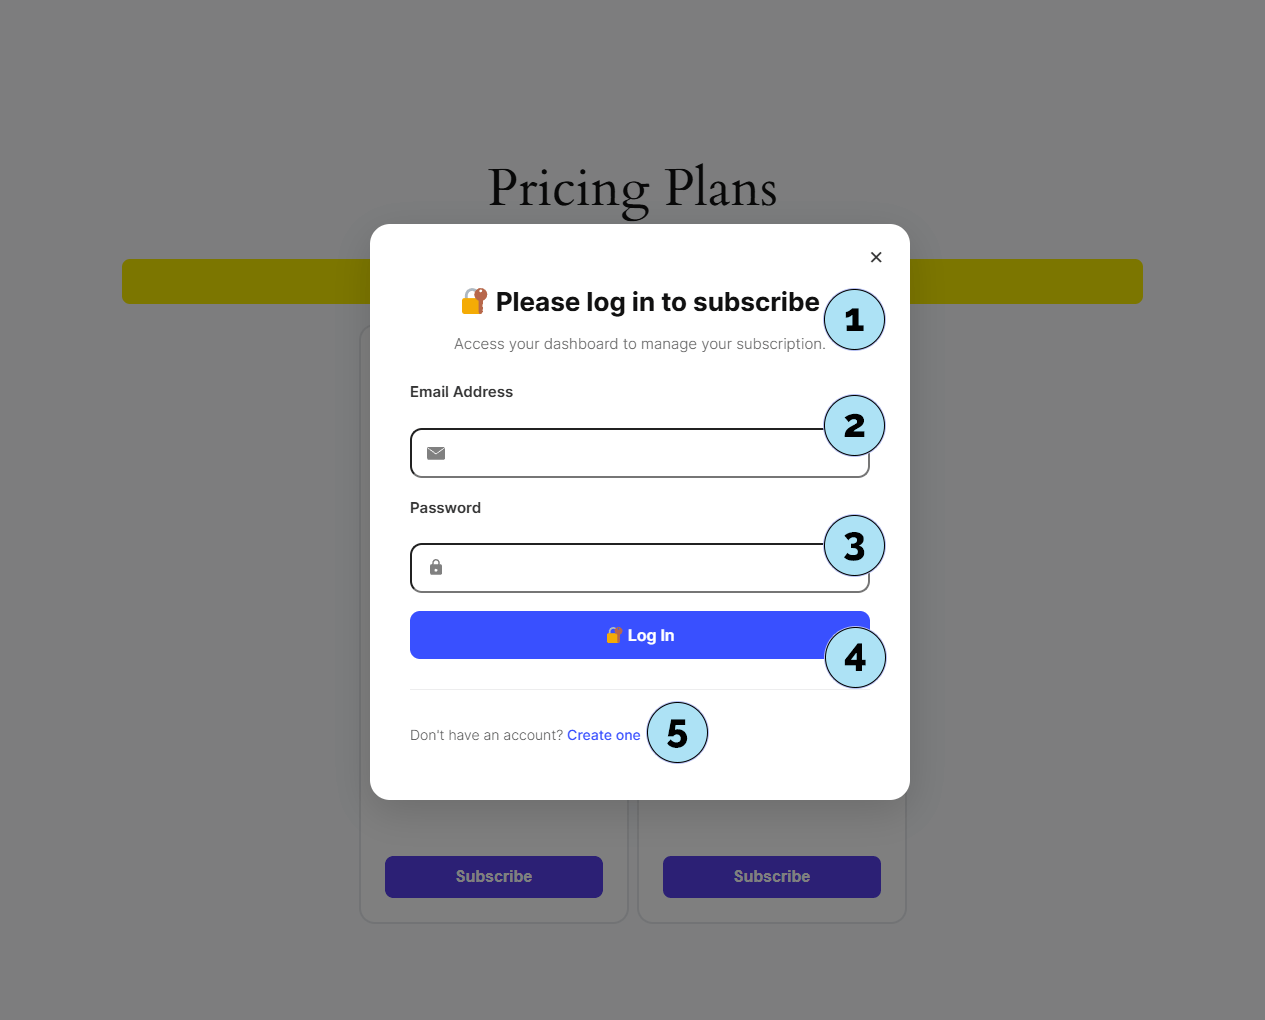
Login Modal – User Authentication
The login modal is a pop-up window that appears whenever a user is not logged in. It allows subscribers to either log in or create an account before accessing their dashboard or subscribing to a plan.
Part 1 — Login view- Welcome message: A greeting displayed at the top of the modal.
- Email field: Users enter their login email here.
- Password field: Enter the account password.
- Login button: Once the fields are filled, clicking this button logs the user in and redirects them to the plugin’s dashboard.
- Create account link: A small blue link below allows users to switch to the account creation form.
- Email & password fields: Same as login, but used to register a new account.
- Create account button: Instantly creates a new WordPress user and redirects them to the subscription dashboard.
- Back to login link: A link lets the user return to the login form if needed.
- Pre-subscription notice: If a visitor clicks to subscribe while not logged in, the modal appears.
- Email field: Must be completed to log in.
- Password field: Must be completed to log in.
- Login button: Confirms login and continues subscription flow.
- Create account link: Allows immediate registration if the user has no account yet.
This ensures that only registered and logged-in users can subscribe to your plans, keeping access secure and streamlined.
Next step: Learn how to use the shortcodes included with the plugin.
Shortcodes – How to Use Them
The Pricing Subscription plugin provides four main shortcodes. You can paste a shortcode anywhere on your pages or posts to render the related feature.
Part 1 —[pricing-subscription]
- What it does: Renders your plan cards so users can subscribe.
- Default placement: Automatically inserted on the
/pricing-planspage at activation. - Important: Do not remove it from
/pricing-plans. Moving it elsewhere will break the plan logic and subscription flow.
[psp_user_dashboard]
- What it does: Displays the user Subscription Dashboard (Overview, Subscription, Billing, Orders, Downloads, Addresses, Account, Support).
- Default placement: Automatically inserted on the
/subscription-dashboardpage at activation. - Slug reminder: Page slug is
subscription-dashboardby default.
[psp_download_button url="https://xxxxxxx.com/xxxxxxxx/xxxxxx/pricing-subscription/downloads/xxxxxx.png" style="default"]
- What it does: Generates a download button controlled by your Quota Rules.
- How to get it: Buttons can be generated endlessly in Subscription Rules → Quota Rules (scroll to the bottom: Generate Button).
- Parameters:
url— direct path to a file stored under the plugin’s/downloadsfolder,style— one of the 18 available button styles.
[stripe_thank_you]
- What it does: Displays the dynamic Thank You page after a successful subscription.
- Default placement: Automatically inserted on the
/thank-youpage at activation. - Behavior without subscription: Shows No subscription found and offers a button to subscribe. Use Stripe Test Mode to try the full flow.
- Template selection: Pick your favorite template under Pricing Subscription → Thank You Pages. After a successful checkout, the selected template displays automatically with confetti and an automatic redirect to your homepage.
Tip: Shortcodes can be used inside the WordPress block editor, classic editor, or most page builders (Elementor, WPBakery, etc.).
Next step: Customize the pages that host these shortcodes (layout, sections, and additional content).
![[pricing-subscription] on the pricing page](https://boostmydish.fr/wp-content/uploads/2025/09/Shortcode-Pricing-Subscription.png)
![[psp_user_dashboard] page](https://boostmydish.fr/wp-content/uploads/2025/09/Shortcode-Subscription-Dashboard.png)
![[psp_download_button] for quota rules](https://boostmydish.fr/wp-content/uploads/2025/09/Shortcode-Quota-Button-Admin-Dashboard.png)
![[stripe_thank_you] page setup](https://boostmydish.fr/wp-content/uploads/2025/09/Shortcode-Stripe-Thank-You.png)
Customizing Pages – Install Elementor
Our shortcodes are in place, but the default pages lack visual style. To customize them easily, we recommend using a page builder.
What is a page builder? A page builder is a visual WordPress tool that lets you design pages with a drag & drop interface, without coding. It allows you to:
- Create sections, columns, and blocks visually,
- Add text, images, videos, buttons, and forms,
- Style content (colors, margins, typography, backgrounds),
- Build responsive layouts (desktop, tablet, mobile),
- Preview instantly, without editing HTML/CSS.
For this guide, we will use the free version of Elementor Website Builder, which offers powerful and intuitive design options.
Part 1 — Open plugin installer- Go to Plugins → Installed Plugins.
- Click the Add Plugin button.
- In the search field, type elementor.
- Wait for results, then find Elementor Website Builder. This is the one we need.
- Click Install Now.
- Once installed, click Activate.
- Elementor is now ready to use for designing your pages.
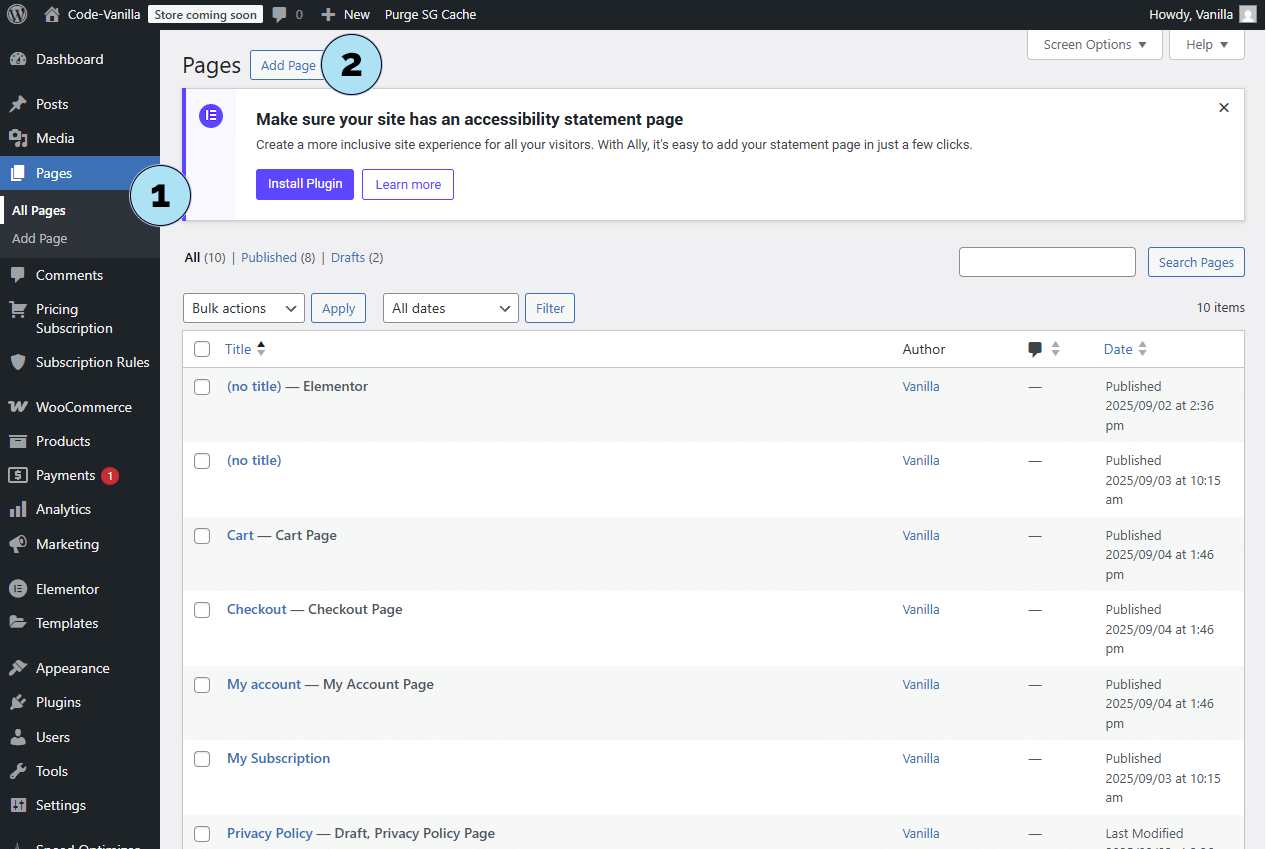
- Go to Pages → All Pages.
- Click Add Page to create a new blank page, perfect for testing custom designs.
Next step: Open this new blank page with Elementor and start customizing it with a professional layout.
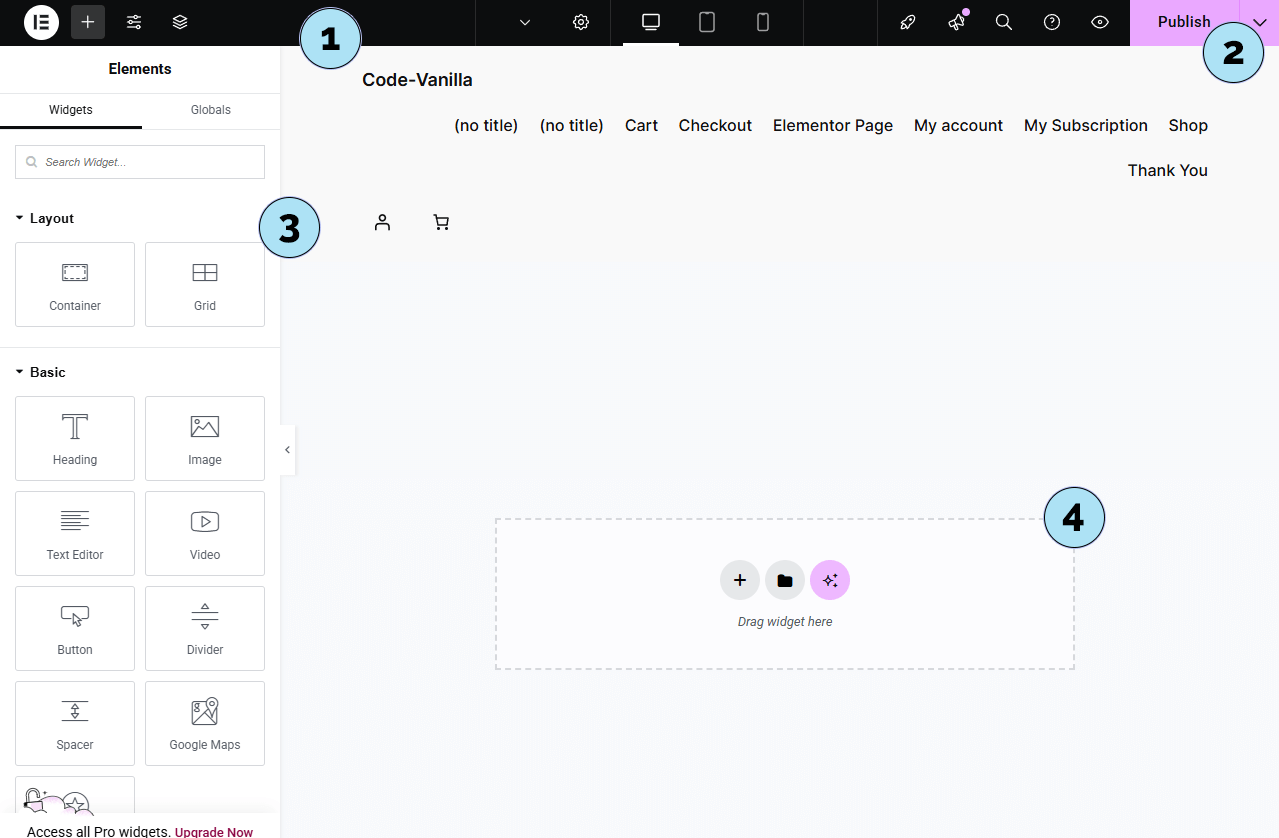
Customize with Elementor – Quick Page Creation
Let’s build a simple page with Elementor using drag & drop. This example shows the essentials only.
Part 1 — Editor overview- Editor settings bar: Global Elementor settings (we won’t use them here).
- Publish button: Use it to publish the page when ready. The dropdown also lets you Preview the page as visitors will see it.
- Widgets panel: All building blocks (Headings, Containers, Grids, Images, Buttons, Dividers, etc.). We’ll use drag & drop.
- Canvas starter icons:
- “+” to pick a layout,
- Folder to browse templates (some paid — we won’t use them),
- Magic wand for AI-assisted building (requires Elementor account/subscription; not used here).
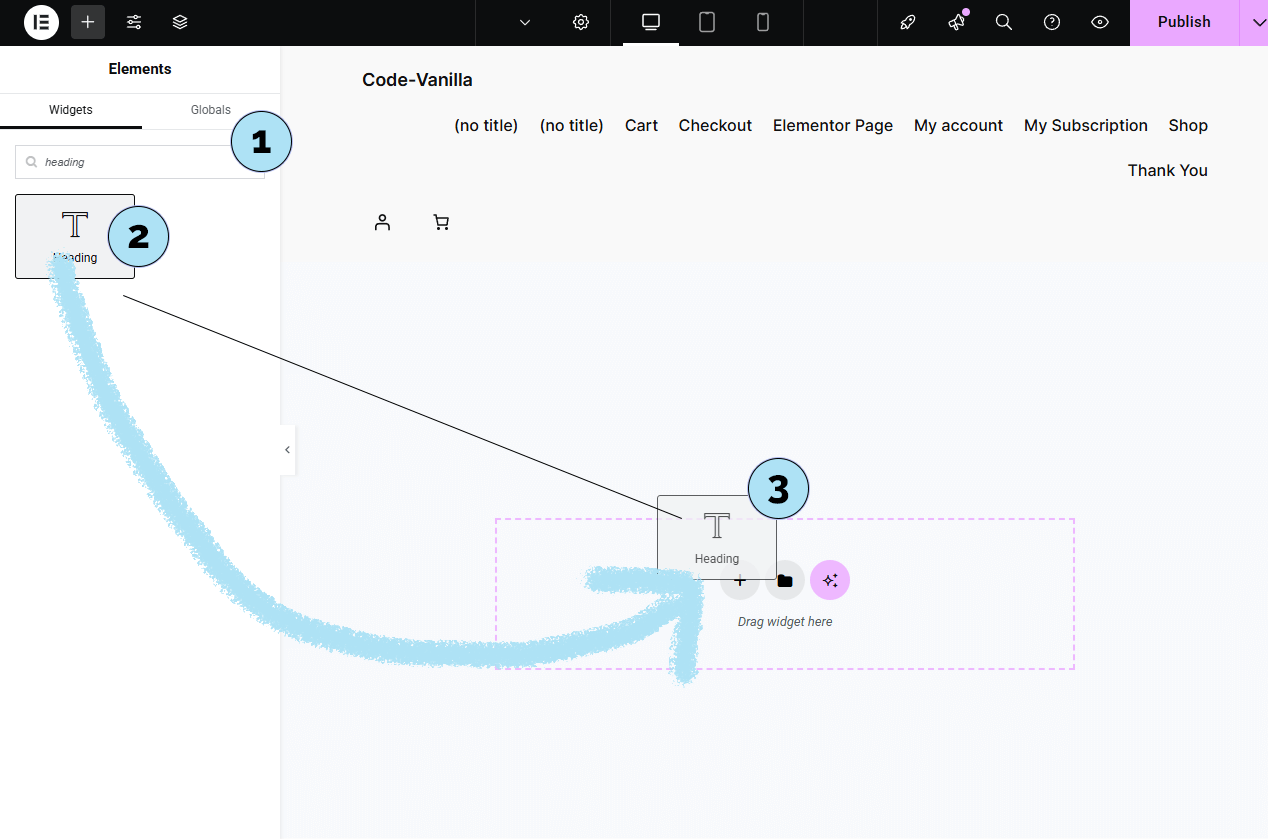
- Search “Heading”: In the widget search field, type heading.
- Drag & drop: Grab the Heading widget and drop it onto the canvas (Drag widget here).
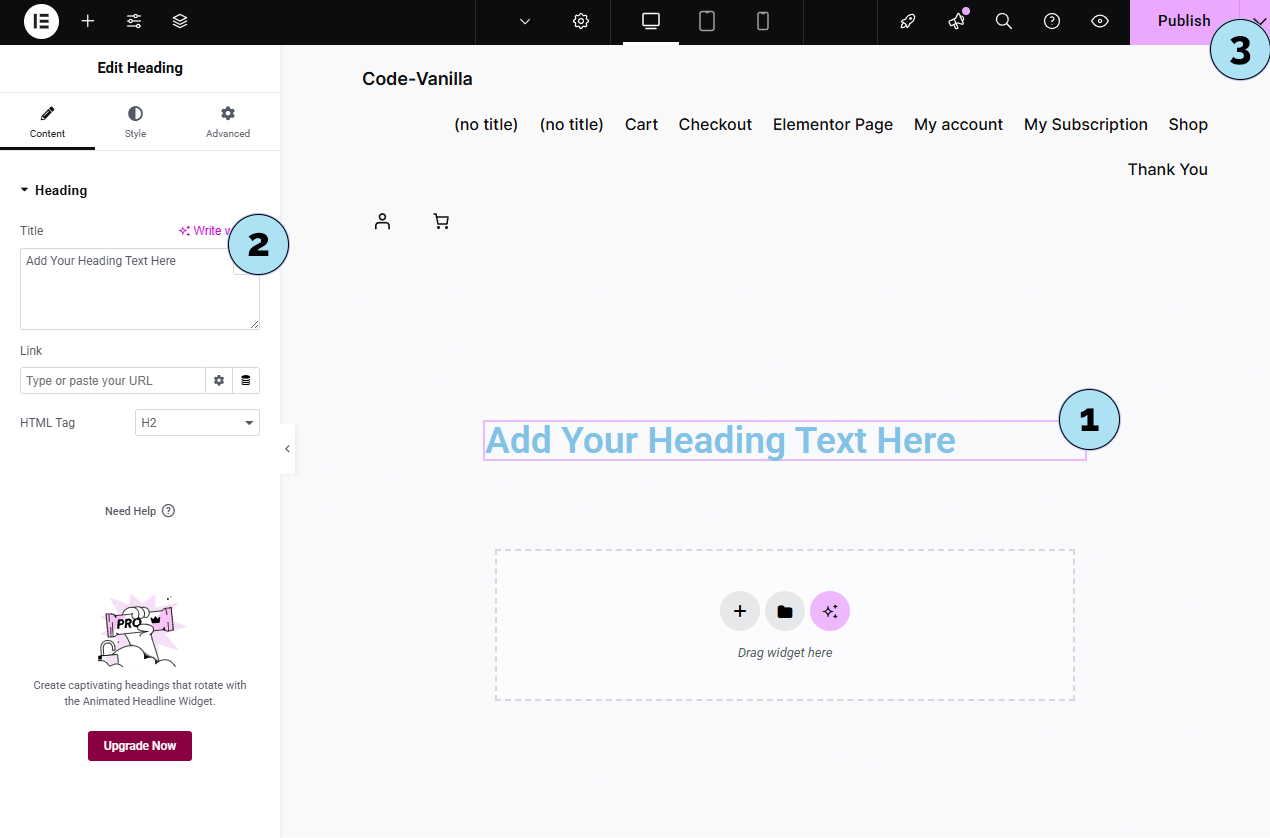
- Title content: Set the heading text to Test.
- Quick edits: You can tweak the title again in the left panel (content, HTML tag, alignment, etc.).
- Publish: Click Publish. Congrats — your first Elementor page is live 🎉
Next step: Let’s finalize the test page with a few stylistic touches (spacing, a hero section, and where to place your shortcodes).
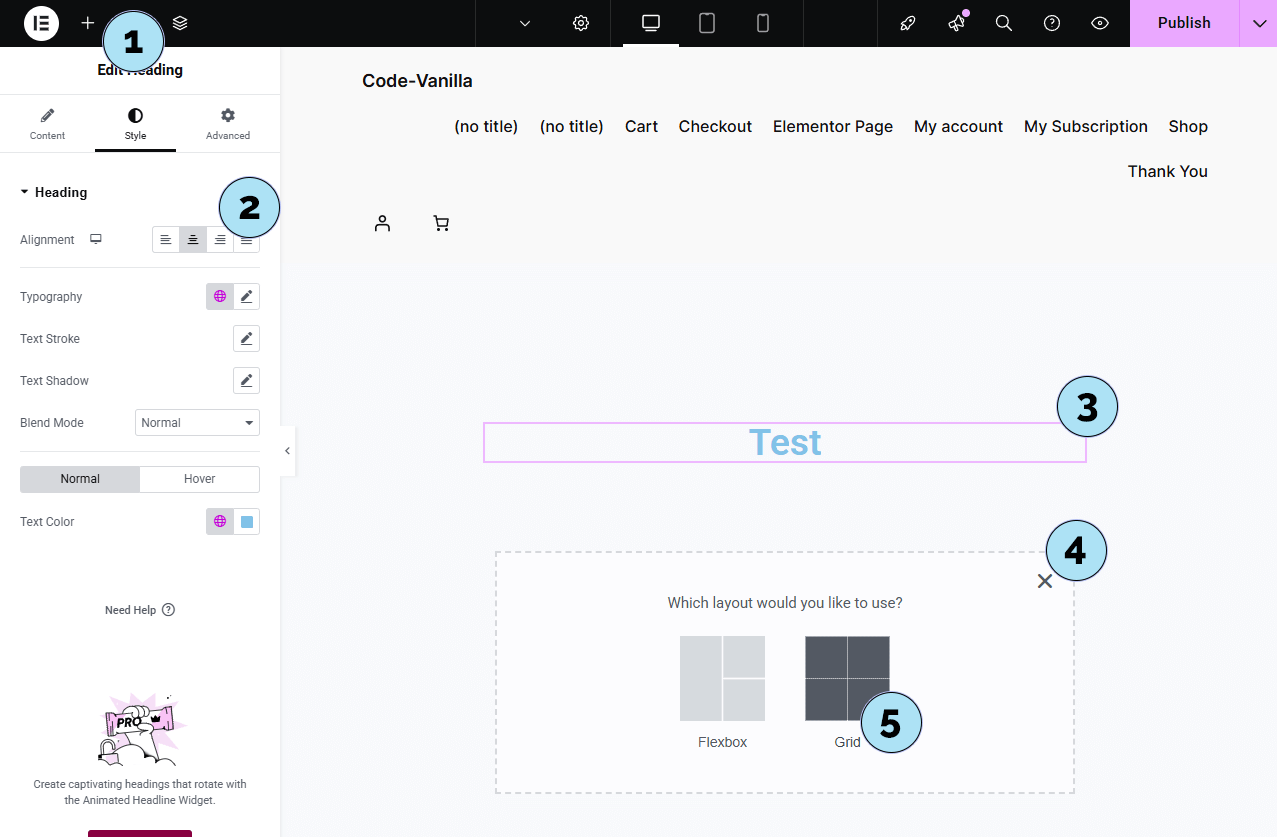
Customize with Elementor – Page Build (Phase 2)
Let’s keep building the page: center the heading, add a 2-column grid, and place content blocks.
Part 1 — Widgets & Style- Widgets shortcut “+”: Click the small + to quickly return to the widgets panel in the left sidebar.
- Style tab: Under Style, center the heading. You can also adjust typography, size, weight, and more.
- Heading on canvas: Your heading is visible on the page; we’ll refine its look via Style.
- Layout options: Clicking the central + on the canvas opens two choices: Flexbox or Grid. Choose Grid to build a clean 2-column layout.
- Grid selection: Pick the 2 columns layout to split the section into a left and right area.
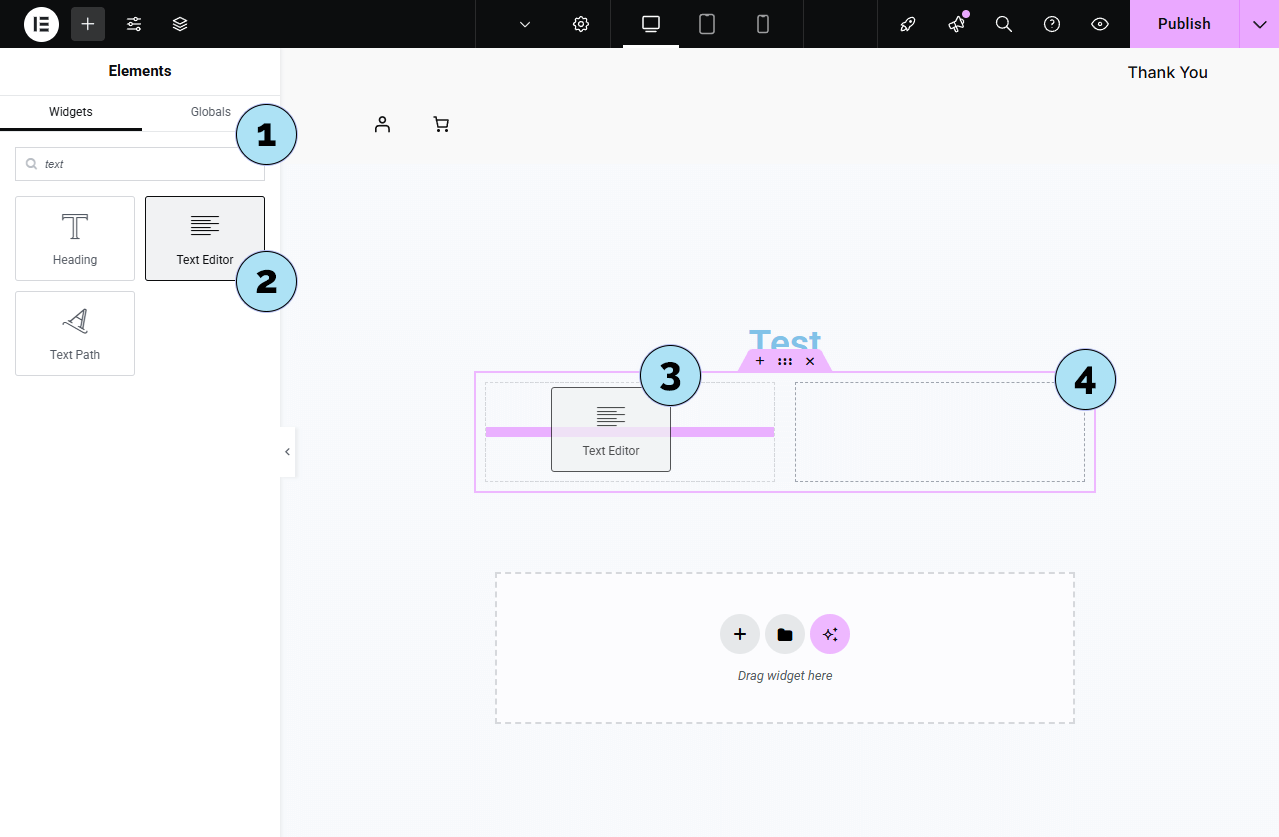
- Search “Text”: In the widgets search, type text.
- Drag & drop: Drag Text Editor into the left column of your 2-column grid (same gesture as for the heading).
- Sample text: The Text Editor shows default “Lorem ipsum…”. Replace it with your content from the left panel.
- Add another block: Click the small + in the right column to add a new widget — we will insert the quota download button shortcode here next.
Tip: In Elementor, always click the element on the right canvas first; then its settings appear in the left panel.
Next step: Insert the quota shortcode and reveal the finalized page layout.

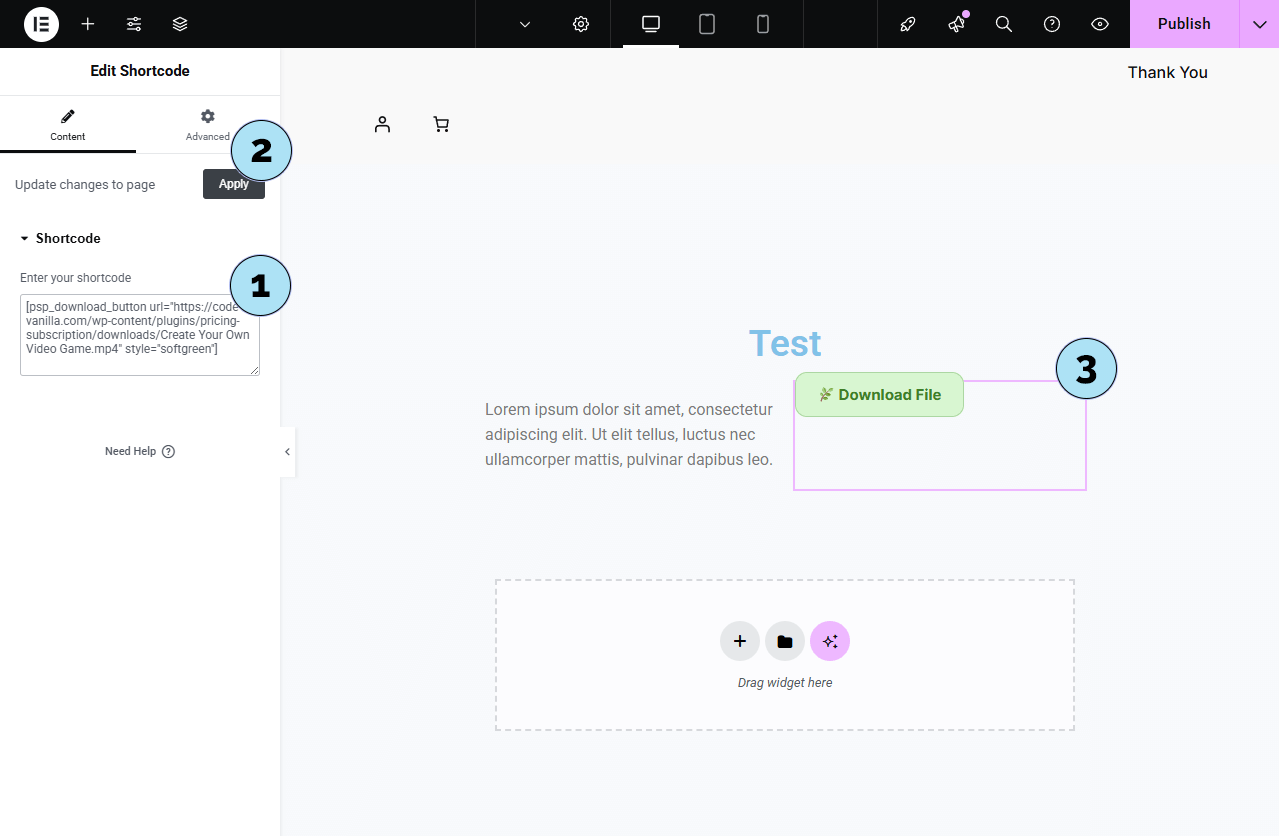
Customize with Elementor – Insert Quota Shortcode
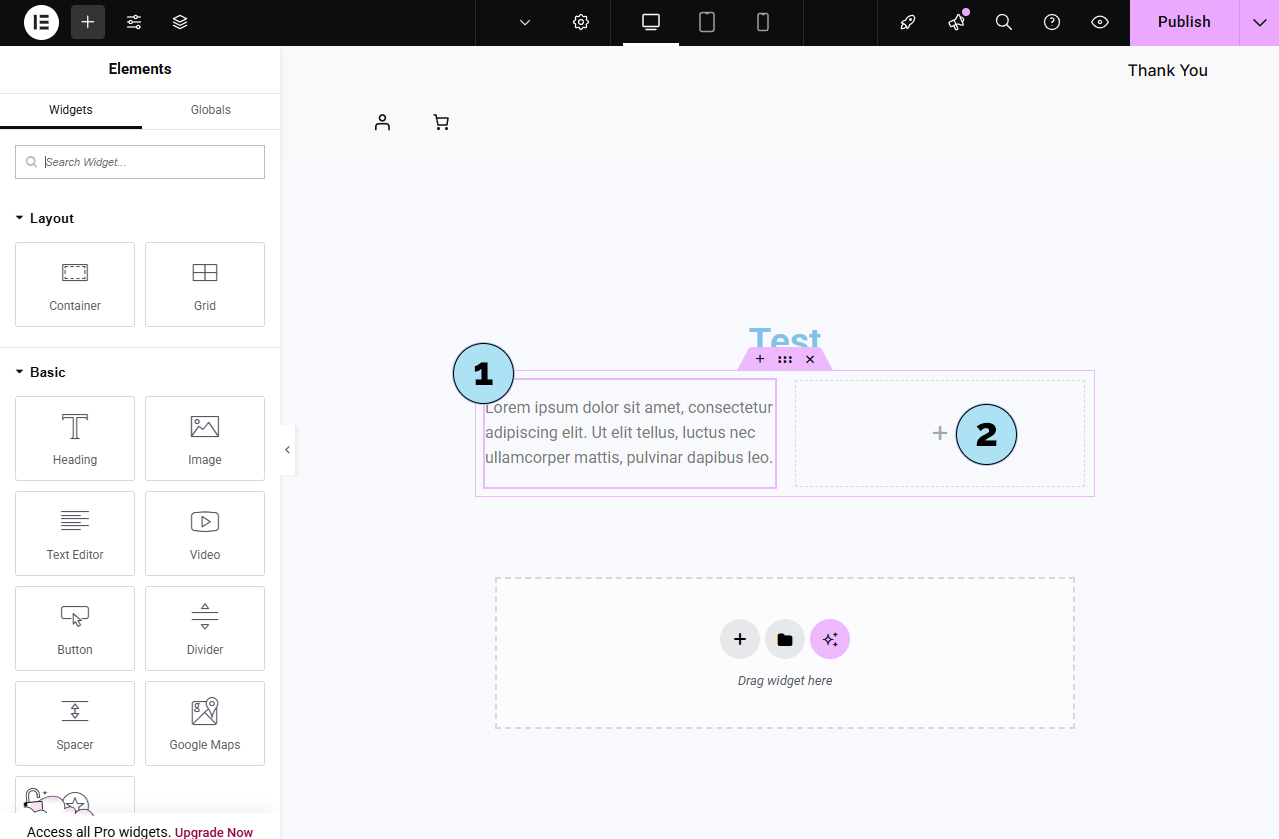
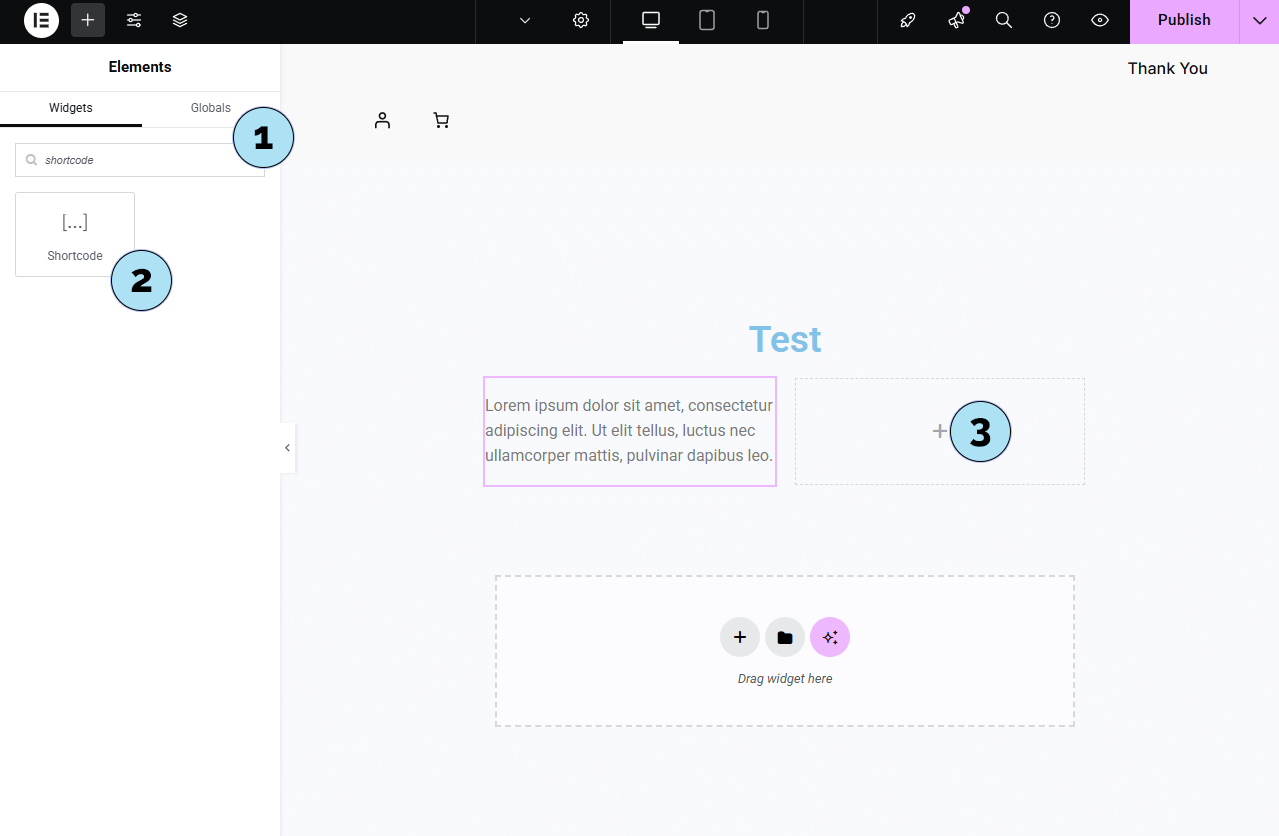
- Search “Shortcode”: In the widget search field, type shortcode to locate the widget.
- Drag & drop: Drag the Shortcode widget into the right column of your 2-column grid.
- Widget area: The input field appears where we will paste our quota button shortcode.
- Paste shortcode: Insert your quota button shortcode (generated in Subscription Rules → Quota Rules), for example:
[psp_download_button url="https://example.com/xxxxxxx/xxxxxxx/pricing-subscription/xxxxxxxxx/file.zip" style="classic-07"] - Apply: Click Apply to render the button on the canvas.
- Style tweaks: Use the Style tab (margins, alignment, spacing) so the button integrates nicely with your layout.
- Heading: A clean page title at the top.
- Two-column grid: Text on the left, quota button (shortcode) on the right.
- Duplicated section: Duplicate the grid to build quickly, then adjust content. Add a second heading below with a different style for hierarchy.
Next step: Create a page with Elementor that uses the [pricing-subscription] shortcode to showcase your plans with a custom layout.
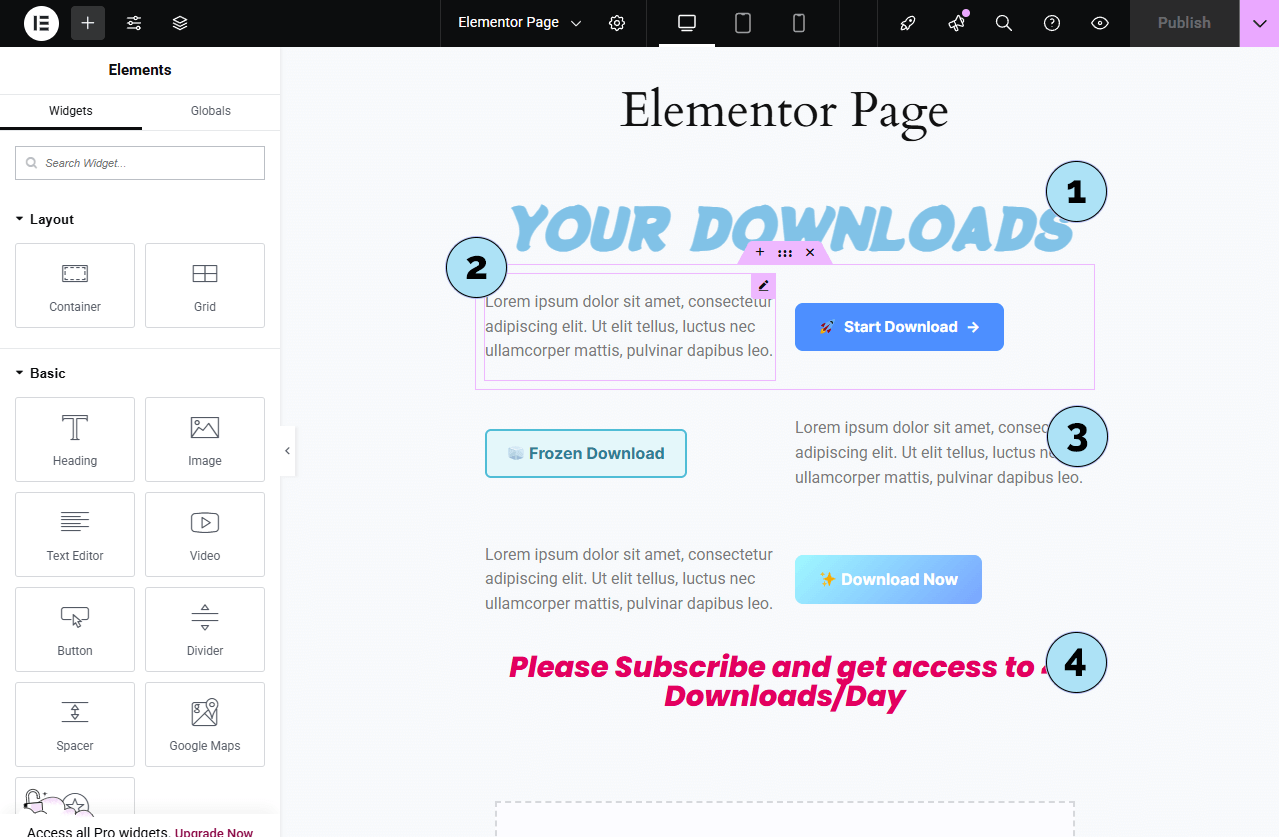
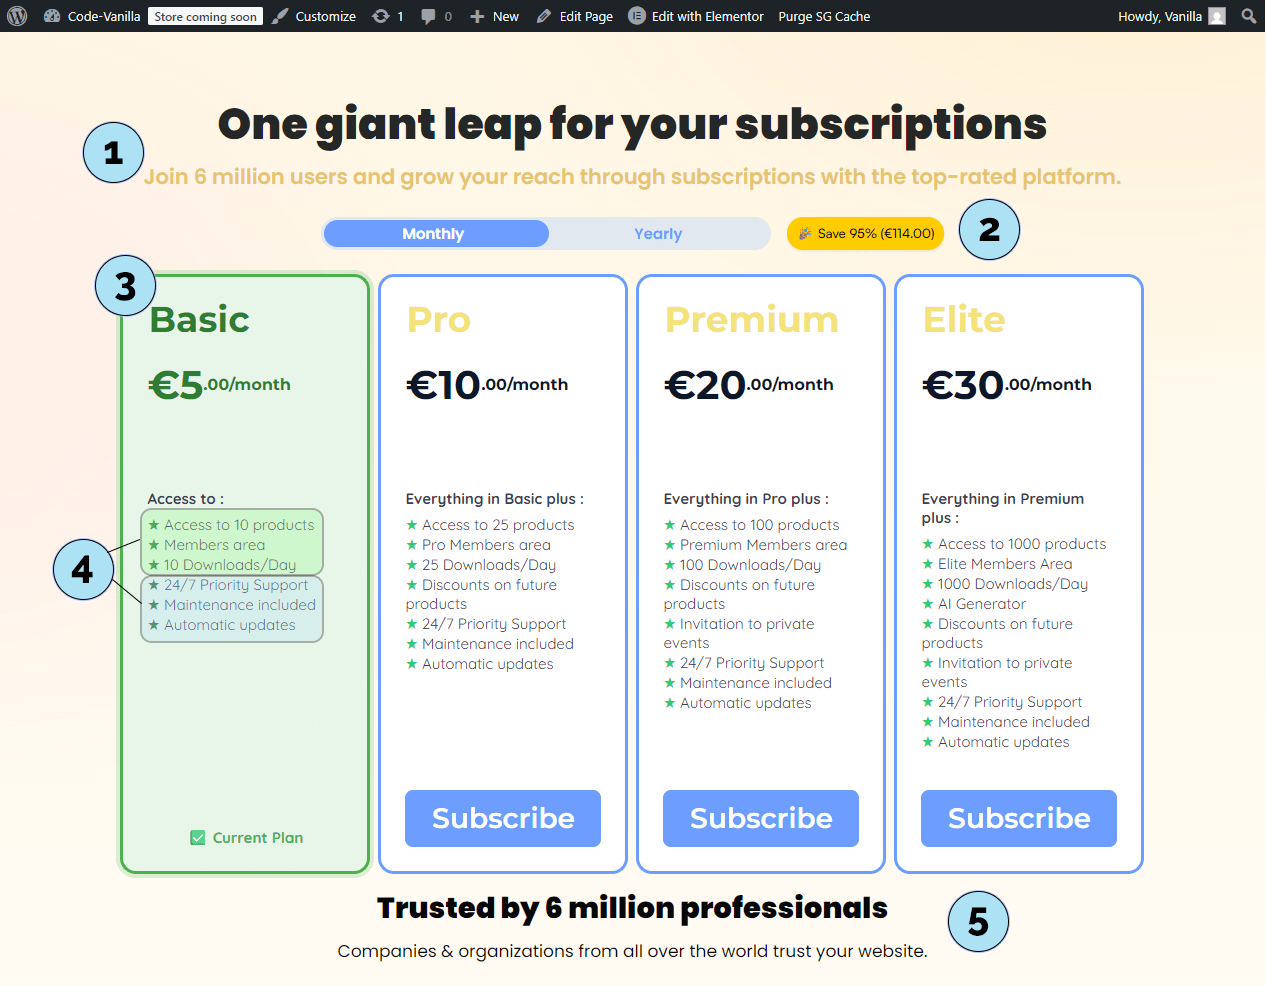
Elementor Page – Pricing Cards Showcase
This example shows a simple Elementor page where the [pricing-subscription] shortcode is embedded and styled by your layout.
- Custom headings: Two Heading widgets designed in Elementor to introduce your pricing section.
- Monthly/Annual switch: A dynamic toggle lets users switch between monthly and annual plans. A yellow label automatically highlights that annual plans exist and displays the applied discount.
- Active plan highlight: The Basic plan card uses a distinct color because it’s the user’s current plan (the bottom badge reads Current Plan).
- Feature badges: Green pill = Subscription Rules features; blue pill = manual features.
Items 2, 3, and 4 are all rendered by the
[pricing-subscription]shortcode inside Elementor. - Extra content: Two more Elementor headings add context below the pricing grid.
Combine Elementor’s visual layout with the shortcode’s dynamic content to achieve a clean, branded pricing page in minutes.
Next step: Translate the plugin interface and documentation strings using the built-in dictionary (EN/FR).
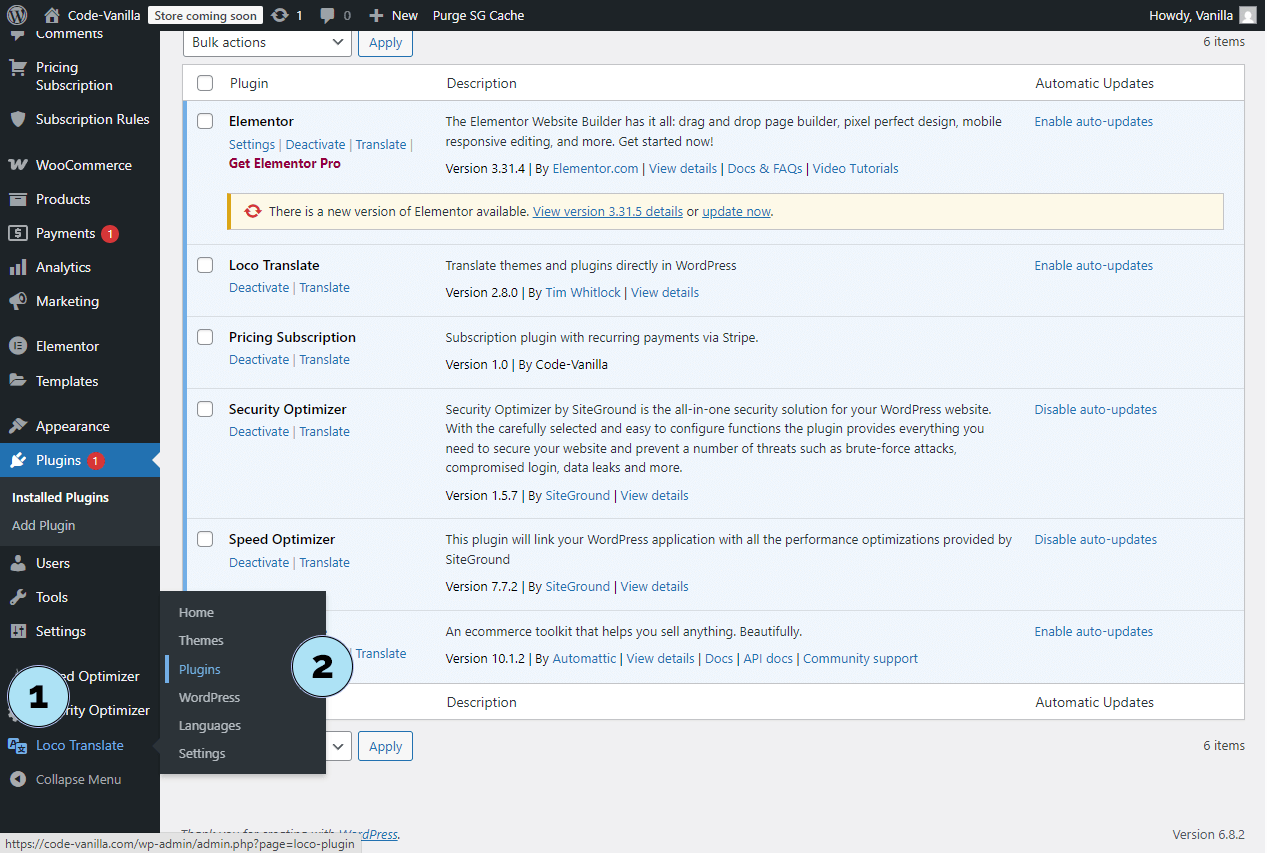
Translate the Plugin – Loco Translate (Setup)
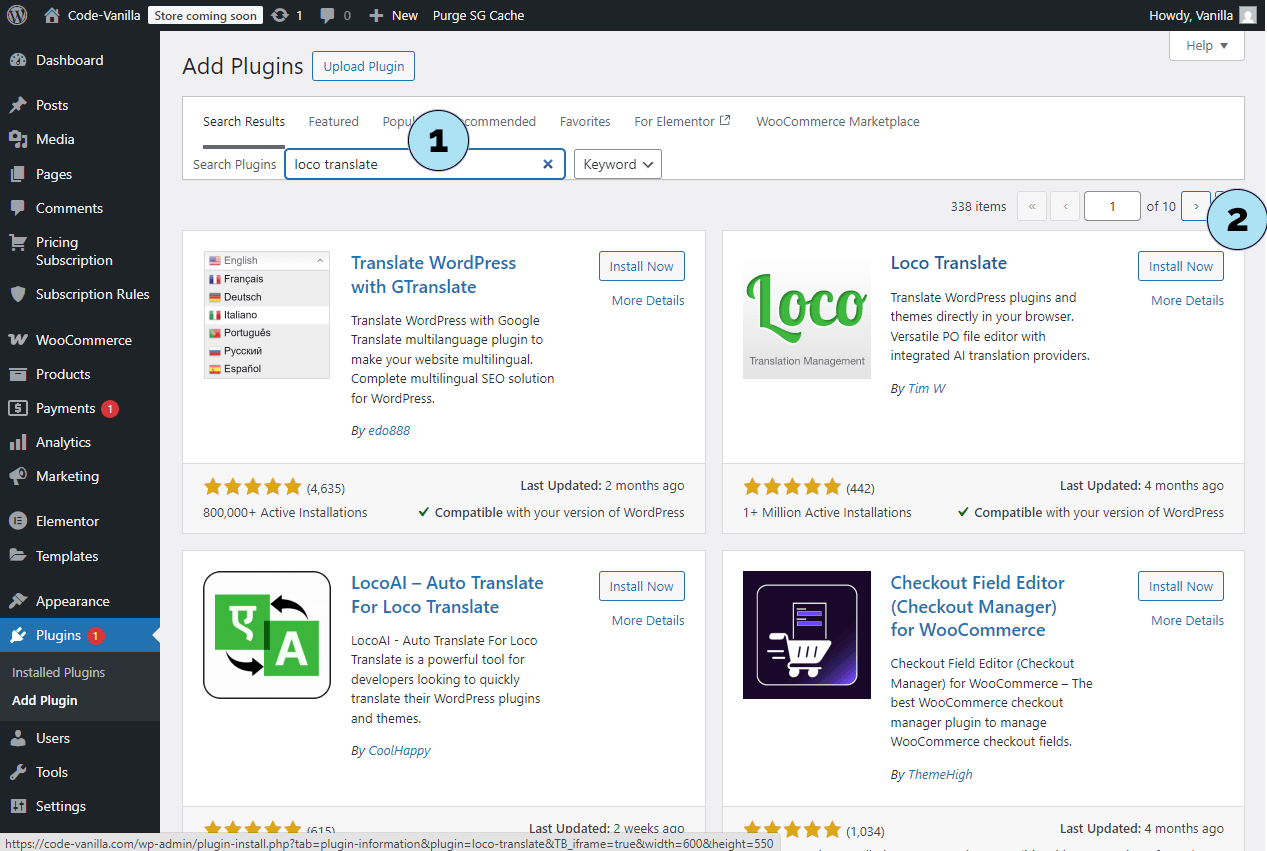
To translate Pricing Subscription easily, we’ll use the free Loco Translate plugin.
Part 1 — Install Loco Translate- Plugins → Add Plugin: In your WordPress admin, open the plugin installer.
- Search: Type loco translate in the search bar.
- Install & Activate: Click Install Now, then Activate.
- Menu: Go to Loco Translate in the sidebar.
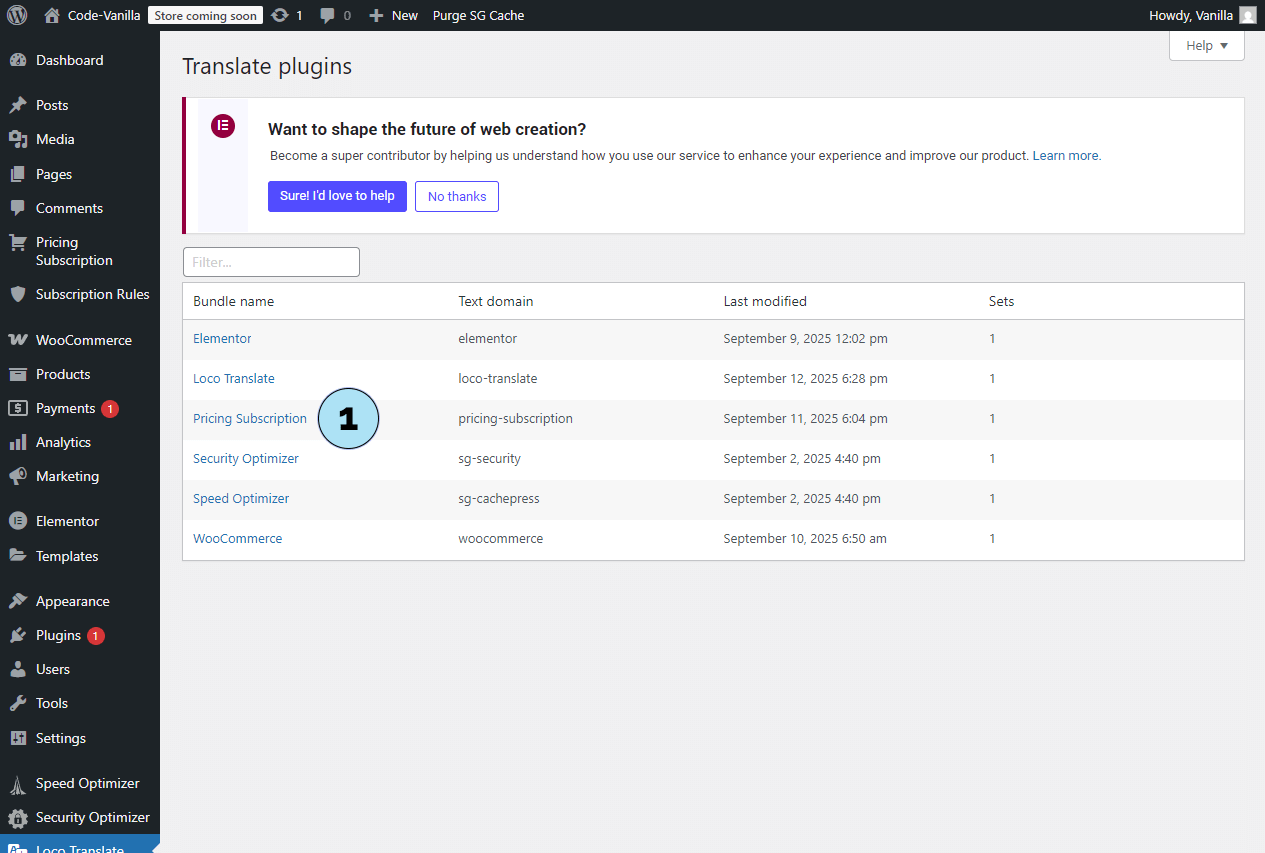
- Plugins: Click the Plugins submenu to list translatable plugins.
- Choose plugin: Click on Pricing Subscription in the list.
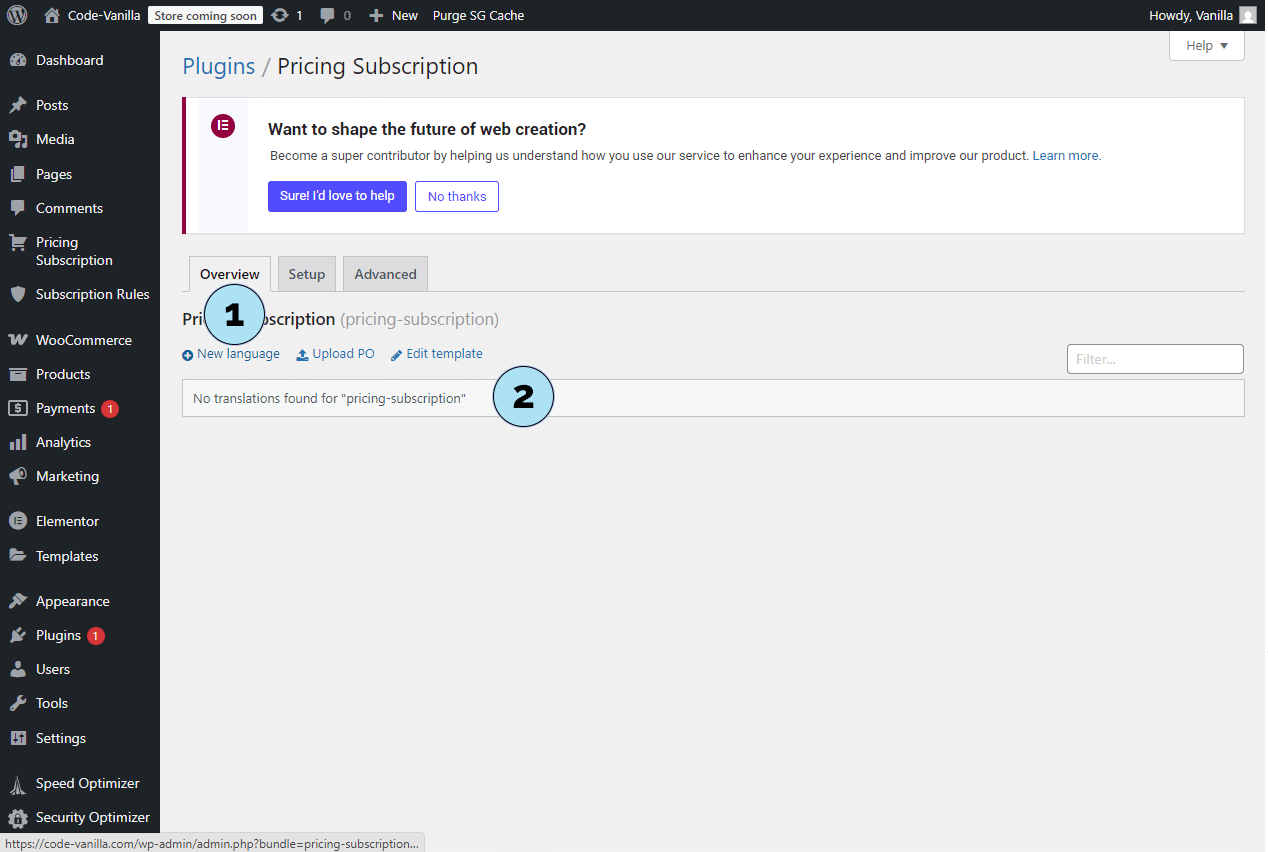
- New language: Click New language.
- No translations yet: If you see No translations found for “pricing subscription”, that’s normal for a first setup.
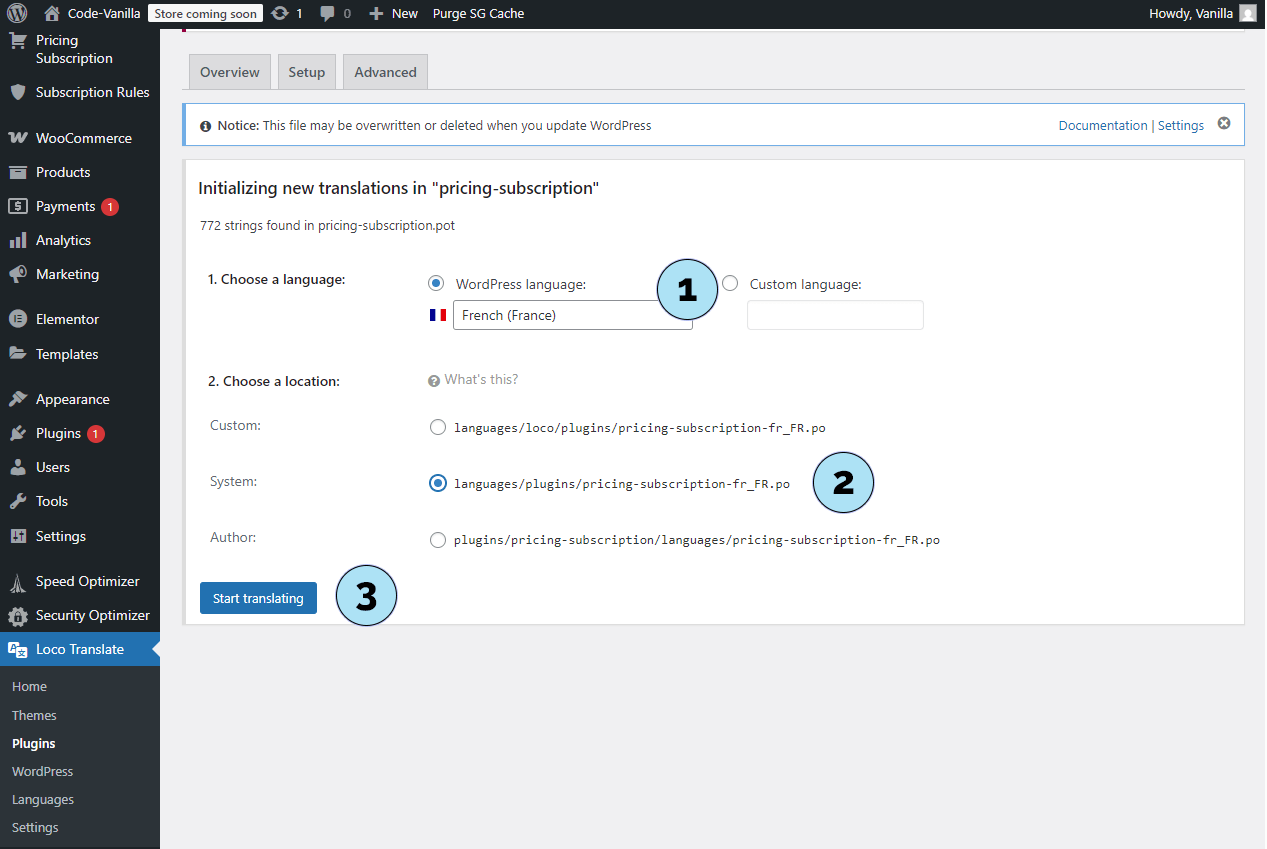
- Language: Pick French (fr_FR) (use your site language).
- Save location: Select System so the file path is
languages/plugins/pricing-subscription-fr_FR.po. - Start Translating: Click Start Translating to open the editor.
Next step: Finalize translations in Loco Translate (find strings, enter translations, save PO/MO).
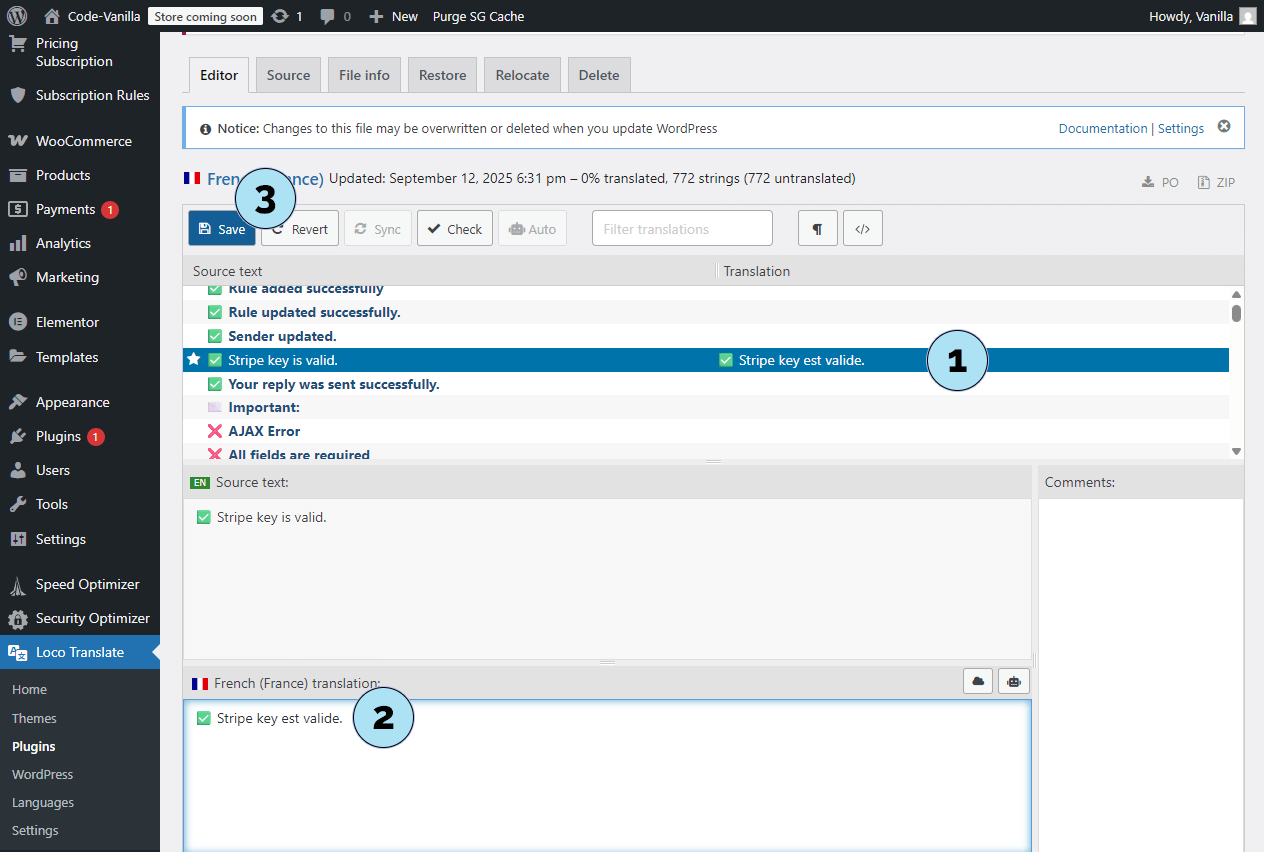
Translate the Plugin – Final Steps
- Select a string: In the Loco Translate editor, pick a string such as “Stripe Key is Valid”.
- Add translation: Translate it into French as “Stripe Key est valide”.
- Save: Click Save to register your translation.
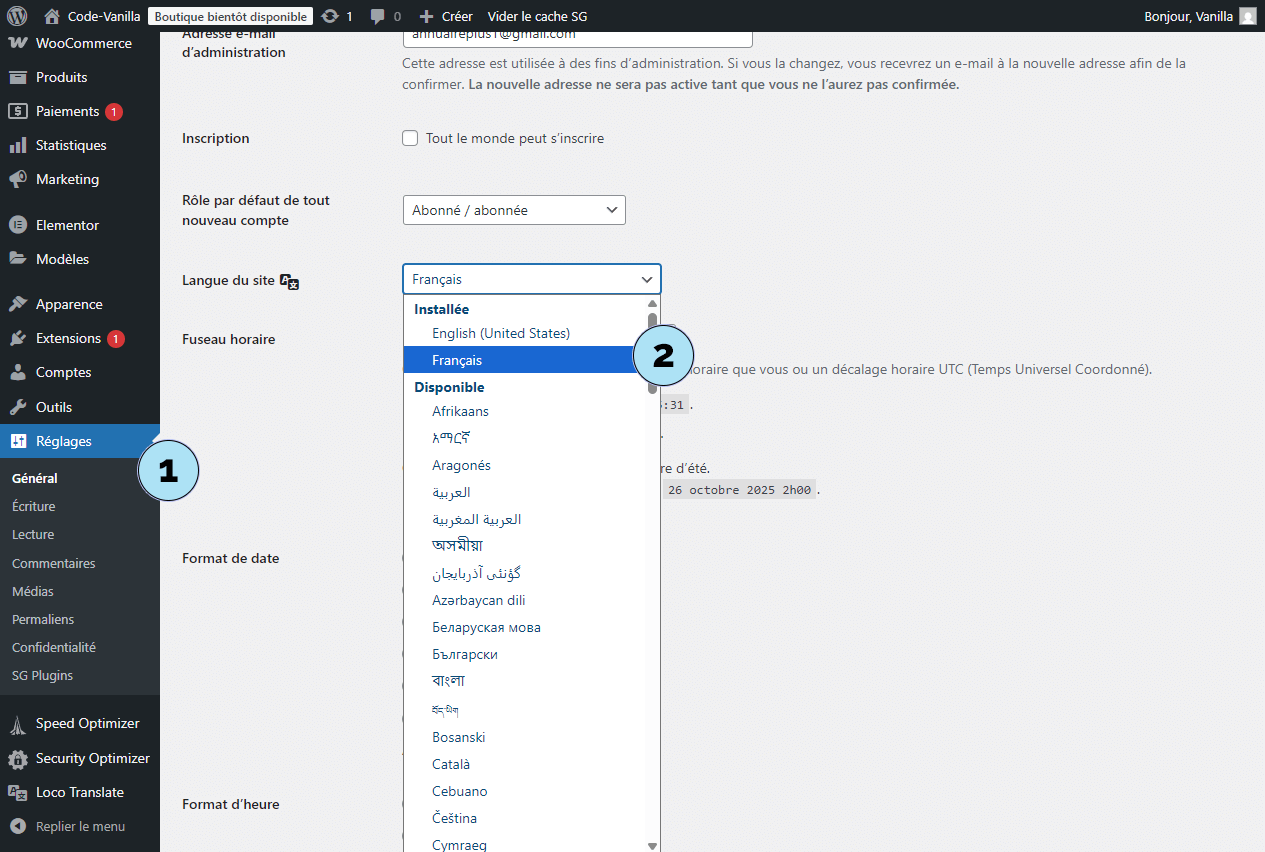
- Go to: Settings → General.
- Site Language: Select Français (or another language of your choice).
- Save Changes: Don’t forget to save at the bottom of the page.
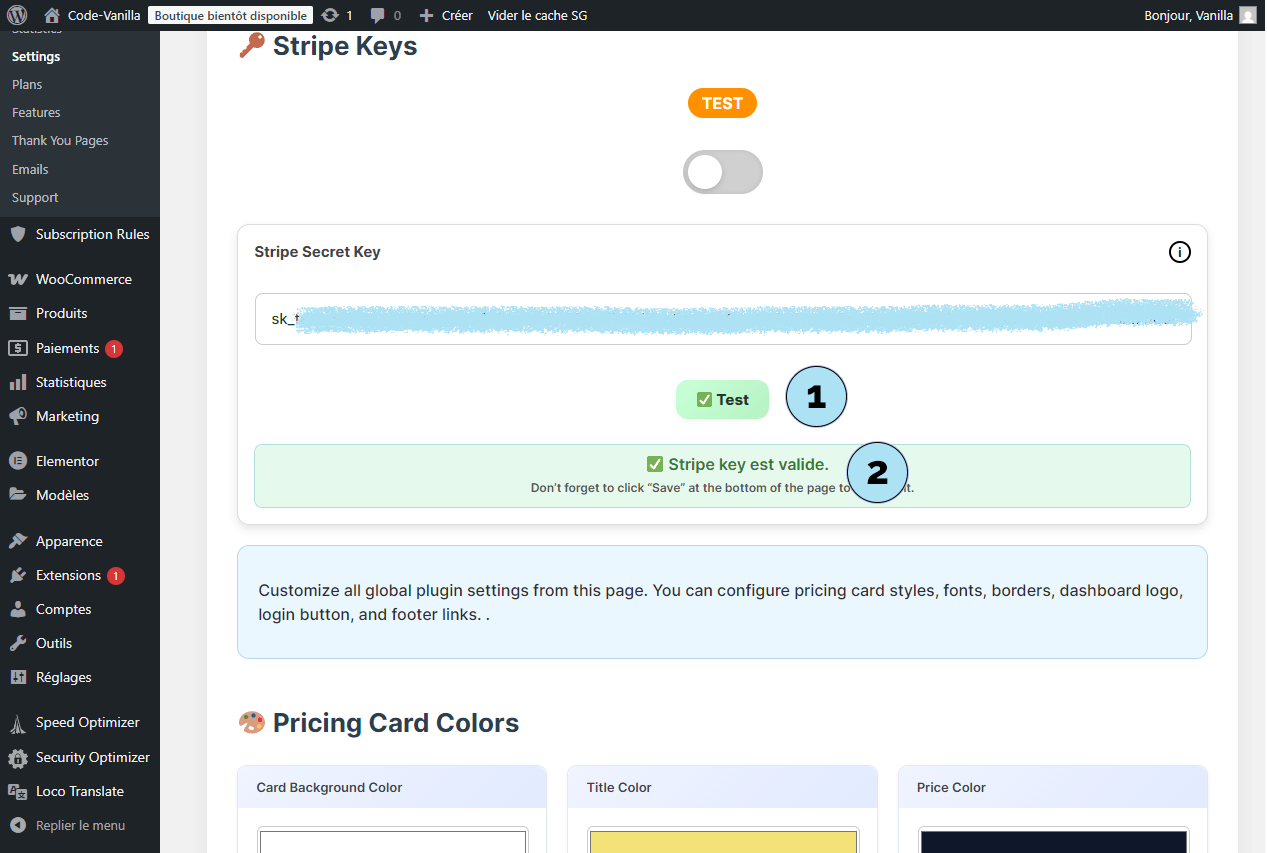
- Check plugin UI: Go to Pricing Subscription → Settings.
- Test button: Click the test button for your Stripe key.
- Result: The translated message appears: “Stripe Key est valide”.
Note: Translations also apply to the frontend of the plugin, so your subscribers see text in their language. WordPress supports dozens of languages, allowing you to adapt globally.
A Heartfelt Thank You to Our Users
Whether you are just getting started or already scaling with Pricing Subscription, we are truly grateful to have you with us.
- Your trust motivates us to build a faster, more reliable, and thoughtfully designed plugin.
- Your feedback shapes our roadmap — bug reports, feature requests, and success stories all matter.
- Your growth is our north star; we want subscriptions to be simple, stable, and profitable.
We hope this documentation makes your journey smoother and helps you create an experience your subscribers will love.
Stay in touchIf you need help, have ideas, or just want to say hi, we’re listening. Together, we’ll keep improving Pricing Subscription — one release at a time. 🚀
Thank you for being part of our community. Here’s to your next milestone! 🥂